 Introduction
“You can't hide from the tide.”
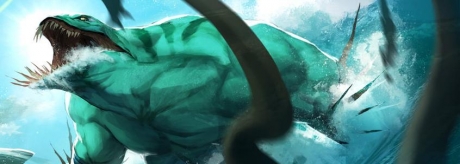
Tidehunter is a melee strength hero who is most commonly played as an offlaner or a support hero. He is a tanky hero with good burst magic damage, damage reduction capabilities, and a slow, but his most famous ability by far is Ravage, which is a potentially tide-turning ultimate that stuns and damages enemies in a huge AoE.
You can find Tidehunter's complete character profile here.
Pros & Cons
Pros
- Tanky support
- Good initiator
- Amazing teamfight ultimate
- Can turn the tide of a battle, and even the entire game, with one good ultimate
- Versatile laning – can offlane, or be 4th or even 5th position support
- Decent burst
- Good armour and damage reduction
- Easy & fun to play
- Good slow
Cons
- Effectiveness reduced once BKB’s come out on enemy cores
- Huge mana issues early on
- Needs a Blink Dagger to initiate optimally
- No hard lockdown outside of Ravage
- No escape mechanism
Item Build
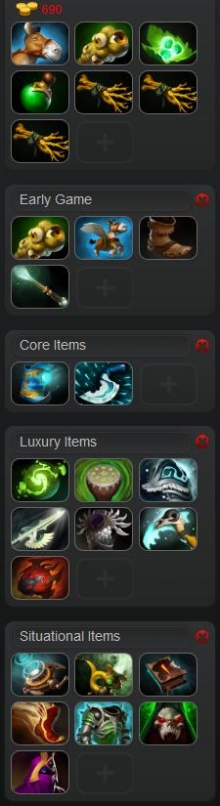 Starting Items
Tidehunter is usually played either as a 4th position support in the safe lane or as a 3 position offlaner, so you may be expected to purchase a set of starting supporting items like Observer Wards or Courier, in which case your starting items will look something like this:
- Observer Wards or Courier, a set of Tangos, a Healing Salve, 3x Iron Branches.
Early Game
Early on upgrade the Courier into a Flying Courier if no one else does, and keep buying Observer Wards if necessary too.
Grab some basic Boots of Speed as quickly as possible then round out your early game purchases by upgrading any Iron Branches you have into a Magic Wand.
Core Items
Your upgraded boots of choice are Arcane Boots. They’re a no-brainer – you desperately need both the mana regen the active provides and the larger mana pool in order to be able to use your skillset effectively. Tide has a fairly small mana pool but high mana cost/spammable abilities (Gush and Ravage, Gush and Anchor Smash respectively), so you will need Arcanes if you want to use them freely.
Throughout the early and mid game you have two key items to shoot for. The first item is the aforementioned Arcane Boots. The second is a Blink Dagger. These two items are almost always core on Tidehunter. The key exception is if you don’t feel you need a Blink Dagger in order to be able to use your ultimate effectively, but even then it’s generally considered a must-have item purchase because it allows you to stand back and carefully watch the enemy team’s movements, and then when enough are clumped together or have committed to an engagement, you can Blink into a spot of your choosing and get off an impactful Ravage to help turn the teamfight around.
Luxury Items
Once you have your core you really have everything you need for Tidehunter to become an effective teamfight contributor. This frees you up to do a few things: 1) Help out with the purchasing of Observer Wards and detection, and 2) Purchase utility-based items that will help out your team, in particular your cores. Or 3) Go greedy and try to rush a Refresher Orb to make your teamfight contribution doubly devastating.
Drums of Endurance – Gives good stat gain and a couple of great auras to nearby teammates. Even if you didn’t buy a Bracer early on you should still consider a Drums if no one else on your team has one. If someone else does have Drums then it’s still a good cost-effective way to acquire a chunk of stats after your core.
Refresher Orb – An all-in on your ultimate, because that’s basically what you’re buying a Refresher Orb for. Either to allow you to cast your ultimate twice (if you get off a great initiation) and deal a whopping 760 magic damage and a 5.54 stun in a huge 1025 unit radius, or to have as a back-up in case a teamfight takes place soon after you’ve already used your ultimate.
Refresher Orb makes Tidehunter an absolute teamfight monster in public matchmaking. At a stage in the game where BKB’s will be up on the enemy cores and will thus reduce the potential impact of Ravage, Refresher Orb allows you to regain the initiative by having potentially two Ravages at your disposal.
Shiva’s Guard – It will make you more durable thanks to the armour buff, and the aura will also provide utility for your team by slowing the attack speed of enemies. The Arctic Blast active also has great synergy with your own hero role, as it can be cast in the middle of your initiation to hit as many enemies as possible and thus further increase the impact your initiation combo.
Heart of Tarrasque -Will make you a full on tank. Your health pool will be enormous and you’ll be hard to take down. A good luxury item if you feel you’re falling in teamfights too quickly, although I prefer…
Heaven’s Halberd – Halberd will help you to tank up whilst also providing utility for your team. 20 strength is a nice boost to your health pool, whilst 25% evasion means you'll mitigate a lot of damage. The main reason I prefer it over Heart is that it also has good overall utility for your team, thanks to the ability to Disarm an enemy physical DPS'er for 3.0-4.5 seconds.
Blade Mail – If you have a poor game Blade Mail can sometimes be the most cost-effective item to get which helps prevent you feeding. It's a great pick up if the enemy team consists of fairly squishy heroes with high damage output (such as Phantom Assassin, or Skywrath Mage).
Scythe of Vyse –Not as odd an item choice as it might seem at first. Some stats and a nice chunk of mana regen, but most importantly an additional disable. Since Ravage is your only form of hard lockdown, Scythe will allow you to bring more utility to teamfights and the late-game outside of just your ultimate.
Situational Items
Mekanism – Tidehunter is not typically thought of as a Mekanism carrier but it is situational. It’s sometimes purchased on Tide in pro games when the Tide is playing in the 3 position in an early game/pushing-oriented line-up, and the same applies in public matchmaking.
He can get the Mekanism up much earlier than 4th or 5th position supports, allowing the team to push effectively from early on. Tide is also fairly item independent, and in an early push line-up he won’t need a Blink for Ravage (the threat of Ravage alone will often make enemy teams reluctant to engage into your 5 man and if they do they’ll be coming at you, so you won’t need a positioning tool).
Pipe of Insight – If you didn’t purchase the Mekanism for your team then that opens up the possibility of going for Pipe later on, when you’ll have a large enough mana pool to utilise it.
30% magic resistance and 400 spell damage block in a 900 unit AoE makes you even more of a teamfight monster and will help your team to break the enemy base or defend against base sieges.
Necronomicon – Great if you’re part of a pushing line-up or your team is struggling to break the base. Also a great item for teamfights and for countering any invis enemy heroes. Some good stat gain too.
Boots of Travel – When you are at that stage of the game when you’re becoming 6 slotted, swap out your initial set of boots for Boots of Travel. It frees up a slot you would otherwise have reserved for a TP Scroll and makes you much less susceptible to split-push.
Assault Cuirass – Shiva’s Guard really is the better of these two ultra-expensive late-game defensive items on Tidehunter, as Arctic Blast synergises so well with initiators like Tide. Tide also gets little out of the Assault Cuirass minus armour debuff on enemies and enemy buildings. However, if no one else on your team is suited to purchasing one, or will be able to purchase one in a decent timeframe, you can definitely consider an AC purely for the utility it gives your team.
Vladmir’s Offering – Your entire team will benefit from the bonus damage, mana regeneration, and armour auras. It’s doubly good if any of your team’s core heroes are melee DPS’ers thanks to the lifesteal aura. Consider it for the utility it provides when you move on to your luxury extensions.
Veil of Discord - Veil gives decent all-round stats - +6 all stats, +6 health regeneration, +6 damage, and +6 armour, but the main reason it’s purchased is for its active, Magic Weakness. Magic Weakness increases the magic damage taken by an enemy caught within its 600 unit radius by 25%, which augments your entire team’s magic damage-based abilities.
It lasts for a lengthy 25 seconds, making it a great active for teamfights, and won’t just buff your own magic damage output either – which isn’t all that high outside of a well-timed Ravage - it will also increase the potency of any other magic damage spells your teammates cast on affected enemies in that time frame too. If your line-up has a lot of magic damage output bump this item up from situational to luxury.
Skill Build
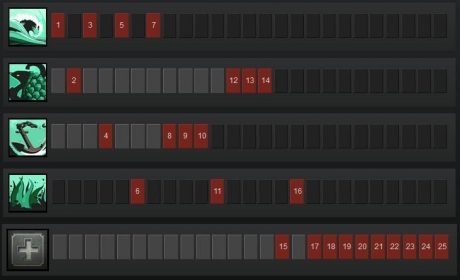 Gush is a single target magic damage nuke which also slows and reduces the target’s armour. It is usually, although not always, skilled and maxed first. Additional levels both increase the armour reduction and the magic damage.
Gush is a great harassment tool, ganking/chasing ability, and nuke. With a lengthy range of 700 units and a relatively low cooldown of 12 seconds it becomes a very versatile, almost spammable nuke. For all of these reasons it tends to be maxed first, although there’s one key exception, which I’ll detail in the section on Anchor Smash.
Kraken Shell is a passive, defensive ability that reduces incoming damage. It is maxed last, however a value point is often taken in it early on (especially if you’re offlaning with him), to help reduce the effectiveness of any lane harassment.
Kraken Shell reduces incoming physical damage when the damage Tidehunter receives hits a certain threshold. The amount reduced scales with levels as follows: 10/20/30/40, and the damage threshold for it to proc is 600/550/500/450. So every time you take more than the threshold of damage within a 6 second period of time this ability will proc and reduce the damage.
Anchor Smash is a short radius AoE nuke that deals physical damage and reduces the damage output from any enemies hit by it. It is usually skilled last and maxed second, however there is a key exception to this rule: if Tide is played mid, or is offlaning against a lone melee opponent, Anchor Smash will often be maxed first in order to punish that hero from approaching the creep wave and to help Tide secure last hits.
Since the cooldown is reduced from 7 seconds to just 4 seconds, and the damage scales decently, it becomes a surprisingly effective harassment tool against short range enemies.
Additional levels increase the physical damage from Anchor Smash, from 75 to 225 and the enemy damage reduction scales from 45 to 60%.
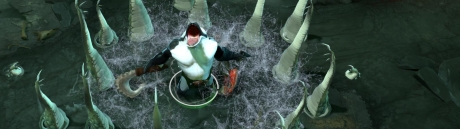
Ravage, Tidehunter’s ultimate, is always skilled (levels 6, 11 and 16). Ravage stuns enemies within a 1025 unit radius of Tidehunter for 2.02/2.32/2.77 seconds and also deals 200/290/380 magic damage. It has traditionally been one of the most powerful teamfight ultimates in the game, and still is in certain situations (in the early game, in low and mid-level public matchmaking, and against enemy cores who don’t tend to purchase Black King Bar).
Gameplay Tips
 Gush is a great chasing tool thanks to its lengthy 700 unit range and 40% movement slow which lasts for 4 seconds.
Later on, you’ll want to prioritise Gush on the highest priority enemy hero your team most needs to bring down first with physical DPS – it will apply 5 minus armour to that hero, making them significantly easier for your cores to bring down.
Kraken Shell does not stack with damage block items – do not purchase Vanguard on Tidehunter!
Kraken Shell only reduces damage from physical attacks by enemy heroes – it does not block magic damage and it does not block damage that comes from non-player sources (i.e. creeps).
Use Anchor Smash if you’re solo laning against a melee hero – the damage output from it is hard to ignore early on, and it has both a very low cooldown and a fairly low mana cost, making it somewhat spammable early on and a great harassment tool.
Anchor Smash actually deals physical damage, not magic damage, and so it works on heroes who are spell immune.
As with Gush, later in the game you’ll want to prioritise Anchor Smash usage on enemy cores, especially physical DPS’ers, in order to reduce their damage output by up to 60%.
Ravage is hard-countered by spell immunity (be it Black King Bar or an in-built ability). This means in the mid and late game you’ll need to time Ravage usage properly – either cast it before the enemy cores have chance to activate their BKBs, such as by initiating with a Blink into Ravage, or save it until after their spell immunity has worn off. Sometimes the latter will get you hate from random teammates in public games, but a Ravage used when the enemy cores are spell immune is completely wasted.
Ravage is a hugely important teamfight ability. You should ideally try to save it for large skirmishes or teamfights from the mid-game onwards. Early on you can use it to help secure a kill your team will otherwise not be able to get, as it is unlikely you’ll need to use it for a teamfight before it comes off cooldown, but it should not be used like this once the laning phase begins to break down.
If there is a Rubick on the enemy team, always follow up Ravage with an Anchor Smash straight away, lest he steal one of the best abilities in the game for him to steal.
Last Updated - Patch 6.83.