 Introduction
"This augurs well for many deaths."
Krobelus the Death Prophet is a semi-carry who excels at pushing down towers and dealing large amounts of damage over time with her fearsome ultimate ability, Exorcism.
Although traditionally not a popular pick in competitive Dota 2, successive buffs in recent patches have made her increasingly viable and she is occasionally picked as a mid laner or safe lane carry. In non-competitive Dota she is an ever-popular pick and boasts one of the highest win rates out of all heroes in the game.
Pros & Cons
Pros
- Amazing pusher
- Deals enormous amounts of damage over time in extended teamfights
- Lengthy AoE silence
- Good mix of magic and physical damage abilities
- Can flash farm fairly well
- Great strength gain
Cons
- No escape mechanism and poor mobility early on leaves her susceptible to early ganks
- No stun or lockdown aside from silence vs mobility heroes
- Needs a lot of farm in order to stay alive long enough for her ultimate to do its job
- Poor attack animation and long cast times
Item build
 Starting Items
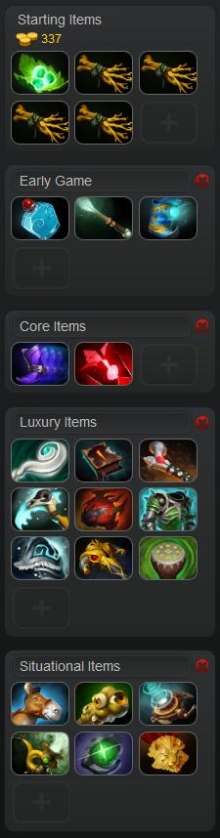
Here's my starting item build on Death Prophet when heading to the mid lane:
- A set of Tangos, 4x Iron Branches.
It's a slightly controversial starting item build. Allow me to explain my reasoning:
First of all, as Death Prophet is categorised as a support officially, you may be required to buy the Courier or Observer Wards in a typical pub game (hence them being listed under the 'Situational' tab in the image on the right), despite likely being placed in the mid lane. Since you're likely to get a lot out of them yourself then bite the bullet and purchase one or the other if necessary.
Secondly, even if not purchasing Observer Wards or Courier, I still like this build. It's basically a Bottle rush build. You grab the most cost-efficient stat items in the game (Iron Branches) for the early stats and base damage, and because they build easily into a Magic Wand. Only one set of regen because the goal is to Courier your Bottle out around the second creep wave, so you shouldn't need more than a set of Tangos.
If you're worried about not having sufficient base damage to secure the early last hits then you can add a Mantle of Intelligence to your starting items.
Early Game
Once you've rushed your Bottle you should have sufficient regen to dish out decent harass with Crypt Swarm in the mid lane, pushing the wave ahead of the next rune spawn so that you can more easily secure the rune for yourself (or force the enemy to lose out on experience/gold and take some tower damage). You should also be able to take some decent harass without being forced out of the lane.
Upgrade those early Iron Branches into a Magic Wand, and grab Boots of Speed as quickly as possible.
Your goal in the early game is to farm up your lane as much as possible, secure level 6 quickly, and whenever possible achieve rune dominance. You can start working towards your Bloodstone now, starting with Arcane Boots. Arcane Boots can later be disassembled and the Energy Booster used to finish your Bloodstone, but early on the Arcane Boots will prove very handy, allowing your to continue to pressure the lane/spam Crypt Swarm, as well as use your ultimate.
If the opportunity presents itself gank the side lanes, and if successful turn it into early pressure on the enemy tier 1 tower using your ultimate to focus the tower. If there's no opening don't force the issue, just pressure the mid lane; don't be afraid to use your ultimate to push into the mid tier 1 tower as it's a hugely potent pushing tool.
Core Items
Grab a Point Booster and Vitality Booster from the Secret Shop whenever you can afford them, then save up for the final piece of your Bloodstone: the Perseverance. Once you can afford it, disassemble your Arcane Boots and use the Energy Booster to finish off your Bloodstone.
Once that's done, upgrade your now basic Boots of Speed into Phase Boots. You have all the mana regen you need from the Bloodstone now, so you no longer need Arcane Boots, and the additional mobility that Phase Boots provides allows you to become a scary ganker and chaser.
You now have everything you need to be an effective force in teamfights and you should be able to push with ease. You can use Crypt Swarm to quickly clear creep waves and your ultimate to melt towers.
Luxury Items
From there you have a lot of options. Particularly strong luxury items on Death Prophet include:
Eul's Scepter of Divinity - There are several reasons Eul's is an amazing first luxury item on Death Prophet:
1) The least important. Even more mana regen.
2) The huge +40 move speed bonus. DP goes from being an immobile and slow hero into having one of the highest move speeds in the game once you hit level 14. With Phase Boots, level 4 Witchcraft, and a Eul's you'll have 443 base movespeed and 503 movespeed with Phase active. Throw in a Drums of Endurance and you'll do an incredible 462 and 521 respectively (that's 1 off max move speed). All from items that are naturally great pick-ups on her. Try it - it will feel like you're permanently hasted.
3) It gives you a disable. One of DP's major negatives is that she has no lockdown. Now, granted, the Cyclone active is not a stun and the target will be invulnerable for the duration, but it will give your spirits time to catch up and crowd around the enemy, and also give your teammates chance to join the fight.
4) Better yet, you can use the disable on yourself. Find you get targeted once you've cast your ultimate? Are you struggling to survive teamfights? Cast Cyclone on yourself. Not only do you buy yourself 2.5 seconds of invulnerability, your spirits will still deal damage for the duration of the Cyclone.
Necronomicon - A very powerful item for pushing. Since that's an area where DP excels, thanks to her ultimate, you can augment your natural pushing power with Necro creeps. Now you really will melt towers in a hurry.
Meanwhile, the health and mana give you good stats, and it acts as a great counter to invisibility heroes.
Rod of Atos - This item keeps getting buffed because it's so rarely picked. It's a fantastically underrated item. Since you naturally lack any form of lockdown or disable the active Cripple will also come in handy when trying to lock down and immobilise a single target. You also get a huge chunk of health and mana off the back of it. A solid pick-up.
Scythe of Vyse - The items so far listed have only limited forms of lockdown/disable. Scythe is the real deal. 3.5 seconds of disable during which you and your teammates can attack the enemy. The ultimate late-game utility item.
Heart of Tarrasque - A strong pick up. It will make it extremely hard for enemies to take you out of the fight. It's the ultimate tank item. That said, I prefer...
Assault Cuirass - ...Because your ultimate, Exorcism, deals physical damage, so AC is a great defensive item (+15 armour) that also increases your damage output tremendously thanks to the -5 armour aura that applies to enemy heroes, units, and buildings. It's also a fantastic utility item for the whole team.
Shiva's Guard - Shiva's is the other option if you want to tank up whilst providing some team-wide utility. Go for Shiva's instead of AC if someone else on your team is building the AC.
Black King Bar - A great defensive item for any carry or semi-carry. This will prevent you being locked down in teamfights by stuns or killed off with burst magic damage. The strength bonus increases your health pool a touch and the damage is always handy, but the main reason you buy this is for the Spell Immunity active, so make sure you use it for teamfights.
Drums of Endurance - If you are struggling consider grabbing a Drums of Endurance. Drums will give you sold all-round stats at an affordable price, give you a nice boost of move speed (see Eul's section above) and provide utility for the entire team.
Situational Items
Purchasing a Courier and/or Observer Wards may fall down to you, as Death Prophet is often thought of as a semi-support/semi-carry. If necessary you may have to buy one of the two at the start (see 'Starting Items' section above) or may periodically have to help your support(s) purchase Wards later on. The same applies for True Sight detection like Dust, Gem, or Sentry Wards.
Medallion of Courage is rarely mentioned in Death Prophet build guides despite it having great synergy with her ultimate. Once you realise her ultimate deals physical damage and not the typically expected magic damage the utility of Medallion should become clear. It's also a fantastic pick up for your team if you intend to Rosh early, or if the enemy team has a Linken's Sphere holder (use it as a cheap way to pop the Linkens).
Mekanism and/or Pipe of Insight - Although not typically the Mekanism purchaser, Mek is viable on Death Prophet. Get it if your team is built around early push and/or the team's supports are too poor to afford it. Since you will likely be in the mid lane and farming decently you'll be able to buy it fairly quickly.
With regards to Pipe, it's a good luxury option if you didn't buy the Mekanism. Get one if no one else on your team does and you're looking to try and break the base of a magic damage-heavy enemy line-up.
Skill Build
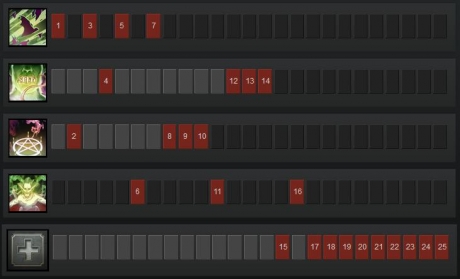 The above image displays a typical Death Prophet build order, and my favoured build on her.
Skill and max Crypt Swarm first. It gives you burst magic damage in a large AoE, making it good for quickly clearing creep waves, harassing the enemy laner, or bursting down enemies in teamfights or during ganks.
An early point in Silence is very useful, but it can be maxed last. Whether you skill it at level 2 or 4 is up to you and is pretty much down to personal preference. If you want mobility and the passive benefit of Witchcraft get that at level 2, if you fear a gank get Silence at level 2.
Silence provides an AoE silence which lasts a very good length (3 seconds at level 1, 6 seconds once maxed). It's especially good against enemy carries that rely heavily on mobility-based skills (such as Anti-Mage) or heroes that like to chain their abilities together (like Puck or Earthshaker).
Witchcraft is a strong passive ability that buffs your other abilities and also greatly increases your move speed, helping to transform you from a vulnerable and slow hero into a high move speed semi-carry. Max it second.
Your ultimate, Exorcism is extremely strong, so always skill it (levels 6, 11 and 16). Cast it at the start of teamfights, where it will do massive amounts of damage over time, providing you stay alive. Or alternatively/additionally, cast it when pushing enemy buildings. The spirits will quickly melt through enemy towers, making you one of the strongest pushers in the game.
Gameplay Tips
 Death Prophet's Silence is very strong. It lasts a full 6 seconds once maxed and Silences in a 425 unit AoE. Be sure to cast it at the start of teamfights or during ganks.
| Tip: Although tempting, when relatively new to the game, to max Witchcraft and Crypt Swarm entirely at the expense of even a single point in Silence, resist the urge to do so. Max Witchcraft second if you wish, but make sure you have a value point in Silence from an early level. |
Remember that, despite most spells in the game dealing magical damage, Death Prophet's ultimate deals physical damage. This makes her especially good in teams that have good minus-armour capabilities, and also makes minus-armour item pick-ups like Medallion or Assault Cuirass great on her.
At 145 seconds at all levels, the cooldown on Exorcism is at first glance quite high, but the ability itself lasts 30 seconds. Don't hold off using it if you see the opportunity to push a tower down.
| Tip: Many people don't release that you can control the target of your spirits. The target you yourself focus will be the one they too will focus as the spirits will focus on the last hostile unit that was targeted. If nothing is targeted then they will select targets within a 700 unit radius. |
Exorcism heals Death Prophet for the damage dealt for its duration, but it will not heal you until every last spirit returns, so don't rely too heavily on this as a crutch to heal yourself.
Last Updated - Patch 6.82c.