 Introduction
“Beware the riptide.”
Morphling is a ranged agility carry. With the ability to morph his strength into agility and vice versa he can quickly transitioning from being a hard-hitting right clicker into a tank who is also potentially elusive. He truly shines in the late game where his ability to shift his strength into agility gives him a huge stat advantage.
At one time Morphling was the go-to hard carry in professional Dota, but he fell from grace after receiving multiple nerfs in the 6.75 balance patch and has struggled to regain popularity in both competitive and public Dota ever since.
Pros & Cons
Pros
- Great hard carry
- Good agility gain
- Very elusive – has two escape mechanisms and an ability which makes him incredibly tanky
- Can morph all of his strength into agility and vice versa
- Good positional ability
- Has a nuke that scales
- Can split push and farm out of position
Cons
- Needs a lot of farm
- Nerfed a year or so ago and has yet to recover in popularity
- Low win-rate in public matchmaking
- Low move speed
- Short attack range
Item Build
 Morphling is an item-hungry carry. Without decent items, moving out of the mid game he will be a useless force in teamfights. As such, you really need safe lane farm or a favourable mid match-up, or at worst a dual offlane where you will be able to get decent last hits.
Starting Items
To start with you want a mix of regen and cost-efficient stats that will allow you to stay in the lane despite some harassment. A typical starting build for Morphling is:
A set of Tangos, a Healing Salve, and 4x Iron Branches
This gives you decent starting stats and plenty of regen. A good alternative is a 3x Branch and 1x Circlet or Slippers build, which is highly recommended if you intend to purchase a Wraith Band (which in turn should be upgraded into a Ring of Aquila for good, cost-efficient stat gain and some useful bonuses).
Early Game
What you get next depends on how successfully you’re farming your lane. If you have uncontested freefarm and a good last hit rate then you can consider a Hand of Midas, in order to really accelerate your farming progress. It is a dangerous and greedy option to go for, however; if the enemy team react to your Midas pick-up by pressuring you early and forcing teamfights it could come back to bite you.
More typically you’ll want to get some early Boots of Speed and then upgrade them into Power Treads, and then upgrade your Iron Branches into a Magic Wand. If you went for a Slippers of Agility or Circlet earlier on then finish off your Wraith Band and/or Ring of Aquila as well, before going straight into your first big item.
Core Options
Linken’s Sphere – The standard build thanks to the stats, regen and active it provides. If the enemy team has any targeted lockdown/stuns then Linken’s will make you much more survivable. Added to that the strong regen from Linkens will allow you to Morph your stats much more freely as well as jungle effectively, massively increasing your GPM.
Do consider the enemy line-up carefully though - even if they have a few stuns, do they also have cheap, low cooldown spells that they can waste popping your Linken’s first? If yes, you may be better off getting Drums and Bottle instead and going into your first damage item, skipping Linken’s entirely.
Manta Style – Manta is more of an early-fighting oriented build. Often in public matchmaking that first big ticket item is a long time in coming and you will be forced to help your team out in early engagements (or risk their wrath when they trade badly in them). As such a Linkens build can be just too much of a long term focus and instead you should consider going Yasha into Manta Style – great stats, good utility, and allows you to take part in teamfights early on.
Ethereal Blade – The greedy kill build. Get an E-Blade out within a decent amount of timing and you’ll be able to one shot supports and squishy cores with your E-Blade > Adaptive Strike combo. It’s an expensive build up, though, so you’ll have a lot of unreliable gold at stake should you die, but if you get it up early you should snowball out of control quite quickly.
Luxury Items
The core items listed above all also make for good luxury extensions, regardless of which you went for first (although note that a delayed Ethereal Blade will generally not be very effective if the enemy supports have managed to farm some small survivability items, in much the same way a delayed Radiance on a hero like Spectre or Phantom Lancer becomes a somewhat ineffective pick up).
Black King Bar - The ultimate defensive item for any carry. This will prevent you being locked down in teamfights by stuns or killed off with burst magic damage. The strength bonus increases your health pool a touch and the damage is always handy, but the main reason you buy this is for the Spell Immunity active, so make sure you use it for teamfights.
Butterfly - The ultimate late-game luxury purchase for agility carries – huge chunks of attack speed, damage, and evasion. The only problem with Butterfly is that it’s hard-countered by Monkey King Bar. If the enemy carry is working towards, or already has an MKB, consider purchasing a different luxury item. It’s still a great item to have, but the evasion is countered and it thus becomes a cost inefficient item.
Monkey King Bar - Alternatively grab an MKB yourself. High damage, a small attack speed boost, and completely counters agility carries that opt for a Butterfly.
Eye of Skadi - Eye of Skadi is great for tanking up and gaining access to additional stats to morph. It gives great overall stat gain and grants your attacks a fearsome slow effect. It’s extremely difficult to escape a Morphling with Skadi, and tough to fight into as well.
Satanic - Doubles up as both a fantastic offensive and defensive weapon. You get a nice chunk of health, life steal from your attacks, and the chance to heal yourself back up when low on health using the Unholy Rage active. I like to liken this to the health effects of Roshan's Cheese. As long as you're able to attack, you basically get your health pool completely regenerated.
Daedalus - Damage, damage, damage. A solid carry damage item if you feel lacking in punching power.
Situational Items
Hand of Midas – As noted earlier in the guide, Hand of Midas is an option if you get uncontested free farm and you don’t expect the enemy team will be able to punish you for going greedy in your item choices.
Drums of Endurance – On the other side of the coin are Drums. If you have a terrible start, or you expect a lot of early engagements, Drums are a great option. It's cost-efficient, gives you decent stats, and is extremely easy to build into so you won't lose much unreliable gold upon death.
Bottle – You’ll want to buy a Bottle to ensure rune control if you lane mid. If you lane in one of the side lanes it can be a good, cheap alternative to Linken’s Sphere when combined with a set of Drums – if you don’t have the farm to go Linken’s first item then Drums & Bottle are a great alternative as they make you combat ready at the same time as providing you with regen for Morphing.
Boots of Travel - There are no better boots in the late game. When you need to free up a slot which would otherwise be taken up by a TP Scroll work towards these and replace your Power Treads. With this, you combine your Boots and TP Scroll slot into one, allowing you to put a slot to better use. They also make your split-push potential even scarier than it already is.
Skill Build
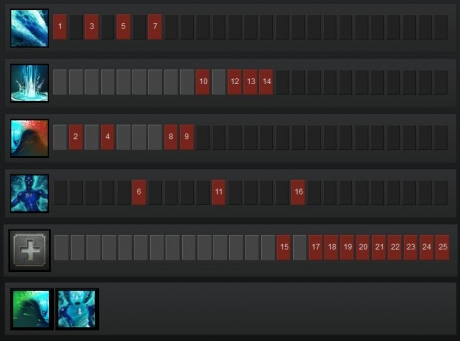 Waveform is a magic damage nuke and positional ability. It is skilled and maxed first. It allows Morphling to surge forward up to 1000 units, dealing burst 100/175/250/325 magic damage to any units it hits on the way.
Waveform gives you some decent burst magic damage to see you through the early and mid game when you otherwise lack damage output, but it is also a great positional ability, allowing you to escape from a sticky situation or get into place to finish off an enemy on low health.
Adaptive Strike is a stun that doubles up as a nuke. As it is fairly ineffective early on, and scales superbly only once Morphling has sufficient levels and acquires farm, it is skilled and maxed last.
Adaptive Strike deals 20/40/60/80 magic damage plus additional damage based on his current Agility. If Morphling’s agility is higher than his strength then it will also stun the target for a brief period of time. If his strength is higher than his agility, however, then it will deal the maximum stun length of 4.25 seconds but only a minimal multiplier of damage. In short: it is a good nuke if Morph has high agility, or it is a stun if he has high strength.
Morph Agility/Strength Gain is Morphling’s signature ability and is skilled and maxed second. It allows you to shift your agility into strength and vice versa at the cost of 30 mana per second. Additional levels increase the rate of stat shift, making for a total of 2 points per 1/0.5/0.33/0.2 seconds. It also gives a passive stat bonus of 3/4/5/6 strength and agility.
Basically, for new players, what this allows you to do is increase Morphling’s damage output, attack speed and armour at the expense of his health when on the offensive, or increase his health at the cost of damage, attack speed and armour when on the defensive and when attempting to escape.
Replicate is Morphling’s ultimate ability, and it tends to be skilled at levels 6, 11 and 16, although it is acceptable to delay skilling it if you do not feel you will get any use out of it until later on in the game. This allows Morphling to create a replicate (i.e. an illusion) of any enemy or allied hero within 700/1100/1500 units. The illusion will last for 30/45/60 seconds, will deal 50% of the hero’s damage, and will take 100% incoming damage.
At any time Morphling can switch positions to the replicate at the cost of 150 mana, making it yet another escape mechanism in his arsenal and also a useful split-pushing tool.
Gameplay Tips
 Waveform is a fantastic escape mechanism as it allows Morphling to travel across unpassable terrain or to hide in the tee-line without destroying nearby trees. This is why it is advisable to always skill it first so that you have access to a reliable escape mechanism from level 1.
Morphling is a hard carry and so struggles to dish out much damage in the early and even mid-game a lot of the time. For the mostpart you will rely on the damage from Waveform to see you through those early engagements.
| Tip: You can use items and abilities during Waveform whilst being invulnerable. |
Adaptive Strike is generally very underwhelming as a stun as you will tend to prioritise agility over strength, but it is still a stun, even if the duration is very short, and so can be used to cancel channelled abilities and TP Scrolls.
Later on, when you have high levels and/or good farm, your agility will be extremely high, and so Adaptive Strike becomes a very potent nuke – it is not uncommon to see a Morphling one-shot enemy supports once he has Ethereal Blade (the so-called ‘Shotgun Morphling’).
When attempting to flee from an engagement or when taking heavy damage, start shifting your agility into strength. This makes you very difficult to finish off, providing you have enough agility and mana left to keep on stat shifting.
| Tip: Morphling can Morph his stats even when disabled. If being ganked and locked down remember that you can still shift your agility into strength in the meantime. |
Generally you will want to maintain a minimum health level that is appropriate for the particular point of the game you’re at and shift any spare health into agility using this ability – this is how Morph is able to stack up incredibly high amounts of base damage. Then, if you lose too much health during an engagement, you can always shift it back to strength.
Replicate is yet another form of escape at Morphling’s disposal. If you’re being ganked a good tactic is to replicate an enemy hero and then micro the illusion so that it travels in the opposite direction you’re fleeing towards and then Replicate to the illusion after a short delay if you feel you will not make good your first escape attempt.
Similarly, a typical tactic as Morph is to create a Replicate of an allied hero and position it somewhere safe on your side of the map while you push the creep wave out into hostile territory in order to gain additional farm and experience, i.e. you split push safely. If you get ganked, or if you wish to farm at another point on the map that is closer to the Replicate, you can instantly jump to the safety of the Replicate’s position.
Remember that it costs 150 mana to jump to your Replicate – a hefty cost that is often not factored in by players who are new to Morphling, misled by the deceptively low 25 mana cost of creating the Illusion in the first place.
Last Updated - Patch 6.83.