Chapter 4 is a very long chapter, as there are multiple places to visit and a good number of puzzles as well. This will be split up into sections, according to the name of the locations given in the game. This page will list all of the optional puzzles you can do in this chapter.
As the chapter begins, you are introduced to the navigational system on board the Bostonius. Simply touch the screen above the captain's chair (or the ship icon on the bottom screen) and tap on a destination to be brought there. In fact, this works similar to the bus system in London. Anyways, there are many puzzles and items that can be gotten before continuing with the story.
Speak with Sycamore to get a puzzle.
| Puzzle 036 - Fuel's Errand |
|---|
| Picarats: 40 |
| Something has gone wrong with the Bostonius' engine, with the pipes that supply it with fuel being shattered into little pieces. It's your job to reconnect all the pipes so the engine connects again to the fuel supply. Note that the pieces make up one long pipe, so all pieces will need to link up.
|
You receive the Belted Bell-Bottoms clothing item. If you talk to Sycamore again, you'll get another puzzle.
| Puzzle 037 - Fuel's Errand 2 |
|---|
| Picarats: 50 |
| This puzzle is similar to the previous one, with only one extra bit added. You should see a white square towards the upper left on the bottom screen. You cannot place any pipes on that white square.
|
With those two out of the way, go to Froenborg and head to the South Gate area. Zoom in on the igloo house and you can get the Still-Warm Scarf collection item from the wooden box, then speak with Donna for a puzzle.
| Puzzle 038 - A Royal Burden |
|---|
| Picarats: 20 |
| The king places a jewel so large and precious on his crown, that he makes it unwearable. He places a challenge to give the crown to the person who thinks they can guess how many jewels are on the crown. There are a total of 18 jewels on the crown. There's one on top, 8 on the arches and 8 along the bottom, making 17. Add the one that rendered the crown unwearable (even if you can't see it) and you have 18. |
For the next puzzle, head to the Snow Coach Stop in Froenborg and talk to Prima.
| Puzzle 039 - Strawberry Sharer |
|---|
| Picarats: 30 |
| You have a plate of strawberries to divide up between four kids, who each want a specific number. Kid A wants on fewer than B, while B wants three times that of C, C wants five fewer than A and D wants half as many as A. Keep in mind that each plate can hold a total of nine strawberries. A gets 8 strawberries, B gets 9, C gets 3 and D gets 4 |
You'll receive the Comfy Tracksuit Bottoms clothing item after finishing the puzzle. Read the World Times article called "Snowman Seen Dancing at Night," then speak to Mascha, who is at the hot springs (zoom in on the right side at the Snow Coach Stop area).
Go back to your ship and fly to Kohd, with your first stop being the Lakeside Forest area (it's to the left). Talk to Hazel (the squirrel) for a puzzle.
| Puzzle 040 - Acorn Allocation |
|---|
| Picarats: 30 |
| Three squirrels are on their way home and pick up acorns along the way. Each clearing they pass, the squirrels will pick up all the acorns there before moving to the next one. The clearings have a number on them, indicating how many acorns they have. The squirrel at the top goes first, followed by the middle and the bottom goes last. Note that any clearing they pass through that another squirrel already did will have no acorns.
Following the paths above, each squirrel will end up with 22 acorns in total. |
Next, head to Kodh Station and speak with Moos for another puzzle.
| Puzzle 041 - Shunting into Sidings |
|---|
| Picarats: 30 |
| The in-game description is a bit confusing, but you need to move the train's engine, with the two railcars, and place it along the top set of tracks to match the ones shown on the very top tracks. The engine will automatically lock onto the railcars when in range, and you can tap the railcars to disconnect the engine. If you want to change the junctions (highlighted in orange), touch the lever in the bottom right.
|
Head to the Fish Market and talk to Karpin for another puzzle.
| Puzzle 042 - A Boatload of Hassle |
|---|
| Picarats: 45 |
| A boatbuilder has six orders for rowing boats, with each boat requiring ten logs in order to build them. The timber merchant has the exact number needed, but you need to buy them in adjacent sets. The biggest problem is that one of the blocks contains an unknown number of logs, but it's definitely not more than five. You need to divide up the blocks into sets of four, with each set containing ten logs. Knowing that the merchant has the exact number required for six boats, and each boat needing ten logs, that means he has a total of 60 logs. Taking this into account, count the number of logs in the rest of the blocks and you'll find out that the unknown block contains five logs. The solution is below.
|
Go to your trunk and read the World Times article titled "A Prehistoric Visitor?" Once you do, go to the Level Crossing area and speak with Boris, who lets you into his cabin. Inside, you will be able to find five Hint Coins. On the right side is a dresser with a dolphin statue on top; check the bottom drawer for one (107), then check the red lure hanging from the ceiling for another (108). The top of the smaller doors on the oven houses a coin (109).
In the top left corner of the screen is a broken piece of the ceiling, which yields another Hint Coin (110). For the last one, find the fish on the table and keep tapping it until the coin pops up (three taps; 111). Check the ship's wheel hanging on the back wall for the Useless Submarine collection item, then investigate the boots for BORIS'S BOOTS mystery item. The dolphin statue before is also another mystery item (DOLPHIN ORNAMENT). Talk to Boris, then you can leave Kodh.
Your next stop is London, with Scotland Yard as your final destination. Head inside to the Reception area and talk to the policeman there for a puzzle.
| Puzzle 043 - A String of Jewels |
|---|
| Picarats: 40 |
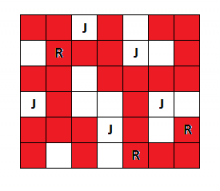
| A group of thieves decided to break in and steal the jewels, but it's possible to round them all up without letting them get to the jewels. You need to use every post in the room and trap all the thieves within a single loop of rope. Some of the rope loop is already marked and all of the jewels need to be on the outside. Each post can only be used once and if one isn't used, then the loop will turn red. The solution to this puzzle is below, with J marking a jewel and R marking a robber. The highlighted areas are the ones the rope should be around.
|
Go to Bloom's Office and speak to the man in a blue suit (Carmichael) for another puzzle.
| Puzzle 044 - Staged Silhouettes |
|---|
| Picarats: 30 |
| You took some instant film silhouettes for a concert and one of the test shots accidentally made it into the pile of final shots. There are four shots and you need to find out which one is the test shot. This can be done by turning on the light and comparing the silhouettes to the photos. Basically, you want to compare the locations of the shadows to those in the pictures. One light comes from the left, one from the center and one from the right. Once you figure out the order of the silhouettes in each set, you'll be able to tell which one is the test shot. The test shot is letter C. |
