Leave the Bostonius and head to the first area, which you find has no one around. For now, search for Hint Coins by checking the tip of the red roof on the left side (205), the lamp connected to the chain on the right (206), and the empty pot in the bottom right corner (207). The BAKER'S SIGN (looks like a loaf of bread) and the SLEEPY CLOCK TOWER are two mystery items.
On the far right, tap on the door to find out no one is home, which will open up the next area. Three Hint Coins are hidden here, so check the top of the barren tree on the far right (208), the smoking chimney on the right (209), the chalice on the ledge underneath the phoenix statue (210) and the grapes on the barrel on the left (tap three times; 211).
The THATCHED ROOF on the left is a mystery item, and you can get the Melodious Trinket collection item by checking the window below the smoking chimney (the one with the Hint Coin). Inspect the phoenix statue now, then head back to the city gate area and talk to the boy (Umid).
Go visit Umid's house and search for four Hint Coins, which are located by checking the small bowl near the boiling pot (212), the hanging lamp (213), the bread on the table on the left (214), and the small object on the bottom shelf of the bookshelf (215). Talk to Umid, then head back to Phoenix Square and talk to the boy there (Temir) for a puzzle.
| Puzzle 079 - Snake Squeezing x10 |
|---|
| Picarats: 40 |
| Squeezing a selection of slithering serpents into a small pot like this is no problem for an experienced snake charmer. There are nine snakes in the pot at the moment, but you will need to do some rearranging in order to fix a tenth snake inside.
|
You'll receive the Submerged Glade garden for the Bloom Burst minigame after solving the puzzle, as well as open up the Mosinnia Forest area. Go there and check for Hint Coins; the tree behind the slanted big branch (216), one of the plants on the ground on the right (217), and the moss on the tree next to the one where the first coin was (218). The sign on the left is a mystery item (KEEP OUT SIGN).
Check the moth in the upper right corner for a puzzle.
| Puzzle 080 - Golden Butterfly 2 |
|---|
| Picarats: 45 |
| This puzzle is similar to Puzzle 075, where you need to get a golden butterfly by mixing together a concoction that will attract it. You can only use measures of the ingredients for this puzzle. Mix two Orange, two Watermelon and one Water to finish the puzzle. |
After finishing the puzzle, head to the next area and check the top of the tower closer to you to find the Slapdash Sculpture collection item. For Hint Coins, check the top of the tower further from you (219), the larger of the two rocks side by side on the ground (220), and the patch of leaves above the bird (221).
Speak with the bird (Adler), then return to the city and talk to Temir again. This opens up the Preesha's Hill area, where you can get the mystery item, BEEHIVE, on the tree. For Hint Coins, check the big blades of grass to the right of the girl (222), the tower-like building in the background on the left side (223), and the tree to the left of the one with the beehive (224).
Talk to the girl (Mehri) for a puzzle.
| Puzzle 081 - Moonlight, Starlight |
|---|
| Picarats: 30 |
| You have a picture of the hanging lampshade Mehri wants to make. It's made up of eight triangular panels, only two of which are decorated with an image. On the bottom screen, you see one panel is already decorated with a star. Your goal is to figure out which panel will have the moon decoration. The moon symbol goes on the panel on the very bottom. |
You receive a new Dress Up request (Mehri's Request) for solving the puzzle. Before going to the new area, check the tree on the far right in the background for another puzzle.
| Puzzle 082 - Walking on Water 2 |
|---|
| Picarats: 40 |
| This puzzle is similar to Puzzle 017, where you need to navigate your way to Aurora at the top of the map using the islands and ice chunks.
|
Head to the new area, Mosinnia Temple, where you can find four Hint Coins. Check the phoenix statue on the right on top of the temple (225), the tall stone slab on the right side (it will break; 226), the stone slab on the left (without the face; 227), and the stained-glass window in the top right (228). The left stained-glass window (top) contains the Magnificent Candle collection item. The slab with the face on it is the FACE ON A MONUMENT mystery item, and the column closest to you on the right side is the STONE SHEEP mystery item.
Talk to Dana, the temple keeper, who tells you to solve the mural. Inspect the blue slab on the right to start, then zoom in on the large mural. Tap the sun on the left three times, then the right one twice. Go back to the city gates and check the plaque that is pointed out to you.
Zoom in on the blue slabs on the bridge, then tap the second from the right, as well as the fourth from the right. Head to Phoenix Square next, then to the city gates to talk to Temir for a puzzle.
| Puzzle 083 - Snake Squeezing x11 |
|---|
| Picarats: 50 |
| This puzzle is similar to Puzzle 079, except you have to fit 11 snakes into the pot instead of 10.
|
You receive a new piece of clothing (Sport Trainers) for solving the puzzle. Go to the temple and speak with Mehri for another puzzle.
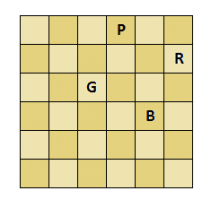
| Puzzle 084 - Potion Placement |
|---|
| Picarats: 30 |
| A witch had asked you to tidy up her house and tells you where to place each potion. The opening in the top left is the porch door and each square represents one step.
|
You receive a new course (Twisty Beach) for the Nutty Roller minigame. Go to Mosinnia Forest and tap on the HORNED OWL for a mystery item, then go to Phoenix's Rest. Tap the sluice gate for a puzzle.
| Puzzle 085 - The Phoenix Wakes |
|---|
| Picarats: 30 |
| To open the sluice gate, the puzzle embedded in the panel must be solved. "Bound by the chains of eight moons, the phoenix shall remain asleep. Only with the power of the star stones may these chains be severed. No stone can be connected to a stone whose number is one higher or one lower than its own. Once the chains are severed, the freed phoenix will awaken."
|
With the puzzle solved, head to Preesha's Hill and watch the cutscenes that occur. Once it's over, head back to the temple and speak with Dana to get the fifth, and final, Egg. Return to the Bostonius and then speak with Aurora while on board to finish the fourth chapter. On the other end, if you want to go around and start getting some puzzles, read ahead to the next section, remembering that you can speak to Aurora to continue the story.
