Collectibles
- BSAA Emblems: 1
- Treasures: Ruby (Pear), 2x Blue Enigma, Sapphire (Pear), Diamond (Trilliant), Beetle (Gold), Idol (Gold), Emerald (Pear)
- Weapons: 0
Worship Area
Head up the stairs and continue straight until you reach an alter with several empty sockets on it. This level is similar to the Marshlands level (3-1). We will need to collect three plates and affix them to the slots here to access the next area. To start with, head to the path leading off to the left. As you move close to the entrance, a scene will show, giving you a look at some nasty solar powered laser beams that you will be dodging in this area.
Rather than cruising to the right towards the source of the beam, head straight across the path and into a large side room. Make your way across the makeshift bridge. Directly in front of you on a raised area, 3 archers will fire at you as you cross, shoot them as soon as you can as some melee and spear majini will start to come down the stairs to the left of that platform to come get you as well. Eliminate both groups of baddies and head up the stairs to where the archers were.
Pick up the Sea Emblem and head back down the stairs. Some majini will now be coming across the bridge you came over previously and a couple more, including a Majini Chieftain will jump down onto the platform. Eliminate them all and head back to the laser hallway.
Make your way up the hallway slowly, making sure to take cover in the side areas when you see the beam coming your way. Transfer to the parallel hallway in the left halfway up and continue up the stairs on the right at the end of the hallway where the laser begins its route. At the top of the stairs, wait in the doorway for the two lasers to pass, run to the right into a safe area under a stone arch, shoot the shiny object on the ceiling here to pick up [Ruby (Pear)], continue to the end of the walkway to the right and up the stairs here, look up towards the alter above to see the majini who is controlling the lasers on this side of the area. Shoot him and then head all the way back along the double laser path and continue into the room to the left.
In this room, give Sheva an assist in jumping across the gap, and then use a sniper rifle to help defend her as she climbs the stairs. She will grab the Sky Emblem and jump back down onto the platform to your right, likely bringing a few angry majini, including another Chieftain with her. Take everything out and move towards where she jumped down from the raised platform. Look for a large crack in the wall to your right. When you find it, look through the crack and pick off the majini utilising the laser on the left side of the area.
Run back along the hallway to where you shot the first laser guy, and make your way down the hallway on the right. At the end of the hallway, turn to the left and eliminate the archers and shield majini in front of you. When the coast is clear, look for a shiny object on the wall to your right above the stairs, shoot it down to pick up [Sapphire (Pear)]. Head down the stairs and pick up the Earth Emblem from the alter in front of you. A few more shield and crossbow majini will appear, eliminate them and head back to the alter with the empty sockets.
Insert the three plates and climb the stairs, before you head through the door, shoot the shiny object above it for [Diamond (Trilliant)]. Enter the door. Move down the stairs and investigate the sun door. Head through to a large open room. We will need to move the reflective plates in the room to make the beam hit the plate on the elevator in the back left corner. Don't touch the solar beams or they will instantly kill you. Head around the outside of the room to the right, and use the mirror closest to the elevator to reflect the light onto the elevator plate. Once the elevator has become active, ride it down.
In this room, arrange the mirrors so that the beam will look like such:
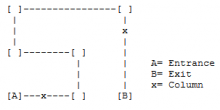
Once organised, kick down the columns blocking the light. Jump on the elevator and ride down.
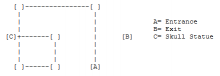
In the next room, before you mess around with the mirrors, head into the room behind the small skull statue and look above the door for [BSAA Emblem1]. Do not open the chest in the middle of this room. It is empty and will summon a swarm of spiders to kick your butt. Instead, organise the mirrors as such:
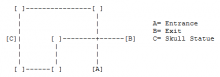
Firing the beam at the skull statue will open the locked doors on either side of the room. Inside you will find [Beetle (Gold)], [Idol (Gold)], [Ruby (Pear)] and [Emerald (Pear)]. Once you've looted everything, then organise the mirrors as such:
Head down the hallway to the elevator and ride it down, move into the room in front of you to complete the mission.