<<<<<<<<<<<<<<<<>>>>>>>>>>>>>>>>
#24 Thunderhead – Isle of Songs
<<<<<<<<<<<<<<<<>>>>>>>>>>>>>>>>
Link enters another world. Instead of Loftwings flying about, he is attacked by flying dragons. There are seven islands here.
Island #1 is in the South/West area and is vacant.
Island #2 is also in the South/West and due West of #1. It has two soft soil spots with hearts and Rupees.
Island #3 is also South/West and due North of #2. It has a small castle like structure with jars, hearts and hornets. The perimeter is fenced, but has several platforms. One very small wooden platform has a treasure chest.
Island #4 is West and is due North of #3. It is round with a small landing area on its South side. Here is a yellow soft soil spot that is empty. On two other sides are caged areas, each with a treasure chest and a yellow soft soil spot.
Island #5 is the North Island called the "Isle of Songs". It has a very tall building and four small isles nearby. There is a treasure chest on its roof and one at its base. Open this one for a Gold (300) Rupee.
Island #6 is nearly due East of #5. It has two structures with an arched roof on each. One is tall, the other is short. Beneath the short structure is a soft soil spot. Dig it up to open a jet of air. This will carry Link up to the arch where he will find a treasure chest containing an Evil Crystal. The other structure has a vine-covered wall with several Walltulas spread about. In the arch is a treasure chest.
Island #7 is South of #6 and South/East of #5. It is covered by a rainbow and has heart plants all around its edge.
Now go back to the Isle of Songs and land on the larger, of the four isles. Fi appears. She tells Link she has memories of this island, and it may have been left by the Goddess, for Link. Fi does not know how to get in the building and suggests that Link investigate.
Nearby is a stone that reads:
"Rotate the center pedestal to
complete the bridge that allows
you to step to the Great Tower
on the Isle of Songs".
To the left of the center pedestal is a device with three gemstones. Looking down on the isle, there are three rings around the center pedestal. Each ring has a square pedestal. Each ring also has a symbol or marker on it. The middle and inner square pedestals have a slab in front of them. Using the center control pedestal, move the outer square pedestal to the left and in line with the inner square pedestal. Now strike the gemstone on the right and the middle slab moves to the right marker in the middle ring. At the same time the slab in front of the inner square pedestal disappears. Use the center control pedestal to move all three square pedestals simultaneously. When the middle square pedestal hits the slab, STOP. Push one more time on the center control pedestal and all three square pedestals will be in line. Now strike the center gemstone. The slab in the middle ring disappears and a slab appears in each of the other two rings. Now push the center control pedestal one time so that all three square pedestals move one space. Strike the gemstone on the right once again for the middle slab to return and the others to disappear. Link can now use the center control pedestal to move all three square pedestals to align the bridge. Cross the bridge and enter the crawl space.
If you have tried moving the pedestal stones and are now confused as to where to move them then you need to reset the pedestal stones following this procedure:
On a piece of paper draw four circles one inside the other to create three rings. Mark the first inside ring or track "1", then the next ring "2" and the outer ring "3". Now in ring "3" at the eleven o’clock position draw a dark rectangle to represent the location of the rising slab and mark it "A". In ring "2" draw a slab at the nine o’clock position and mark it "D" then at the two o’clock position draw another slab and mark it "C". In ring "1" at the eight o’clock position draw a slab and mark it "E" and at the twelve o’clock position draw a slab and mark it "B".
At the wall of three gem-stones, when the left gem-stone is struck (when not glowing) the D & E slabs will rise and the A & B slabs will drop. When the top center gem-stone is struck (when not glowing) the slabs A & B will rise and the D & E slabs will drop. When the right gem-stone is struck (when not glowing) the slabs that are in the up position will go down and the slabs in the down position will rise. This is how you can control the resetting of the pedestal stones.
At this point it doesn’t matter where the stones are positioned. Strike the top-center gem-stone and slabs A & B will rise and all the other slabs will drop. Push on the center control pedestal moving all the stones in a clock-wise rotation until the stones in ring "1" and "3" stop at the slabs and the stone in ring "2" is next to the stone in ring "3". If the stone in ring "2" is ahead of the stone in ring "3" just keep pushing the control pedestal until it lines up with the stone in ring "3". Now strike the left gem-stone to raise slabs D & E. Go back to the control pedestal and push until the stone in ring "1" touches slab "E" and STOP!. Push the control pedestal just enough for the stones in ring "2" & "3" to move one more space and then STOP! All the stones should be in-line or next to each other. Now strike the top-center gem-stone to raise "A" & "B" and to lower "D" & "E". Push on the control pedestal to move the three stones at least two spaces and STOP!. Strike the left gem-stone and slabs "D" & "E" will rise and "A" & "B" will drop. Again push on the control pedestal until the three slabs reach the twelve o’clock position. The bridge is now in-line.
Go down the walkway to its end. Standing in the circle, look forward to see a Goddess Symbol. Use the skyward strike to activate the symbol.
-Cut Scene-
A large Goddess Statue rises from the depths. Fi appears and tells Link that she has a message from the Goddess that was given to Fi long ago. Fi tells Link it was intended for him and it reads:
"He who seeks the Sacred Flames, listen
well, for I guide you from my place at
the edge of time.
The Sacred Flames are three in number.
To obtain them, you must also earn
Relics known as the three Sacred Gifts.
For each trial you overcome, you shall
Be blessed with one of the gifts…
Make use of the Power of these Gifts,
and you will find your way to the
Purifying Sacred Flames.
Now I bestow unto you a melody.
It will serve as a key, opening the
First trial that awaits you deep in the
Wilds of Faron Woods".
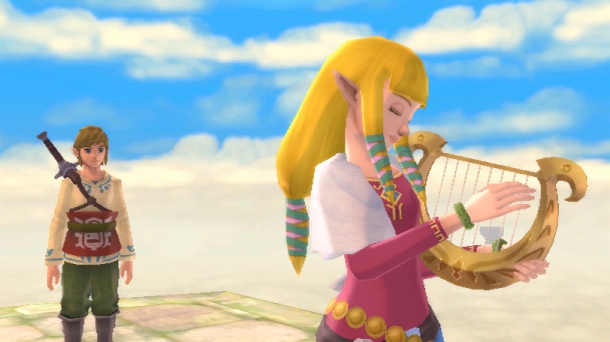
Fi goes into a flying dance while a stream of light radiates to Link. Link begins to play the Goddess harp while visions of Loftwings fly above him. Fi tells Link the song is called "Farore’s Courage", and its rousing melody will guide him. The Goddess Statue sinks into the depths and Fi confirms what was told by the Goddess. Fi has given Link the dowsing ability to find the gate to the first trial.
-End Cut Scene-
Take to the sky, leaving Thunderhead the same way Link came in, and go to the Faron Woods.