Introduction
“Failure is just another kind of success. The wrong kind.”
Alchemist has traditionally been played as a hard carry, and indeed still is; he has one of the best ‘steroids’ in the game and a passive ability that lends itself to a farming carry.
Alchemist's complete character profile can be found here.
Our detailed Build Guide for Support Alchemist can be found here.
Pros & Cons
Pros
- Amazing ‘Steroid’ ability that gives him huge DPS and makes him very tanky
- Powerful lockdown ability that deals physical damage
- Can deny himself
- All of his abilities are worth leveling
- Great lane sustainability
- Great push/anti-push AoE
- Great farming hero…
Cons
- …But it’s risky to go for a Greevil’s Greed build
- Stun can quite easily turn against you
- Fairly ineffective (and squishy) when ultimate is on cooldown
- Low armour
- Very bad stat gain
Carry Alchemist
When should you go carry Alchemist? When you’re likely to be the team’s primary DPS’er and can take the safe lane basically.
If someone else on your team wants/insists on having safe lane farm then the mid lane is an option for Alchemist, in which case you should probably go for the ‘Battle Build’ (i.e. you don’t level Greevil’s Greed early on - for more detail scroll down the page a bit).
If you don’t get the safe lane and you don’t opt to go mid then you really should consider being a 4th or 5th position support (in which case see the ‘Support Alchemist’ guide on the next page).
Item Build
 OK, so you’ve decided to play Alchemist as a carry and you’re going to the safe lane.
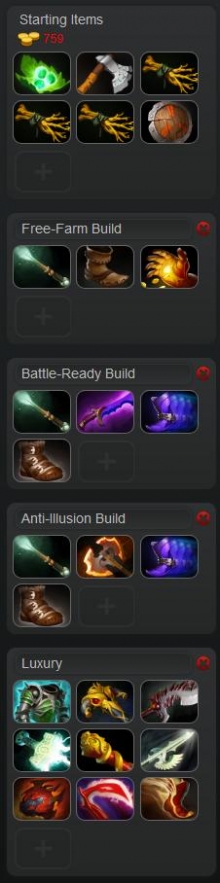
A typical starting build is:
A set of Tangos, a Healing Salve, a Quelling Blade, and 3x Iron Branches.
You can swap those Iron Branches and one set of regen out for a Stout Shield if you expect the enemy to aggressively lane and try to contest your farm.
Core Items
You have three core item progression routes in the early-mid game, largely based on how the laning phase is panning out and what the opposing line-up consists of.
If you have uncontested free farm: rush a Hand of Midas and go super greedy, grab some basic Boots of Speed from the side shop and upgrade any Iron Branches you have into a Magic Wand. Next build Phase Boots or Power Treads.
If you’re struggling to farm go for an early teamfight build: upgrade any Iron Branches you have into a Magic Wand, get some Power Treads or Phase Boots, and work towards a Shadow Blade with which to combo your Concoction up with.
If the opposing team has an illusion-based carry (such as Phantom Lancer) or minion-based push go for an anti-illusion build: upgrade any Iron Branches you have into a Magic Wand, get some basic Boots of Speed from the side shop, and work into a Battle Fury. Next build Phase Boots or Power Treads.
Luxury Items
Once you’ve decide on, and gotten, your core items, you should aim to pick up your first luxury item. Good options on Alchemist are (in rough order):
Assault Cuirass – THE best luxury item for Alchemist. You have naturally low armour – Assault Cuirass fixes that. You’re a right-click carry – Assault Cuirass’s attack speed and minus armour aura both make your carry potential go through the roof. And it benefits your entire team. Definitely the ideal first luxury pick-up for Alchemist.
Black King Bar – BKB is one of the few items you may need to prioritise ahead of an Assault Cuirass. If the enemy team is able to lock you down hard then consider going Black King Bar as your first luxury item in order to be able to actually get stuck into the fights. It naturally makes you tankier as well.
Abyssal Blade – A nice chunk of health and damage, but most importantly two additional forms of lockdown that go through Spell Immunity – an active ability that will give you 2 seconds of stun and a passive that gives you a 25% chance of a 1.4 second stun.
Mjollnir – If you need anti-push/anti-illusion then Mjollnir is a perfect extension to the Battle Fury build. Between your ultimate and Mjollnir you’ll be ‘chopping wood’ insanely quickly; you’ll be able to farm jungle camps and creep waves that much faster and will hit hard and fast in teamfights.
Monkey King Bar – Huge attack damage, mini-bash, and a little bit of attack speed. It also grants you True Strike, making it the ideal pick-up to combat agility carries that would typically build into a Butterfly or which have evasion built-in (such as Phantom Assassin).
Other good damage items include: Desolator (the minus armour stacks with Assault Cuirass and it works on enemy buildings, making it a great mid-game push item), and Daedalus (high damage and critical strike chance)
Heart of Tarrasque – Will make you a full on tank. Your health pool will be enormous and you’ll also hit a lot harder. A good luxury item if you feel you’re falling in teamfights too quickly, but I prefer…
Heaven’s Halberd – If you do feel you die too quickly in teamfights consider Heaven’s Halberd instead of Heart of Tarrasque. You get a nice chunk of health, damage, and bonus effective health (through evasion), but you also become an anti-carry thanks to the Disarm active.
Boots of Travel – Alchemist tends to get 6 slotted much faster than most carries thanks to Greevil’s Greed. When you are at that stage of the game swap out your initial set of boots for Boots of Travel. It frees up a slot you would otherwise have reserved for a TP Scroll and makes you much less susceptible to split-push.
Radiance – Traditionally an oft-recommended item on Alchemist. It’s lowest down on my list because ideally you want to get Radiance quickly in order to get value out of it. The problem is your core items were fairly expensive and there a luxury items that give you so much more, so you likely won’t be able to get it in a timely manner and in any case it’s a very one dimensional item build. It’s not a bad option by any means, but I strongly recommend the items listed above ahead of it.
Skill Build
I’m going to detail two different skill builds for carry Alchemist. The first is the greedy ‘Goblin’s Greed’ build.The second is the more active 'Battle Build' which allows you to engage in fights earlier.
Goblin’s Greed
This build focusses on maxing Greevil’s Greed first (‘cos FREE GOLD!), and is for when you have uncontested safe lane farm. Even then it’s still a really risky build – if the enemy team decide to force fights early you’ll have very little to contribute to engagements. Risky, but popular, and I’m sure we’ve all done it when we shouldn’t have; it’s so damn tempting!
 So for this build you skill Greevil’s Greed whenever you can and max it out by level 7. Unstable Concoction at levels 2 and 4 gives you a certain amount of protection in the laning phase against dives and will also allow you to contribute at least something to early engagements.
Always get Chemical Rage (levels 6, 11 and 16), and don’t be afraid to pop it in the lane just to regenerate your health if you’ve been brought down fairly low. The mana regen you get during the ultimate actually means it pays for itself in terms of mana and then some, so the only downside is that it’ll be on cooldown for 45 seconds.
If you do get dived early on, pop your ultimate and seek the protection of your tower; the huge health regen from Chemical Rage will mean you live through all but the largest amounts of burst damage and the tower hits will punish them for waiting your ultimate out.
Max Unstable Concoction second for the additional damage and lockdown, and then finally Acid Spray, which will give you some AoE push/anti-push and a large amount of AoE minus armour in teamfights.
Battle Build
The second build for carry Alchemist is the ‘Battle Build’. It’s actually the same build support Alchemist uses. The upside is you contribute so much more to early teamfights, become a potent ganker, and don’t just leave your team to 4v5 for the first 25 minutes. The downside is you won’t be getting the bonus gold from Greevil’s Greed until level 10, so during the laning phase you’ll have to make do with farm like an ordinary carry.
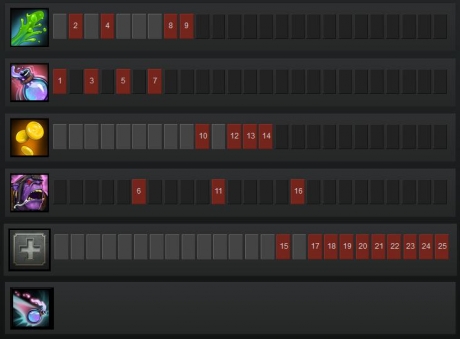
You skill and max Unstable Concoction first for the bonus damage and lockdown it provides, and max Acid Spray second, for the AoE minus armour and damage over time.
| Tip: Throw out Acid Spray onto enemies before you stun them with Concoction – Concoction’s damage is actually physical, so the minus armour from Acid Spray will make it hurt enemies that much more. |
As with the Greevil’s Greed-centric build always get Chemical Rage whenever you can (levels 6, 11 and 16). This steroid ability is what makes you a DPS’er, so use it during teamfights to pound on enemies whilst regenerating your health insanely quickly. Finally you max Greevil's Greed last.
Gameplay Tips
 Concoction doesn’t just stun, it deals quite a lot of damage (360 at level 4), and this damage is physical. That fact is crucial, as explained earlier in the guide. You can burn through enemy armour by first casting Acid Spray on the enemy (-4 to -7 armour) before you land your stun. If you pull it off successfully you’re going to deal a lot more damage on top of a 4 second stun.
| Tip: You can actually use Unstable Concoction to deny yourself if you know you have no chance of surviving. |
| Tip: You can start charging Unstable Concoction and then TP to one of your towers to hit a diving enemy with a fully charged Concoction. |
Acid Spray deals quite considerable damage over time – lay it down in front of your tower/base when the enemy team is pushing, or on top of/slightly behind the enemy tower if your are pushing them.
| Tip: Always cast Acid Spray in teamfights if only to apply the minus armour debuff to enemy heroes in the AoE. |
Chemical Rage pays for its mana cost itself over the course of its duration (75/187.5/300 mana is regenerated in total), so feel free to cast it to regenerate your health when necessary without worrying about losing mana, but avoid teamfighting without Chemical Rage.
| Tip: You can dodge spells and auto attacks by activating Chemical Rage at the right time; during the 0.35 transformation time you dodge attacks. |
Last updated - patch 6.83.