 Introduction
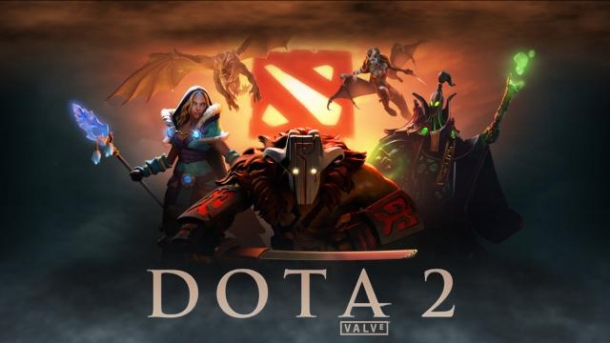
“From the hell of hells I come.”
Terrorblade is a melee agility hard carry that is a strong pusher and has the potential to scale incredibly well into the late-game.
He is unique amongst melee carries in that one of his abilities allows him to take ranged form for a lengthy period of time. He also has an ultimate that can literally turn the tide of an engagement, effectively switching his health with an enemy (or allied) hero.
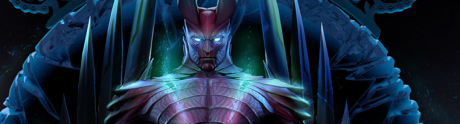
Terrorblade's complete character profile can be found here.
Pros & Cons
Pros
- Incredibly high agility gain
- Ability to transform into a ranged hero
- High move speed
- Great pushing carry
- Ultimate can easily turn the tide of an engagement
- Great late game DPS’er
Cons
- Relatively squishy (despite ultimate) and poor strength gain
- Very item dependent
- No stun or hard lockdown No AoE Quite weak early game Ultimate needs to be used properly or it will be detrimental
Item Build
 Starting Items
Terrorblade is a highly farm dependent carry and so should ideally be given safe lane farm, although can be jungled if necessary. An ideal starting item build would be:
A set of Tangos, a Healing Salve, a Quelling Blade and 3x Iron Branches.
If you expect the enemy team to contest your farm then a Stout Shield is advisable, in which case go for the following starting items:
A set of Tangos, a Quelling Blade, and a Stout Shield.
Early Game
Early on grab basic Boots of Speed and upgrade them into Power Treads. You have naturally high mobility already and will be working into a Manta Style later on, so like Luna you don’t need the bonus move speed Phase Boots provide. Your first ability – Reflection – is also a potent slow, further negating the need for Phase Boots. That said, the damage in itself would be useful, but Terrorblade is an innately very squishy carry – he has low strength gain and a low health pool - so Power Treads are the advised upgraded boots for him.
Upgrade any Iron Branches you purchased earlier into a cost-effective Magic Wand, and then start working towards your Manta Style, beginning with the Yasha.
Mid Game
You want to get your Manta Style as quickly as possible. Manta not only synergises well with Terrorblade being an agility carry, the illusions will also maximise your nature as an illusion-based carry with strong pushing potential.
| Tip: Cast Metamorphosis first, and then cast Conjure Image alongside Manta Style’s Mirror Image. You’ll have 4 ranged damage dealers, maximising your pushing potential, damage output, and confusion in teamfights. |
Using the tip above you become a very potent pusher even fairly early on. If the opportunity arises cast Metamorphosis followed by your illusions and send them to push the tower. You yourself can hang back in relative safety whenever you fear a gank (much in the same way a cautious split-pushing Nature's Prophet might).
Similarly, make use of your illusions (especially Conjure Image) to farm jungle camps whenever there’s no creep wave nearby or whenever you fear the potential for a gank on your lane.
Even with your core you’re still quite a fragile hero, but you do now have some decent forms of escape mechanism, between the disjoint of Manta Style illusions, the confusion that multiple illusions can create, the slow from Reflection against a single target, and finally of course the ability to effectively switch health percentages with a chosen enemy (or ally).
As far as fighting goes you won’t be dealing massive amounts of damage, but you can still make a somewhat decent contribution to teamfights so long as you have Metamorphosis off cooldown. If you don’t have access to Metamorphosis you should avoid taking fights until it’s off cooldown, as it’s the primary source of damage for Terrorblade in these earlier stages of the game.
Luxury Items
Black King Bar – BKB is typically the first luxury item you should aim for. On top of the added survivability +10 strength gives you, and a small damage boost, you gain Spell Immunity, which is crucial for surviving teamfights and not being stun locked. Sunder goes through BKB, but you cannot use Sunder if you’re stunned or silenced, so a clutch BKB usage can often mean the difference between a teamfight won or lost decisively.
Eye of Skadi – Eye of Skadi is great for tanking up whilst at the same time getting good overall stat gain and a fearsome slow effect. It’s extremely difficult to escape a Terrorblade with Skadi, and tough to fight into as well.
Satanic – Satanic will make you a lot less reliant on Sunder to ensure you survive engagements. You’ll hit harder, be tankier, and gain life leach from your attacks. The Unholy Rage active also allows you to refill your health pool (providing you’re not locked down).
If you do intend to go the Satanic route then you can get your Helm of the Dominator fairly early on, and use your dominated creep to stack the Ancients.
Assault Cuirass – A great option for any carry which has good pushing power. The minus armour aura from AC applies to enemy heroes and buildings, making your illusion-based pushes much stronger. Assault Cuirass also makes you tankier and gives your entire team the benefit of attack speed and armour auras.
Butterfly – The ultimate late-game item for any agility carry, and Terrorblade is no exception. Make sure the enemy team does not have a Monkey King Bar carrier, otherwise the Evasion element of Butterfly is negated, making it very cost-ineffective compared to other luxury options. Rule of thumb: Get it if you’re flush and there’s no MKB out on the enemy team.
Monkey King Bar – An alternative damage option and also a hard counter to Butterfly, so if the enemy carry is going for a Butterfly opt for an MKB yourself. The other, less well publicised benefit of MKB, is that True Strike works on buildings, so you won’t miss uphill attacks when sieging the enemy base.
Daedalus – The other luxury damage option – high damage and a chance to Critical Strike. Not as reliable as an MKB but has much higher damage potential.
Situational Items
A quick word about some potential situational picks. In the early and mid game if you’re struggling to farm and are being forced into fights early on then a Ring of Aquila and Drums of Endurance should be considered. They’re two of the most cost-efficient stat items in the game, they’re both easy to build into (meaning you won’t have much unreliable gold lying around to lose if you die in those engagements), and they allow you to fight early. The ideal item pick-ups for a Terrorblade forced into less than ideal circumstances.
On the flip side, if you have complete free farm and a good early game, you can consider a Hand of Midas.
The other situational item to consider is a Necromicon. Despite the nerf is 6.80 this is still an incredibly strong item, both for pushes (which is a natural strength of Terrorblade, and thus means the item synergises well with him) and for teamfights. If you’re leaning more towards a push strat than a late-game carry build then go for Necro and try to finish the game early.
Skill Build
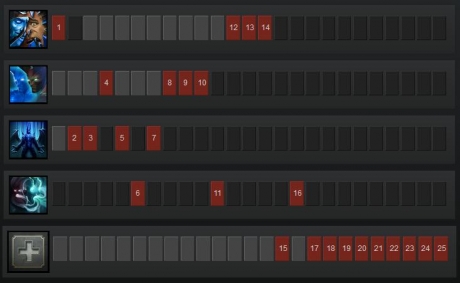 Avoid using your first skill point until you see the laning situation. The image above shows what I consider to the be the ideal starting option if you’re safe laning farm, BUT if the enemy team offensively dual or trilanes and you are unable to acquire last hits from melee range then you may be forced to skill Metamorphosis first in order to get ensure you get last hits. So keep your options open initially.
Get an early point in Reflection for the incredibly potent slow it gives you, which makes it useful for ganking your lane opponent(s), counter-initiating, or as a defensive tool to try and prevent tower dives. Avoid spamming it early on because you’ll need the mana for your other abilities.
Reflection is typically skilled first (or second in tough lanes where you’ve been forced to opt for Metamorphosis), but is maxed last. The slow is very useful early on but itself does not scale, whereas the damage element is much more useful later on in the game.
Although skilled last out of all of your initial abilities, Conjure Image is maxed second of all, after Metamorphosis. The short cooldown means you can use this quite frequently. It’s fantastic for stacking jungle camps (if you’re capable of micro’ing multiple units), good for pushes, and also strong at increasing your own damage output when engaged with enemy heroes.
Metamorphosis is skilled at level 2 usually (sometimes level 1 – see paragraphs above), but is maxed first. Metamorphosis is the source of your early damage and allows you to transform into ranged form, but it comes with one huge drawback – it has an extremely lengthy 140 second cooldown (it also reduces your move speed by 25).
Finally, your ultimate, Sunder, is always skilled (levels 6, 11 and 16). The cooldown reduction with each successive level is significant, and even at level one the cooldown is shorter than that of Metamorphosis, so always use it whenever you need to during engagements.
Gameplay Tips
 You should not trigger Metamorphosis unless you need to, either when committing to a tower push or during a teamfight, because it has an extremely long cooldown. Avoid using it when being ganked if you’re pretty sure you’re going to die anyway. Think of it as your ‘real’ ultimate form.
Always use Metamorphosis first before casting any illusions. For your bread and butter combo: cast Metamorphosis first, and then cast Conjure Image alongside Manta Style’s Mirror Image. You’ll have 4 ranged damage dealers, maximising your pushing potential, damage output, and confusion in teamfights.
Push if the opportunity presents itself, with Metamorphosis and Conjure Image you have extremely good pushing power for a carry hero, even in the early stages of the game.
Your aim, when using Sunder, should be to target a nearby enemy hero with an almost-full health pool. During teamfights or ganks, focus on targeting one hero with your attacks, and use their allies as a source of back up for yourself by using Sunder on a healthy enemy hero when you are low. This way, you should be able to bring two enemy heroes low whilst topping your own health pool back up.
| Tip: You can actually use Sunder on your own illusions at present. If there’s no more optimal target (like an enemy hero) to swap life forces with then feel free to use a healthy illusion. |
Sunder goes through Spell Immunity, but you cannot use Sunder if you’re stunned or silenced, so BKB is a good item choice on Terrorblade.
Last Updated - Patch 6.83.