Introduction
“My shadow leaps ahead!”
Dazzle is a ranged intelligence support hero. He is currently one of the most popular support picks in competitive Dota, where it seems his potential as a support has finally been realised after years of being underrated.
With good healing capability, the ability to grant effective immunity from death to either himself or an ally for 5 seconds, and a tremendous minus-armour ultimate, Dazzle can be a very high-impact support hero in the right situation.
You can find the complete character profile for Dazzle here.
Pros & Cons
Pros
- Has a mini-stun
- Literally a life saver with Shallow Grave
- Good, spammable heal
- Very powerful teamfight ultimate
- Amazing support hero for minus-armour line-ups
- Item independent
- Great pusher
Cons
- A very level-greedy support hero
- Mana intensive
- Lacks decent lockdown
- Squishy
- No escape mechanism & tends to get focussed in teamfights
Item Build
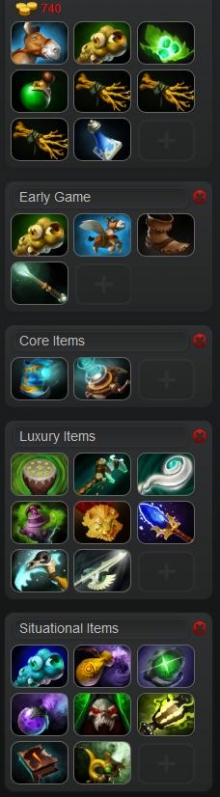 Starting Items
As a support hero it’s your job to ensure that the Courier and/or Observer Wards are bought at the start of the game. Usually these duties will be split between yourself and another hero on your team, but you can’t always guarantee this in public games. If no one else ponies up the gold for one then you should bite the bullet and buy both for your team.
Good starting items if there’s another support on your team:
Courier or Observer Wards, a Set of Tangos, a Healing Salve, 3x Iron Branches, Clarity.
And if you’re forced to solo support:
Courier, Observer Wards, a set of Tangos, a Healing Salve, and an Iron Branch.
Early Game
Ensure that the Courier is upgraded into a Flying Courier when it comes off cooldown at the 3 minute mark. Also ensure that Observer Wards are always purchased when they’re off cooldown.
Get your Boots of Speed up and running as quickly as possible, then upgrade any Iron Branches you have into a Magic Wand, and then get to work on your core.
Core
Arcane Boots are a no-brainer on Dazzle; they allow you to use his abilities freely whilst at the same time being a good Mekanism carrier.
Talking of which - if there are no more viable Mekanism carriers on your team that will get it up much faster than you (such as a mid-Viper, or a jungle Chen), then Mekanism should be your go-to core item – it’s absolutely necessary for your team and the perfect extension for a ‘healer’ support like Dazzle. Be sure to check with your team to see if anyone else intends to build one before you get started on it though; if someone else does intend to build it then you can move straight onto a luxury item pick-up.
Luxury
Drums of Endurance – Drums of Endurance are a great option because they give your team bonus attack speed and move speed auras, whilst at the same time giving you plenty of stats and being easy to build into (since the components are so cheap you can buy them up whenever you have the spare unreliable gold, meaning you won’t lose much gold when you die). You may also have a Bracer from the early game as well, making Drums a natural extension to your inventory.
Urn of Shadows – Great option if you want some early mana regeneration and burst healing.
Medallion of Courage - Easy to build into and gives you a nice chunk of armour as well as mana regen, making it a good support pick-up. It is also a fantastic pick up for your team if you intend to Rosh early, or if the enemy team has a Linken's Sphere holder (use it as a cheap way to pop the Linkens).
Force Staff – Will significantly improve your mobility and make you feel less vulnerable. It’s an amazing escape tool for someone who is naturally very squishy, and can be used on allies and enemies, making it a great play-making item for clutch saves or to Force an enemy into bad positioning.
Eul’s Scepter of Divinity – The active is good for taking an enemy carry out of the fight for a couple of seconds. In that respect it’s sometimes referred to as a poor man’s Scythe of Vyse, the downside being that the hero selected cannot be attacked. Nonetheless, it’s useful for buying your team time. The other downside is that whilst a Scythe use is universally beneficial, Eul’s can sometimes be disadvantageous to your team, perhaps saving an enemy when they would otherwise have died, or trapping an allied hero who would otherwise have escaped. If you’re not confident in your decision making abilities in the heat of battle then don’t go for Eul’s (and for the love of the RNG Gods don’t Eul’s an enemy that you’ve just cast your ultimate on).
The other upsides of Eul’s are the fantastic mana regeneration and the burst +40 move speed – both fantastic buffs for a mana hungry and quite squishy hero such as Dazzle.
Scythe of Vyse – You're unlikely to be rich enough to ever afford it, and if you are the game is likely already won anyway, but if the game is really stretching out it can potentially be a decisive item to get. 3.5 seconds of lockdown on a key enemy hero is the reason Scythe is considered one of the most powerful items in the game.
Aghanim’s Scepter – On top of the +10 all stats, 250 health and 150 mana that the item provides, Aghanims increases the radius of Dazzle’s ultimate, Weave, from 575 units to 775 units, and increases the armour per second from 0.75/1.0/1.25 to 1.25/1.5/1.75 (in effect, it changes it from plus/minus 18/24/30 armour to 30/36/42), which makes it a great luxury item on him.
Heaven’s Halberd – A fantastic anti-carry item, thanks to the ability to disarm an enemy core for 3.0-4.5 seconds, Halberd will also give you a much-welcome chunk of health an evasion, making you a lot less fragile.
Situational
Sentry Wards, Dust of Appearance, Gem of True Sight – all-important detection. You’ll need at least one of these in your inventory if the enemy line-up features an invis hero. Sentry Wards will also allow you to deward rune spots, and Gem will give you superior vision going into the mid and late game.
Smoke of Deceit – If you roam with another support in the early stages of the game a Smoke will allow you to do so more quickly and without being spotted by enemy wards. Smoke will also come in handy in the post-laning phase if your team wants to gank as 5.
Pipe of Insight – If you didn't buy the team's Mekanism earlier on then consider getting a Pipe as a luxury item for your team. If you did buy the Mekanism then it's very risky getting Pipe as well - it's inadvisable to have both on one hero, doubly so when that hero is a squishy support hero like Dazzle.
Vladmir’s Offering – Yes, you’re ranged, so you won’t get the lifesteal bonus from Vlad’s, but you’re not buying it for yourself, you’re buying it for your team. Vladmir’s Offering is great to pick up on a support even if your team doesn’t consist of any melee heroes because of the bonus damage and armour it provides. If your team does have a melee core and no one else has purchased one then it’s an excellent utility item to purchase.
Ghost Scepter – The go-to luxury pick-up if you find the enemy team is able to bring you down quickly with physical damage (typically in the form of right-clicks). Most often this will be the enemy carry taking you out of the fight quickly with a few auto-attacks. Ghost Scepter will buy you a clutch 4 seconds of physical immunity, which gives you time to create distance between yourself and the enemy carry or at the very least buys your team 4 seconds of distraction time.
Necronomicon - Great if you’re part of a pushing line-up or your team is struggling to break the base. Also a great item for teamfights and for countering any invis enemy heroes. Useful stat gain as well.
Skill Build
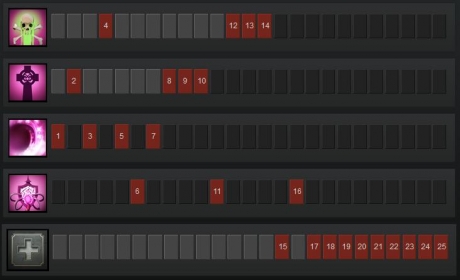 Poison Touch is Dazzle’s only stun and slow ability. Many players like to recommend maxing this first. I absolutely do not – for me it is the worst of his three non-ultimate abilities and I always skill and max it last.
Poison Touch has a slightly confusing skill description, so I’ll first detail exactly what it does: once cast on an enemy unit it will first slow them, and finally it will stun them for one second if it is at level 4. If it is not, it does not end in a stun. On top of that, for 7 seconds following the slow, it will deal minor physical damage. Sounds good, right?
Well, not really. You get a mere 3 second slow at level 1. Additional levels increase the extent of the slow, but they do not increase the duration. You do not get a true stun out of Poison Touch until level 4, and this stun lasts a pathetic 1 second. In short: when looking at the slow and stun potential of poison touch you need to max it as soon as possible if you actually want to get any value out of the ability – there’s no middle ground. Since the stun at level 4 is a mere 1 second I do not feel it is worth maxing first (who the hell picks a support hero for a 1 second stun that only takes effect 3 seconds after it’s cast? No one).
Turning to the damage element. Poison Touch deals physical damage over time. The totals work out as 112/160/208/256 respectively. As a DoT ability I feel this is low-to-middling damage output, and certainly not enough to convince me to max it first or make up for that mere 1 second of stun.
Shallow Grave allows Dazzle to cast a protective spell either on himself or on a chosen ally. This prevents them from dying for 5 seconds. I skill this second and max it second. It’s a fantastic support ability, allowing you to keep a core hero alive for at least an additional 5 seconds (more than that if you use Shadow Wave and Mekanism at the end of the duration). This allows them to keep fighting or to retreat to safety and heal.
Additional levels do three things in the case of Shallow Grave: 1) Decreases the mana cost from 140 to 110. 2) Decreases the cooldown from a huge 60 seconds to a relatively short 15 seconds. 3) Increases the cast range of the ability from 550 units to 1000 units. The last two upgrades are particularly great – the cooldown reduction means you’ll be able to use it more than once in lengthy engagements, while the range increase means you’ll be able to cast it from relative safety. It also means you’ll be able to cast it even if you arrive late to the party.
Shadow Wave is Dazzle’s healing ability. I recommend skilling and maxing it first. Shadow Wave heals 3/4/5/6 targets in a 475 unit radius of the main target of the ability, as well as Dazzle himself, and also damages any enemy units within 185 units of the targets healed for the same amount (80/100/120/140).
The amount each individual is healed for is fairly small (140 health at level 4), but remember that it allows you to heal multiple allies as well as yourself every time, making for a much more impressive heal total. On top of that it is a very spammable ability, with a 6 second cooldown at level 4.
Dazzle’s ultimate, Weave, is always worth skilling (levels 6, 11 and 16). A hugely impressive, but often under-estimate teamfight ability, Weave buffs any allied heroes it catches within its 575 unit radius by +0.75/1/1.25 armour per second for a total of 24 seconds. It also decreases enemy heroes’ armour by the same amount for 24 seconds.
If you manage to land Weave on a majority of the heroes in the game at the start of a teamfight your team is going to have an enormous armour edge for the duration of the teamfight; they will get stronger whilst your enemy team gets weaker with the effects magnifying as the teamfight drags on.
Gameplay Tips
 Since Poison Touch is a fairly minor irritation for most enemies it serves as a great way to break Linken’s Sphere later in the game as well.
You want to time Shallow Grave usage so that you land it just before your ally in question is about to die – timing is crucial becaise if you cast it too soon and you waste most of the 5 second duration, whilst if you cast it too late your teammate will be dead.
Shallow Grave in theory prevents the person you cast it on from dying for 5 seconds. However, there are some notable exceptions/counters which you will need to be aware of (and consider not picking Dazzle against these heroes): Axe’s Culling Blade completely ignores Shallow Grave. Goblin Techies also counters Shallow Grave with Suicide Squad, Attack!
Remember that the unit you Shallow Grave will continue to take damage, they will just not die until the ability ends. This makes it somewhat ineffective against heroes with damage over time abilities (such as Venomancer, Ogre Magi, Silencer, Viper, and Shadow Demon). In such cases try to restrain from casting Mekanism or Shadow Wave on the ally until the end of Shadow Grave, that way your healing will have greater chance of being sufficient for the hero to live.
| Tip: If you’re on your own and about to die anyway, you can use Shallow Grave and then instantly teleport back to your fountain. You can still be stunned during the channelling, but you cannot die whilst channelling the TP Scroll and so unless the enemy team commits a stun to stopping you, you will survive with 1 health. |
Shadow Wave can actually be a pretty potent nuke. By healing near a creepwave that an enemy is also near, you will heal multiple allied units and the enemy can take multiple instances of damage. Traditionally this has made Dazzle a popular pick up for illusion or minion-based heroes like Broodmother, Chen, Enchantress, Chaos Knight, Shadow Demon etc. as you can deal a significant amount of damage from Shadow Wave alone (240/400/600/840 max).]
Weave effectively has a 16 second cooldown, since it lasts 24 seconds and has a cooldown of 40 seconds. So long as you can ensure hitting multiple allies and enemies then feel free to use it before a fight has even broken out (provided you have good mana reserves); by the time you’re likely to need it again it’ll be off cooldown anyway.
| Note: Most people don’t realise this, but Weave actually provides extended sight (800 range) at the location it Is cast on for 8 seconds. |
Last Updated - Patch 6.82.