 Introduction
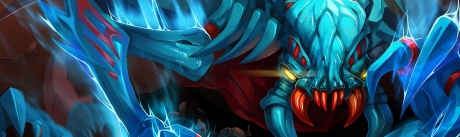
“Let’s weave a battle plan.”
Weaver is a ranged agility hero commonly played either as a solo offlaner or as a same lane farmer. With abilities that make him both highly elusive and very mobile, he is a tough hero to lockdown, but his low health pool makes him easy to kill if he does get caught.
For these reasons he is usually played as a 2 or 3 position carry/semi-carry, and is not usually picked in 4 protect 1 carry strategies.
Weaver's complete character profile can be found here.
Pros & Cons
Pros
- Highly mobile
- Very evasive
- Can be very aggressive and dive towers before Time Lapsing to safety
- Great chaser
- Good right-click damage output
- Can offlane
Cons
- Extremely squishy
- Requires farm
- Somewhat countered by detection
- Low stat gain
- Slow attack animation
Item Build
 Most in-game guides, and most old build guides on the internet, recommend Radiance rush on Weaver. This was arguably flawed in the first place, doubly so now that the Meta is so heavily focussed on early engagements. Radiance itself is a great item if farmed quickly enough, but on Weaver Radiance rush is really not ideal. Weaver is perhaps the squishiest carry/semi-carry in the game and you need to be present in those early teamfights, bringing your incredible early game richt-click damage to bear.
So this guide will not be recommending Radiance. Instead, I recommend early cost-efficient items that increase Weaver’s damage output considerably early on, whilst working towards a couple of key survivability items that will make you feel more confident getting involved in fights, rather than hanging back for fear the enemy team has detection and will burst you down.
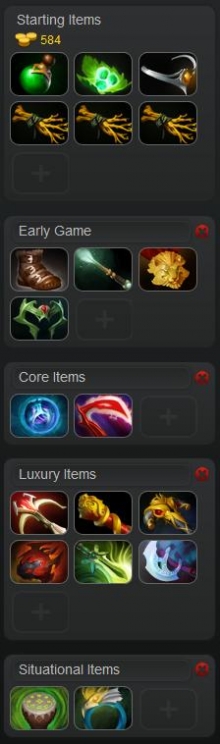
Starting Items
To start with you need some regen and cost-effective stat items. A good starting build for Weaver is:
2x Healing Salve, a Circlet, a Gauntlets of Strength, and an Iron Branch.
Before the 6.79 patch I would have recommended a set of Tangos instead of an extra Healing Salve, but if you opt for Tangos you cannot afford the Iron Branch. Instead, another option is to go for a set of Tangos, a Healing Salve, a Circlet, and 3x Iron Branch.
Early Game
Upgrade any Iron Branches you have into a Magic Wand, and upgrade any Wraith Band components you have into a Wraith Band. You can turn the Wraith Band into a Ring of Aquila as well if you want.
Medallion is a great item to get on Weaver. The mana regen will allow you to spam Shukuchi much more, and the minus armour active stacks with that you get from The Swarm, making you an amazing hero for minus-armour line-ups. Between The Swarm and Medallion, as well as the second attack Germinate Attack gives you, Weaver’s right click damage early on is not to be under-estimated.
Get Power Treads to boost your health pool and give you some bonus attack speed. Power Treads are the only viable early game boots for Weaver at present. Tranquil Boots are no longer viable on carry heroes and you are so incredibly squishy that Phase Boots really aren’t ideal (the power of Shukuchi also renders the added mobility of Phase Boots irrelevant). Indeed, you can actually go without Boots of Speed for quite some time in lane because of the max movespeed Shukuchi provides, and build up your other early game items first instead if you want.
Mid Game
At this stage I would consider Drums of Endurance, depending on the in-game situation. If you’re struggling to farm and fighting early then Drums are a very good cost-effective stat item that are extremely easy to build into. The advantage of this is you’ll get the item quite quickly, bringing it to bear in those early engagements, and you don’t need to fear losing lots of unreliable gold upon death, because you can spend it on those small components as you farm.
Most of the time you will probably want to skip Drums and aim straight for a big-ticket core item. Linken’s Sphere is the typical go-to item on Weaver in recent months, thanks to the stats, regen and active it provides. If the enemy team has any targeted lockdown/stuns then Linken’s will make you much more survivable. Do consider the enemy line-up carefully though - even if they have a few stuns, do they also have cheap, low cooldown spells that they can waste popping your Linken’s first? If yes, you may be better off getting Drums instead and going into your first damage item, skipping Linken’s entirely.
Desolator should be your first damage item. Between The Swarm, Medallion, and Desolator you have incredible minus-armour against a single target (at the very least -14, scaling up to a maximum of -33); you will bring most enemies into minus armour territory with just your first attack, allowing you to shred through enemies. Desolator also works against enemy buildings, making you a good split-pusher as well.
Luxury Extensions
At this point you need to decide where your strength lies. Are you primarily split-pushing or teamfighting? Are you dealing enough damage when you do take on enemy heroes, or are you being killed off too quickly?
If you’re primarily split-pushing or base sieging then consider get a Monkey King Bar or a Manta Style. Both will allow you to push much more effectively, Manta through its illusions and MKB through its damage and True Strike, which means you won’t miss when attacking uphill. MKB is also a great option if you need damage for teamfights.
If you’re primarily teamfighting, however, then the next question is do you need to tank up or do you need more damage? Your damage options are Monkey King Bar and Daedalus. Your tank options are Black King Bar (which gives you a decent chunk of health and Spell Immunity) or Heart of Tarrasque (which is all-in health). Butterfly is a good half-way option, and the top tier item for agility carries like Weaver, but don’t buy it if the other team have a Monkey King Bar because the evasion component of Butterfly will be nullified.
Skill Build
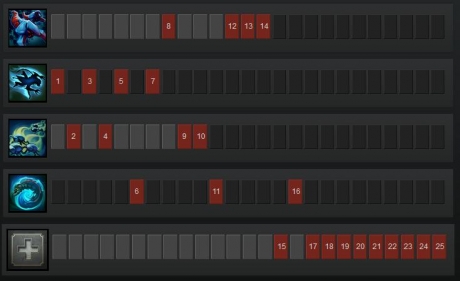 Get Shukuchi first regardless of lane. You’re extremely vulnerable to level 1 ganks if you don’t have Shukuchi, so you’re better safe than sorry. You should max Shukuchi first as well. It deals more damage with levels and most importantly significantly reduces the cooldown. Once maxed it will have a cooldown of just 6 seconds, whilst lasting 4 seconds itself, meaning you’ll only be vulnerable/visible for 2 seconds if you time it properly.
The second skill to max is Geminate Attack. This effectively gives you two attacks for the price of one whenever it is off cooldown. Max it, ideally, by level 10, at which point it will have a very low cooldown of 3 seconds.
Always get Time Lapse (levels 6, 11 and 16). Initially the 150 mana cost of the ability makes it very expensive given your low mana pool, but try to save sufficient mana to cast it should you ever get ganked or brought down low. Once maxed it will not cost any mana at all and will only have a cooldown of 40 seconds, so feel free to use it more freely at that point.
Max The Swarm last, but definitely take it over stats. An early point in it is great just for the minus armour it provides, so I get a point in it at level 8 if not earlier. Cast it at the start of teamfights. It has quite a large range and travels a massive 3,000 units so as long as the enemy team is relatively close together you should be able to hit most of them.
In the midst of a fight enemy heroes are unlikely to prioritise attacking your Swarm Beetles because it takes 4 hits to kill each one off, meaning the minus armour will slowly accumulate on them (1 per second until the ability ends). The Swarm is often under-estimated, both by Weaver players and by those facing off against Weaver, but it is actually a great ability that will make your team’s physical damage hurt that much more.
Gameplay Tips
 Weaver has no lockdown, but his chasing potential is incredible. Once Time Lapse is up you can dive towers relatively safely; cast The Swarm, Shukuchi ahead of the enemy, right-click attack (with bonus attack from Geminate). Shukuchi and Geminate Attack both have very low cooldowns, abuse this and rinse and repeat the combo as much as necessary. If you get low, or fear being stunned, use Time Lapse to retreat.
Shukuchi is a very versatile ability. Defensively it can be used to escape thanks to it granting you invisibility, and offensively the max movespeed it supplies makes it easier to chase down enemies. Try to break Shukuchi slightly ahead of the enemy hero if they’re fleeing from you, that way you should be able to get more attacks in before needing to continue chasing.
Time Lapse can be used to return to the fight if you die and buyback. If triggered soon enough you’ll Time Lapse straight back to shortly where you were before you died. This is best used if you were suddenly burst down and you can time it to before the burst was applied.
Early on, Weaver’s poor attack animation can make it tricky timing last hits properly, but note that a follow up attack from Geminate Attack will apply if it’s off cooldown, which can make last hitting easier.
Last Updated - Patch 6.82.