 Introduction
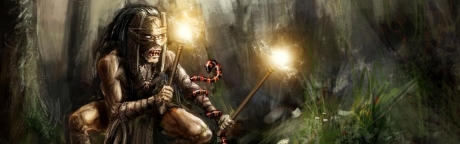
“Beat you like a drum!”
Shadow Shaman is a support hero with amazing lockdown capability and fearsome pushing power, both in terms of wave clearance and building damage output. He is one of the most specialised supports in the game, with two of his skills devoted to lockdown and two to AoE damage output.
You can find our complete character profile for Shadow Shaman here.
Pros & Cons
Pros
- Amazing pusher
- Good Building killer
- Amazing anti-push
- Great lockdown
- Good burst magic damage
- Largely item independent
Cons
- Terrible move speed
- Extremely squishy
- No escape mechanism
- Huge mana problems early on
- Scales off in the late game
Item Build
Shadow Shaman is typically played as a lane support, especially in public matchmaking, and so this build guide is geared towards this style of play.
In competitive Dota he is sometimes chosen as a solo mid core, where the goal is to gain a quick level 6 and push early on. This is much less commonplace in ordinary matchmaking, where Shadow Shaman is for the mostpart considered strictly support and teams lack the organisation necessary to pull off early co-ordinated pushes.
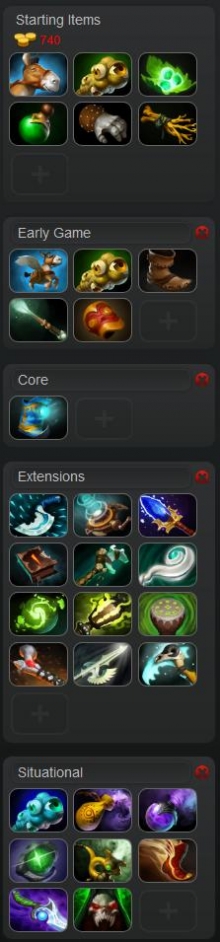
Starting Items
As a support hero it’s your job to ensure that the Courier and/or Observer Wards are bought at the start of the game. Usually these duties will be split between yourself and another hero on your team, but you can’t always guarantee this in public games. If no one else ponies up the gold for one then you should bite the bullet and buy both for your team.
Good starting items if there’s another support on your team:
Courier or Observer Wards, a Set of Tangos, a Healing Salve, Gauntlets of Strength, and an Iron Branch.
And if you’re forced to solo support:
Courier, Observer Wards, a set of Tangos, a Healing Salve, and an Iron Branch.
Early Game
Ensure that the Courier is upgraded into a Flying Courier when it comes off cooldown at the 3 minute mark. Also ensure that Observer Wards are always purchased when they’re off cooldown.
Get your Boots of Speed up and running as quickly as possible. Shadow Shaman has absolutely terrible base movespeed (285) and he’s very squishy, so without Boots of Speed you may end up being easy pickings for enemies during early rotations and ganks.
Upgrade any Iron Branches you have into a Magic Wand, and any Bracer components into a Bracer.
Core
Keep ensuring Observer Wards are bought whenever they’re off cooldown, and in the meantime work towards your Arcane Boots. These really are the upgraded boots of choice for such a mana hungry hero as Shadow Shaman who has no in-built mana regeneration ability like Lich. Your abilities all have fairly high mana costs and for the mostpart low cooldowns, so you’ll be burning through a lot of mana. Arcane gives you both mana regeneration and a nice boost to your mana pool.
Core Extensions
After that things are fairly open for Shadow Shaman. Unlike a lot of supports who have a strict form of item progression, Shadow Shaman has a lot of flexibility and what you get should depend on the situation in the actual game. In competitive Dota he will often rush a Blink Dagger. In public matchmaking Mekanism and Force Staff are more common pick-ups.
Blink Dagger – Your Hex ability has such a tremendously low cast time that it’s almost instant, making you a great Blink initiator. Blink into Hex into Wards and auto-attacks (or Shackles if you failed to trap the enemy in your wards) will be enough to kill off a lot of heroes in the mid game. Even if you’re unable to insta-kill heroes with this burst output Blink will still make you a great Blink initiator when trying to gank as a team and grab pick-offs.
Blink also helps somewhat remedy your dreadful mobility, but only for the mostpart in offensive situations. For a more defensive and team-based mobility item consider…
Force Staff – It’s an amazing escape tool for someone who is naturally very squishy and can be used on allies and enemies, making it a great play-making item for clutch saves or to Force an enemy into bad positioning. It also gives you some stats, whereas Blink does not. Force is the safer option, but gives you less of a positioning advantage, especially when playing aggressively.
Mekanism – If there are no more viable Mekanism carriers on your team that will get it up much faster than you (such as a mid Viper, or a jungle Chen), then Mekanism should be your go-to core item in most situations. Be sure to check with your team to see if anyone else intends to build one before you get started on it though.
The burst heal and armour it allows you to give your teammates in fights, and the low cooldown that means you can sustain pushes, makes it one of the best support items in the game.
Luxury Extensions
Whilst Blink/Force and Mekanism are the most likely candidates for core items, the following are good luxury options to consider:
Drums of Endurance – I recommend Drums on a lot of heroes, especially supports like Shadow Shaman. You're slow, squishy, and supposed to provide support to your team. Drums goes a little way to combating all of these points. The attack and move speed aura affects teammates, the stats gain makes you a little bit tankier, it's a very cost effective item that's easy to build into, and since you already likely have a Bracer anyway it means you can grab a Drums without taking up an extra item slot.
Aghanim’s Scepter – Aghanims gives you solid stat gain - +10 all attributes, 200 health and 150 mana, but the main reason it’s purchased is for the buff to your ultimate. The damage dealt by Serpent Wards is increased from 40-45/55-60/70-75 to 85-90/105-110/125-130 – a substantial damage increase that will make them that much more deadly to both enemy heroes and buildings.
Refresher Orb – A popular luxury item for Shadow Shaman when games are going well or when transitioning into the late game. It’s basically bought purely for the ability to plant two sets of Serpent Wards in a single teamfight or push. Enemies will be reluctant to engage into them unless they have superior range, and buildings will fall extremely quickly so long as there’s no backdoor regeneration. Simply planting two sets of wards on the highground can net you a tower and set of barracks even if your team gets wiped in the ensuing teamfight.
Necronomicon – Great if you’re part of a pushing line-up or your team is struggling to break the base. Also a great item for teamfights and for countering any invis enemy heroes.
Ghost Scepter – If the enemy carry tears through you like a warm knife through butter than save up for a Ghost Scepter. You'll buy yourself 4 seconds in which to do something, such as Force Staff to safety, disable the carry using Hex or Shackles, or just distract them during a teamfight for a full 4 seconds (that's 4 seconds the more important heroes on your team have to punish the enemy team).
Heaven’s Halberd – Also another good defensive item that is often overlooked. While Ghost Scepter makes you invulnerable to enemy physical attacks for 4 seconds, Halberd will prevent them attacking anyone on your team for 3-4.5 seconds. On top of that you gain a nice chunk of strength and survivability.
Rod of Atos – A large chunk of health and mana, and a potent slow which acts as a pseudo-disable when added to your existing abilities. Good for ganking and if your team is ahead, less useful if you’re playing on the back foot because the slow will be of little consequence to enemies.
Eul’s Scepter of Divinity – The active is good for taking an enemy carry out of the fight for a couple of seconds. In that respect it’s sometimes referred to as a poor man’s Scythe of Vyse, the downside being that the hero selected cannot be attacked. Nonetheless, it’s useful for buying your team time. The other downside is that whilst a Scythe use is universally beneficial, Eul’s can sometimes be disadvantageous to your team, perhaps saving an enemy when they would otherwise have died, or trapping an allied hero who would otherwise have escaped. If you’re not confident in your decision making abilities in the heat of battle then don’t go for Eul’s (and for the love of the RNG Gods don’t Eul’s an enemy that you’ve just cast your ultimate on).
The other upsides of Eul’s are the fantastic mana regeneration and the burst +40 move speed greatly helps alleviate your move speed issues. On Shadow Shaman it also allows you time to place Serpent Wards on the target.
Scythe of Vyse - The ultimate late game item for most intelligence heroes. It's very good on Shadow Shaman too, giving you a third source of disable, although you won't get as much out of the bonus stats as most typical Scythe carriers that can transition into semi-carry roles. The 3.5 second Hex is superb in teamfights and for picking off enemy heroes though. The enormous cost makes it prohibitively expensive for most supports, but if the game is going very late and you're almost 6 slotted it's a great option.
Situational
Sentry Wards, Dust of Appearance, Gem of True Sight – all-important detection. You’ll need at least one of these in your inventory if the enemy line-up features an invis hero. Sentry Wards will also allow you to deward rune spots, and Gem will give you superior vision going into the mid and late game.
Smoke of Deceit – If you roam with another support in the early stages of the game a Smoke will allow you to do so more quickly and without being spotted by enemy wards. Smoke will also come in handy in the post-laning phase if your team wants to gank as 5.
Pipe of Insight – A very expensive item for a support, and not an ideal pick-up if you bought the team’s Mekanism (having both on one hero is very risky, especially a squishy one like Shadow Shaman), but always a good item to have if the enemy team has any magic damage (which they almost certainly will). Quick rule of thumb: go for it if you didn’t buy the Mekanism earlier.
Boots of Travel – Great for the late game, when you need to free up a slot which would otherwise be taken up by a TP Scroll. With this, you combine your Boots and TP Scroll slot into one, allowing you to put a slot to better use if you’re about to become 6 slotted. This is a viable option because by this stage you should no longer need the health regeneration from Tranquils anyway, and you may well need to TP back to defend the base in an emergency.
Diffusal Blade – A very situational pick-up. The trend of Diffusal on supports, like a lot of novel and unusual item pick-ups, traces back to the competitive Dota scene. It’s used on a support, primarily, in the super late game to purge the effects of Scythe when used on one of your cores. This way to effectively cancel the impact of a 5675 gold item with a 3300 gold item, providing you have fast reactions and purge your ally quickly.
Vladmir’s Offering - Yes, you’re ranged, so you won’t get the lifesteal bonus from Vlad’s, but you’re not buying it for yourself, you’re buying it for your team. Vladmir’s Offering is great to pick up on a support even if your team doesn’t consist of any melee heroes because of the bonus damage and armour it provides. If your team does have a melee core and no one else has purchased one then it’s an excellent utility item to purchase.
Skill Build
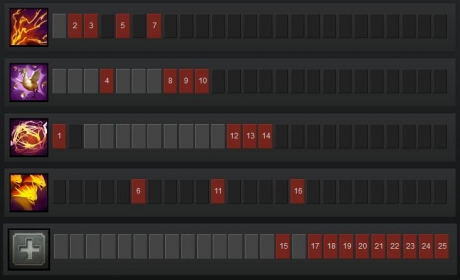 Ether Shock is usually skilled either second or last, but is typically maxed first. A magic damage nuke ability, Ether Shock sends forth a cone of energy that can hit up to 7 targets when maxed, dealing 140/200/260/300 damage to each. With a fairly low cooldown of 8 seconds it is somewhat spammable, but a high mana cost prohibits this until Shadow Shaman has sufficient mana or mana regen to support its regular usage.
Ether Shock is maxed first more often than not so as to maximise Shadow Shamans nuke/harassment damage and also to accelerate his pushing ability. Once he hits level 7 he can quickly clear a creep wave using Ether Shock and then advance to the tower, where he can place his Mass Serpent Wards to deal considerable damage to it.
Hex is usually skilled last (at level 4) but is usually maxed second. One of two lockdown abilities Shadow Shaman possesses, Hex turns an enemy unit into a chicken for 1.25/2/2.75/3.5 seconds. It’s the more useful of his lockdown abilities as it allows him to attack and cast other abilities while the unit is hexed, and so is maxed first, but as the duration is initially very short, it is less useful early on.
Shackles is his second lockdown ability. It is usually skilled first but maxed last. This is a channelled ability, which means Shadow Shaman is also effectively locked down for its duration. This is usually a good trade off, as he’s a support and will mostly target enemy cores with it, but it leaves him very vulnerable and so is usually considered a secondary lockdown for after he’s used his other abilities.
Shackles has a lengthy duration, even at level 1, of 2.75/3.5/4.25/5 seconds, so its scales well but as it is used less often and has more limited use it is still skilled last – 1 point is sufficient for most of the game.
Shadow Shaman’s ultimate, Mass Serpent Ward, is always skilled (levels 6, 11 and 16). A tremendous pushing ability, as well as a good teamfight ultimate, it places a set of 10 serpent wards on the ground at his chosen location. They last for 45 seconds and each deals 40-45/55-60/70-75 damage to nearby enemy units.
Mass Serpent Wards is a very versatile ability, despite the wards being static. It melts towers and buildings, but can also be used to trap an enemy hero and kill them, and can even be used to deter enemy pushes.
Gameplay Tips
 Shadow Shaman is a fantastic pusher. He excels at both aspects of pushing: clearing creeps waves, and melting buildings. He can do the former with Ether Shock, quickly clearing creep waves and pushing the creeps towards the enemy towers/buildings, and does the latter with Mass Serpent Wards, which can easily take down towers and barracks so long as they have the support of a creepwave.
Ether Shock also allows Shadow Shaman to deal significant harass in the laning phase. However, as the mana cost is fairly high (95/105/135/160), don’t spam it unless you have Arcane Boots, or some other source of mana regeneration; as lane support you should always keep enough in reserve to cast one or both of your disables, should the enemy team gank your carry.
| Tip: Hexed targets have any damage block or evasion removed, making it great against evasion-based carries like Phantom Assassin or agility carries who purchase Butterfly. |
Once you hit level 6 look for an opportunity to either kill of an enemy hero or a tier 1 tower using Mass Serpent Wards.
If attempting to secure a kill using Mass Serpent Wards, Hex the target first and then place the Wards directly on top of them. Most of the time this will trap the enemy within the wards, allowing for an easy kill. If you miss, try to hold them in place with Shackles – the long duration means your wards should get off plenty of damage for the duration. If the enemy is still alive and you have mana left, finally use Ether Shock to finish them off.
| Note: Mass Serpent Wards actually deal physical damage, not magical damage. They also deal area of effect splash damage, which reduces with distance, so the closer the enemy or enemies are the more damage they deal. |
Remember to control your Mass Serpent Wards! Those who are new to the hero often don’t realise or forget to do this. You should prioritise your targets and ensure the Wards aren’t wasting precious time attacking enemy creeps when they could be dealing damage to heroes.
Last Updated - Patch 6.82.