 Introduction
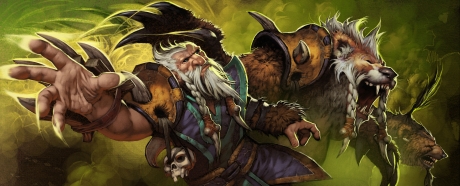
“We fight as one!”
Lone Druid is a unique agility hero capable of taking ranged or melee form. However, regardless of form, his main source of damage actually comes from his summon – Spirit Bear – which is unique among all summons in the game in that it has its own unique inventory space.
Lone Druid's complete character profile can be found here.
Pros & Cons
Pros
- Highly versatile laner – can offlane, mid lane, safe lane, or jungle
- Strong pusher
- Tanky (in True Form)
- Strong presence at all stages of the game
- Two inventories to potentially fill out
Cons
- His disable is RNG luck based
- Needs farm
- Requires good micro skills – has very high skill floor and ceiling
- Highly ineffective if Spirit Bear dies
- Spirit Bear has a high bounty of 300 gold and experience for enemy heroes
- No escape mechanism
- Slow move speed in True Form, but extremely squishy if not in True Form
Item Build
Because of his unique ability to equip items on his summon – his Spirit Bear – Lone Druid has one of the most unique forms of item progression in the game. Lone Druid himself will, for the most part, have a very sparse, basic set of items in his inventory (indeed it’s not uncommon for him to have nothing but basic Boots of Speed for the vast majority of the game). His item progression instead revolves around equipping his Spirit Bear to become a strong source of damage output, regardless of how he’s being laned.
Due to the fact that both Lone Druid and the Spirit Bear have inventory spaces, I’ll be dividing the sections below according to who carries what, with the image on the right of the screen given you an easy at-a-glance overview of the items for each.
Starting Items
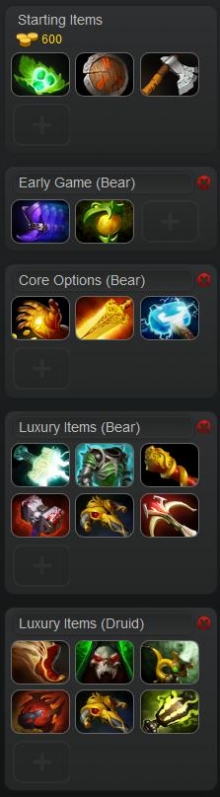 Lone Druid himself doesn’t need much in the way of starting items, instead a Stout Shield and Quelling Blade are equipped on the Spirit Bear, so that he can tank creep waves (if pulling them and disrupting their standard pathing), jungle camps (if jungling), and enemy harassment (if laning in the traditional manner) and also become a more efficient last hitter.
Lone Druid will typically stand back from the creep wave if laning – within experience ranged but outside of harassment range – and the Spirit Bear will take the brunt of harassment damage and will secure last hits. If jungling, last hitting becomes and obvious joint effort, though again the Spirit Bear will tank the damage.
A set of starting Tangos will provide you with some regen should you happen to get low yourself. If the Spirit Bear gets low on health you can either send him back to the fountain to heal or re-summon him (although note that the cooldown is extremely lengthy, so you’ll typically want to avoid doing this).
Early Game (Bear)
Phase Boots are your first purchase for the Spirit Bear. They give him some much-needed move speed, chasing power from the active, and a nice chunk of damage. Finally they also help cut down on kiting and collisions, thanks to the Phase active.
Orb of Venom is a good value pick-up at this stage for the Bear as well. The 12% slow is not to be under-estimated, and will make the pursuit of enemy heroes significantly easier, allowing your Bear to get off more attacks and (hopefully) an Entangling Claws proc.
Early Game (Druid)
The Druid himself, meanwhile, only really needs basics Boots of Speed at this stage. Your highest priority is kitting out your Spirit Bear, as he is the one that will be doing most of the fighting, and once you get True Form you become significantly tankier and so don’t need to fear burst magic damage.
Tranquil Boots can be considered at this stage if you are laning and facing considerable harass, as they will allow you to stay in the lane, but again, ideally you want to be trying to fill out your Bear’s inventory. The major downside of having two inventories is that you either spread yourself thin on both of them or you virtually ignore one of them and fill out the other – the latter option is better, and it is the Bear who gets the spoils and the Druid who languishes with basic items for a large portion of the game
Core Options (Bear)
Going forwards you have to decide which core option to go for. There are three typical builds:
Hand of Midas – The Hand of Midas rush is the most common. Lone Druid needs a lot of farm and a HoM will really accelerate his progress once you have it up and running. It’s also worth noting that, early on, the Spirit Bear’s damage comes from right clicks, yes, but also from getting an Entangle proc, and so attack speed becomes critical. Hand of Midas therefore actually does contribute quite substantially to your DPS.
Hand of Midas also keeps your options open and doesn’t commit you to one specific build – if you get it in a good timing window and continue to farm well thereafter you can also build Radiance. If you’re making slow progress then you can go the Maelstrom route.
Radiance – The expensive option, but again a highly popular one. Radiance helps remedy one of Lone Druid’s key weaknesses: he does not deal AoE damage. He is incredibly solo-target oriented. Radiance gives him an AoE damage presence thanks to the 50 magic damage per second Radiance burn.
Other advantages include a large damage boost for your Bear and the ability to quickly flash farm the jungle and creep waves. You can also finally farm remotely – whilst the Spirit Bear cannot attack if separate from Lone Druid, the Radiance burn does still continue to work (it can be quite amusing chasing around squishy supports with a Radiance Spirit Bear, as there’s little they can do other than flee to the fountain, but be careful not to do so at the expense of continuing to farm and gain experience on the Druid).
Maelstrom – The cheap option. If you’re not farming well then Radiance is really ill-advised. It’ll take you a while to build up the gold required and will leave you vulnerable to losing large chunks of unreliable gold should you do. Maelstrom by contrast is easy to build into as it consists of three individual items that are all reasonably priced.
It also gives your Bear a little of everything he needs to become a DPS’er – a nice chunk of attack speed, a small direct damage boost, and an AoE presence in the form of the Chain Lightning passive. That Chain Lightning passive also increases your farming rate. It’s not as high-impact as a Radiance, but it will put you in a fighting state.
Luxury Items (Bear)
Assault Cuirass – Assault Cuirass is always your highest priority luxury item. It’s amazing on Lone Druid for several reasons:
- Your Bear gains a huge +10 armour and 35 attack speed for himself, and you and your teammates gain +5 armour and 20 attack speed.
- The -5 armour that applies to nearby enemies also works on enemy creeps and enemy buildings, making it a great overall teamfight and pushing item, synergising perfectly with the Spirit Bear’s own pushing potential.
- Because it has auras, it’s an item that benefits both your Spirit Bear and your hero, so you get even more value out of it than heroes usually do.
- It doubles up as a defensive and an offensive item, and can easily be switched to your Druid if your Bear becomes 6 sotted.
Mjollnir – Always a fantastic item for your Spirit Bear – a huge +80 attack speed and a bonus 24 damage really sends his DPS potential through the roof.
The passive chain lightning ability makes it great for quickly clearing creep waves and jungle camps, and the static charge active will really punish teams that decide to focus your Bear down.
Finally, as you’ll likely be purchasing a Maelstrom for your Spirit Bear at some point, the Mjollnir upgrade becomes a no-brainer later in the game.
Monkey King Bar - Very high damage, a small attack speed boost, and True Strike, which will allow you to counter any evasion heroes (such as Phantom Assassin), agility carries that purchase Butterfly, or strength/support heroes that buy Heaven’s Halberd. MKB is usually purchased after your Bear has a core item plus an Assault Cuirass.
Skull Basher – A very popular item, Skull Basher gives your Bear an additional 40 damage, but the best thing about it on the Spirit Bear is that the 25% chance to stun an enemy hero for 1.4 seconds is fantastic for giving him lockdown so that he can actually pound away at enemies. Between the 25% chance for a 1.4 second stun, and an innate 20% chance at a 3 second entangle, the Spirit Bear has amazing lockdown potential.
Later on, when inventory space becomes scarce, the Skull Basher can be upgraded into an Abyssal Blade, granting the Bear an extra 60 damage on top of the existing 40, and an extra form of lockdown – Overwhelm, which is as an active 2 second stun that goes through spell immunity.
Black King Bar – Not a traditionally popular pick-up on either Lone Druid or his Spirit Bear, but it’s sometimes a crucial luxury item pick-up. If the Bear is being shut down in teamfights the spell immunity from Black King Bar can be essential to allowing him to get off his auto-attacks.
Daedalus – Very high damage (+81) and a chance to Critical Strike, Daedalus is typically a popular 5th or 6th slot item for the Spirit Bear.
Luxury Items (Druid)
Once your Spirit Bear is substantially kitted out (usually at least his core and one luxury item) you can start picking up some items for your Druid. The Druid never becomes a true DPS force himself, instead his luxury item progression revolves around items that tank him up and/or that provide utility for both himself, his Spirit Bear and his teammates.
Pretty much any defensive item in the game is useful on Lone Druid, but some of the more frequent pick-ups are:
Boots of Travel – If you stuck with basic Boots of Speed throughout the early and mid game then BoTs are the best boot upgrade. They free up a slot you would otherwise have reserved for a TP Scroll, make you much less susceptible to split-push in the super late game, and have the highest move speed of all upgraded boots – something that’s not to be ignored given the True Form Druid’s slow bas move speed.
Vladmir’s Offering – Arguably THE best utility item to get on Lone Druid. Vlad’s is a strong carry item that is rarely purchased by core heroes because of their lack of spare item slots. Not a problem for Lone Druid, given he essentially has 12 slots to work with.
The fact that its bonuses are aura-based makes it even better for Lone Druid – both the Spirit Bear, the Druid, and his teammates benefit from its purchase – they all get 16% life steal, 15% bonus damage, 5 armour, and mana regeneration.
Pipe of Insight – This one’s a bit more situational. The 400 spell damage block is great for protecting the Bear, the Druid, and any nearby teammates, and the item’s innate defensive attributes of 30% magic resistance and health regeneration are good to have on the Druid, whose item progression revolves around tanking up.
You may not be the best candidate for Pipe though. It’s expensive, and given that you have a lot of high priority items you need to purchase before even thinking about Pipe, it’s going to be a long time before you’re aiming for one. By that time it’s possible if not probably that someone else on your team is working on one (in which case a naked Hood of Defiance on the Druid is sufficient).
Heart of Tarrasque – It goes without saying that Heart is a good item on the Druid, making him even tankier and harder to kill in teamfights. If you get a Heart up and running you usually won't die in teamfights and the enemy team will instead take out your allies before focussing on you.
Black King Bar – BKB is a good luxury pick up on almost every hero in the game. For the Druid it’s more about survivability than being able to contribute to teamfights, given his Bear is his main source of damage. If you find you get stun-locked or Hexed and brought down too quickly as a result, then go for a BKB. Those 10-4 seconds of Spell Immunity will prevent the enemy locking you down in teamfights.
Heaven's Halberd - Halberd will make you deceptively tanky. 20 strength is a nice boost to your health pool whilst 25% evasion means you'll mitigate a lot of damage. As with the last two items I described it also has utility for your team, thanks to the ability to Disarm an enemy physical DPS'er for 3.0-4.5 seconds.
Ghost Scepter – Ghost Scepter will buy you a clutch 4 seconds of physical immunity, which gives you time to create distance between yourself and the enemy carry or at the very least buys your Bear and teammates 4 seconds of distraction time. Get both this and a Heaven’s Halberd and the enemy carry will loathe the very sight of you.
Skill Build
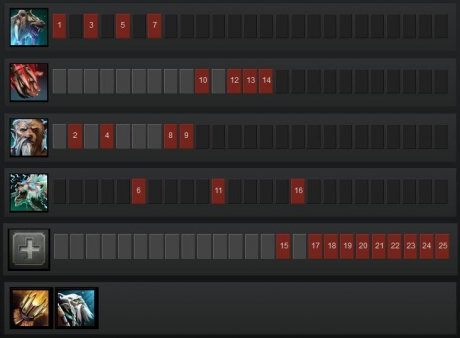 Spirit Bear allows you to summon your Spirit Bear companion, which can equip its own items. It is always skilled and maxed first. The Spirit Bear has 1400/1800/2300/2700 health, is permanent (unless killed), and has three unique abilities: Return (which allows you to teleport the Bear to your Druid), Entangling Claws (a chance-based disable), and Demolish (a passive which gives the Bear 33% spell resistance and increases his damage to buildings).
Spirit Bear should be thought of as your ‘true’ ultimate. The Bear is your key source of damage output, as well as a source of gold and experience for the enemy team if killed, and the ability comes with a hefty 180/160/140/120 second cooldown, so you want to do all you can to avoid getting it killed unnecessarily.
| Important: The Spirit Bear can only attack if it is within 1100 units of Lone Druid. If it isn’t, it will simply not attack, though it can still be moved about freely. |
Rabid is an active which increases the attack and move speed of the Druid and his Bear. It is always skilled and maxed last. Rabid increases your movespeeds by 5/10/15/20% and your attack speeds by 10/20/30/40%.
Although initially only lasting 10 seconds, Rabid’s duration is actually increased to 40 seconds by Lone Druids next ability. With a cooldown of 30 seconds it thus becomes a permanent bonus for the two of you providing you remember to cast it (and have the mana to do so).
Synergy is a passive ability which increases a number of your Bear’s and Druid’s attributes. It is always skilled and maxed second.
Synergy increases the Bear’s damage by a flat 10/20/30/40 and his move speed by a flat 10/20/30/40 as well. It also increases the duration of Rabid by 10/20/30/40 seconds. Finally, it increases Lone Druids own health when in True Form by 100/200/300/400.
True Form is Lone Druid’s ultimate and it is always skilled (levels 6, 11 and 16). True Form transforms your Druid into a bear, greatly increasing his health and armour but at the cost of move speed and his ranged attack form.
True Form also grants Lone Druid an additional ability – Battle Cry – which increases the Druid and Bears’ armour (5/10/15) and damage (50/75/100). It lasts just 6 seconds, though, and has a cooldown of 60 seconds.
Gameplay Tips
 As soon as you gain control of Lone Druid skill and summon his Spirit Bear. The cooldown will then immediately start ticking down. Given that it’s an extremely lengthy 180 seconds at level 1 if your Bear dies in the first 3 minutes of the game you will not be able to re-summon it, so the sooner it’s put on cooldown at the start the better.
The cooldown isn’t the only reason you want to avoid the Bear dying – it gives a whopping 300 gold and 300 experience bounty to any enemy hero that manages to kill it. If it gets low on health either re-summon it or send it back to the fountain to heal – it’s better to play safe than sorry now that the bounty is so high.
| Note: If the Spirit Bear dies, Lone Druid himself also takes what is called ‘backlash’ damage, of 10% max health as Pure damage. You can avoid this damage by re-summoning the Bear or by denying it. Remember, however, that the Bear cannot be re-summoned if it has taken player-based damage within the last 3 seconds. |
You need to be capable of micro-ing in order to play Lone Druid effectively. Having three keybinds set is a good idea: 1 for the Druid on its own, 1 for the Bear on its own, and 1 for the two together. This way you can kite with the Druid whilst commanding the Bear to attack pursuers, for example.
Don’t forget to use the active abilities for items on the Spirit Bear. The active on Phase Boots is especially useful for chasing enemy heroes and getting in extra attacks, for example. Later on items like Mjollnir, Black King Bar and Abyssal Blade are all frequent pick-ups with a lot to offer if you use them properly.
Return, which is an active ability on the Bear, allows you to teleport the Bear back to the Druid every 5 seconds, providing it has not taken player-based damage within the last 3 seconds. This allows you to farm remotely using the Bear if it has Radiance while you farm in safer territory, you can then return the Bear to yourself at will.
At level 3, the Spirit Bear is granted the Entangling Claws ability. It gives him a 20% chance to entangle a hero or creep for 3 seconds and 9 seconds respectively, dealing 60 damage per second for the duration and disabling the enemy. Thus when Lone Druid hits level 5 he becomes a very strong hero capable of quickly killing off heroes in 1-on-1 engagements. If your enemy laner does not respect or expect the damage output from Entangling Claws then you can seriously punish them.
The Spirit Bear’s own Demolish ability, which he acquires at level 4, not only makes him more resistant to magic damage, it also makes his base sieging capabilities much stronger. It grants him a bonus 40% damage to structures. If you see an opportunity to push a tower then do so – the Spirit Bear brings them down deceptively quickly.
| Note: The Spirit Bear can only use three of the five runes in the game – invisibility, haste, and regeneration. If he attempts to pick up double damage or illusion then he will simply destroy them. |
Once you have two points in Synergy, Rabid’s duration is the same as its cooldown, meaning it can be a permanent move speed and attack speed buff for the Druid and Bear.
| Note: The percentage-based move and attack speed increases from Rabid stack with percentage-based increases from other sources. |
Although the decreased move speed from True Form can be very annoying, in the post-laning phase of the game most of the time you will want to remain in True Form, as the bonus armour and health outweigh the disadvantages, especially when fighting or being ganked.
| Tip: Upon casting True Form, there’s a brief period where Lone Druid can disjoint projectiles, including stuns, attacks, and abilities. |
Don’t forget to cast Battle Cry whenever your Bear is fighting enemy heroes or trying to take down enemy structures – the bonus damage and armour is great for it to have in these cases.
Last Updated - Patch 6.83.