 Oracle Build Guide
"Let's get the future off to a good start, hmm?"
Oracle is a ranged intelligence spellcaster that is typically played as a support hero, and that is what this particular build guide will be geared towards.
Oracle has tremendous burst nuke and healing potential, and an incredibly powerful single target ultimate that provides an incredible buff to either Oracle himself or, more likely, one of your team’s cores. All together it makes him a top tier pick, but be warned – his skill floor is incredibly high and beginners should avoid playing him until they’ve learnt his skills inside and out.
You can find Oracle's complete character profile here.
Pros & Cons
Pros
- A top tier pick
- High burst damage potential
- Similarly high healing potential
- Incredibly powerful ultimate
- Good anti-carry and carry buffer
- Support hero that fits into pretty much every line-up
- Good attack range
Cons
- Very mana intensive
- Very high skill floor
- Squishy
- Must be fluent in his abilities and their various combinations
- If not used properly, his abilities will actively harm your team and help the enemy team
Item Build
 As a support hero it’s your job to ensure that the Courier and/or Observer Wards are bought at the start of the game. Usually these duties will be split between yourself and another hero on your team, but you can’t always guarantee this in public games. If no one else ponies up the gold for one then you should bite the bullet and buy both for your team.
Good starting items for support Oracle are:
Courier and/or Observer Wards, Tangos, Healing Salve.
If you divide support duties with another players on your team then you can round out your inventory with some Iron Branches, additional Clarities, or an early Smoke of Deceit or Sentry Wards (if the game requires them – hold off on purchasing Sentries until you’re sure you’ll need them to deward).
Early Game
Ensure that the Courier is upgraded into a Flying Courier when it comes off cooldown at the 3 minute mark. Also ensure that Observer Wards are always purchased when they’re off cooldown.
Get your Boots of Speed up and running first. Oracle actually has decent base move speed (305), but is still squishy and vulnerable to early rotations and ganks, so Boots are a must.
Upgrade any Iron Branches you have into a Magic Wand, and if you feel the need for some early stats and health you can opt for an earlier Bracer (you can upgrade this into Drums of Endurance later on if no one else on your team opts for them).
Finally, an Urn of Shadows is great on Oracle. You gain some much-needed mana regeneration, some health, and additional burst healing potential on top of your skillset.
Core Items
Arcane Boots - A no-brainer for a hero that is as mana hungry as Oracle. They have the added bonus of allowing you to provide utility for your teammates as well.
Arcane Boots are probably all you’re going to be able to afford for quite some time, and should rarely be prioritised over Observer Wards, which are an absolute must for your team. Until you get your Arcane Boots try be conservative in your mana usage.
Eul’s Scepter of Divinity – Hardly any heroes have Eul’s as their number one core item, even intelligence casters. Oracle is one of them, however. Not just because of the bonus move speed, intelligence, and mana regeneration (all of which are fantastic on him), but because of one of the item’s less respected features – it purges the target.
Why is this important on Oracle? Because it gives you a second purge (one from Euls, one from Fortune’s End). This means you can use Purifying Flames three times on a single enemy target in one burst without them being healed for any amount (Flames > Euls > Flames > Fortune’s End > Flames). That’s a whopping 1430 magic damage on a single target, which should finish off most heroes.
Luxury Items
Drums of Endurance – If you bought an early Bracer in order to tank up a bit them Drums of Endurance are a great option because they give your team bonus attack speed and move speed auras, whilst at the same time giving you plenty of stats and being easy to build into (since the components are so cheap you can buy them up whenever you have the spare unreliable gold, meaning you won’t lose much gold when you die).
Avoid them if one of your cores already has a set of Drums, though; 9 times out of 10 you’re better off with a casual Bracer and building into another item, rather than doubling up on Drums.
Force Staff – Force Staff gives you less all-round stat gain than an item like Drums or Rod of Atos, but it gives you much more mobility and more direct team utility (Drums’ auras are largely a passive, somewhat unnoticeable buff). It’s an amazing escape tool for someone who is naturally very squishy and can be used on allies and enemies, making it a great play-making item for clutch saves or to Force an enemy into bad positioning.
Rod of Atos – Huge chunks of health and mana, and an active that slows an enemy by 60% for 4 seconds (especially useful if your team is ahead but the other team is attempting to avoid direct engagements). I'm actually a fan of Atos, but most people are not. If you like it, you can get it on Oracle as a luxury pick-up.
Orchid Malevolence – It gives you a great boost of damage, attack speed, and mana. The added mana and mana regen allow you to use your abilities more liberally and the active 'Soul Burn' will allow you to silence an enemy hero and deal significantly more damage for its duration. The other great thing about Orchid is that it's really easy to build into and at all stages provides nice bonuses for a spellcaster like Oracle.
Scythe of Vyse – The ultimate late game item for most intelligence heroes. It's of course excellent on Oracle too, giving you a reliable disable, a good chunk of stats and incredible mana regen. The 3.5 second Hex is superb in teamfights and for picking off enemy heroes.
Unfortunately, the enormous cost makes it prohibitively expensive for most supports, but if the game is going very late and you're almost 6 slotted it's a great option and you might just have the farm to purchase it.
Heaven’s Halberd – A fantastic anti-carry item, thanks to the ability to disarm an enemy core for 3.0-4.5 seconds, Halberd will also give you a much-welcome chunk of health an evasion, making you a lot less fragile.
Ghost Scepter - The go-to luxury pick-up if you find the enemy team is able to bring you down quickly with physical damage (typically in the form of right-clicks). Most often this will be the enemy carry taking you out of the fight quickly with a few auto-attacks. Ghost Scepter will buy you a clutch 4 seconds of physical immunity, which gives you time to create distance between yourself and the enemy carry or at the very least buys your team 4 seconds of distraction time.
If you’re able to afford an E-Blade in the late game then you can actually make an allied hero completely immune to physical and magic damage by using it in combination with your Fate’s Edict ability.
Situational Items
Sentry Wards, Dust of Appearance, Gem of True Sight – All-important detection. You’ll need at least one of these in your inventory if the enemy line-up features an invis hero. Sentry Wards will also allow you to deward rune spots, and Gem will give you superior vision going into the mid and late game.
Smoke of Deceit – If you roam with another support in the early stages of the game a Smoke will allow you to do so more quickly and without being spotted by enemy wards. Smoke will also come in handy in the post-laning phase if your team wants to gank as 5.
Mekanism – Oracle is a somewhat decent Mekanism carrier, as it synergises well with his healing skillset (doubly so since it will provide twice the healing effect to a unit under the affects of your ultimate), and it’s virtually a must-have on all line-ups. The problem is the mana cost is high, and Oracle’s own skillset is already pretty damn demanding in terms of mana consumption.
Ordinarily you’d want a mana item first (e.g. Arcane Boots or Eul’s), but this will often delay the Mekanism well beyond a useful timing window on a support. As such, it’s a situational pick-up on Oracle.
Pipe of Insight - A very expensive item for a support, and not an ideal pick-up if you bought the team’s Mekanism (having both on one hero is very risky, especially a squishy one like Oracle), but always a good item to have if the enemy team has any magic damage (which they almost certainly will). Quick rule of thumb: go for it late game if you didn’t buy the Mekanism earlier and no one else on your team is building into one; it’s superb for teamfights and base sieging.
Necronomicon – Great if you’re part of a pushing line-up or your team is struggling to break the base. Gives you some nice chunks of health and mana. Also a great item for teamfights and for countering any invis enemy heroes.
Vladmir’s Offering – Yes, you’re ranged, so you won’t get the lifesteal bonus from Vlad’s, but you’re not buying it for yourself, you’re buying it for your team. Vladmir’s Offering is great to pick up on a support even if your team doesn’t consist of any melee heroes because of the bonus damage and armour it provides. If your team does have a melee core and no one else has purchased one then it’s an excellent utility item to purchase.
Linken’s Sphere – A very expensive utility item, so you’re unlikely to be able to purchase it in the vast majority of games as a support Oracle, but if the enemy team’s line-up has a handful of key single target abilities this is a great pick-up on a support in the late game, giving you an added layer of defensive utility for your cores, whilst also providing you with a bunch of stats and high mana regen.
Diffusal Blade - The trend of Diffusal on supports, like a lot of novel and unusual item pick-ups, traces back to the competitive Dota scene. It’s used on a support, primarily, in the super late game to purge the effects of Scythe when used on one of your cores. This way to effectively cancel the impact of a 5675 gold item with a 3300 gold item, providing you have fast reactions and purge your ally quickly.
On Oracle it’s doubly useful, as the purge will allow you to remove the healing effects of Purifying Flames when cast on an enemy. This third purge (Fortune’s End being the first, and your Eul’s Scepter providing the second) allows you to reach your maximum burst damage potential, and of course the additional utility a purge provides your team should not be under-estimated, especially in the late game.
Skill Build
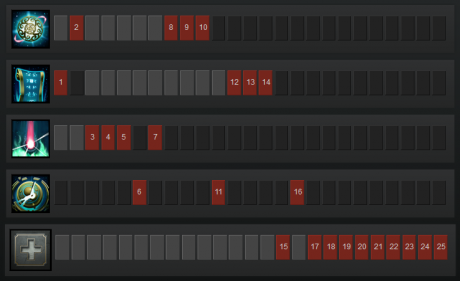
 Fortune’s End is a magic damage nuke and purge that is skilled and maxed second in most cases. It deals 75/150/225/300 magic damage and purges in a 215 unit radius around the selected target for 0.5 - 2.5 seconds. The length of the purge is determined by the duration you channel the ability, but the maximum damage is always dealt.
Fortune’s End has a 650 unit cast range and always applies the purge before dealing the damage. Thus it damages through abilities like Repel, and will remove positive buffs from enemies, but does not damage through BKB.
Fate’s Edict is a disarm ability and damage amplifier. It is skilled first in case of level 1 engagements but is maxed last in most cases. Fate’s Edict disarms a single target for 3/4/5/6 seconds and makes the unit immune to magic damage. However, it also amplifies damage taken from physical and pure damage types by 50%.
Fate’s Edict can be cast on both enemies and allies. General rules of thumb:
Defensively, you’ll want to cast it on enemy physical DPS’ers that are going ham on your teammates, as this will prevent them from attacking. You can also cast it on an ally that is attempting to escape from nukers.
Offensively, you can use it on enemies you or your team intend to jump on with physical damage dealers or pure damage dealers. You can also cast it on an ally that is likely going to tank heavy magic damage but little physical damage (such as an initiator).
Purifying Flames is a magic damage nuke that also doubles up as a heal. It is usually skilled last but is always maxed first. Purifying Flames deals 90/180/270/360 magic damage to a single target but with then heal that target for 11/22/33/44 per second for 9 seconds.
It can be cast on both enemies (for the nuke, which is applied first), and allies (for the heal, which is applied second). The nuke will not kill allies, so if they’re safe but on low health you can use it to guarantee a net health gain. More typically, however, you want to cast Fate’s Edict on them first in order to block the damage. Conversely, in order to damage an enemy but not heal them afterwards, cast Purifying Flames then Fortune’s End.
False Promise is Oracle’s ultimate and it is always skilled (levels 6, 11 and 16). One of the most powerful abilities in the game, False Promise makes an allied hero invisible for 7/8/9 seconds. During this time they can attack and use abilities without breaking the invisibility and any damage or healing taken during this time is not applied to the unit until after the ultimate ends.
False Promise also removes any negative buffs when it is applied, has a 0 second fade time, a 1000 unit cast range, and doubles any healing taken throughout its duration.
Key Ability Combinations
 Here’s a quick list of Oracle’s most common ability combinations:
- Fate’s Edict followed by Purifying Flames on an allied hero will deal the full heal without dealing any damage.
- Purifying Flames followed by Fortune’s End on an enemy hero will deal full damage without healing them at all.
- Purifying Flames cast on an allied hero under the affect of False Promise will receive double the healing effect. Use Fate’s Edict on them to prevent them taking any magic damage.
- Fate’s Edict on an enemy physical carry will force them to use BKB in order to attack. You can purge the effect using Fortune’s End if you change your mind.
- Fate’s Edict on a hero with Ghost Scepter, E-Blade, or Decrepify will be immune to all but pure damage abilities.
Gameplay Tips
 The most important tip for new Oracle players is that you absolutely must read each of his ability descriptions and learn their effects and combinations off by heart before playing him in a serious game. Once you’ve got a grasp of how they work together put this to the test against bots first of all, to make sure you can combo his abilities properly in the heat of the moment – an Oracle that doesn’t know how each of his abilities interact with one another and other heroes in the game is one that will likely get his team killed just as often as he helps it out.
Fortune’s End is blocked by all forms of spell resistance, except for Repel, which it purges before applying the damage. As Guardian Angel is also repelled Oracle is an amazing hero counter to Omniknight.
Fortune’s End has a small 215 unit AoE. Generally this is too small to allow you to affect multiple heroes, but if you’re able to catch enemies clumped together (for example after a Magnus Reverse Polarity, or during a Void Chronosphere), it will be especially useful.
Unlike all other purges in the game, the purge from Fortune’s End actually prevents the unit from moving (they have 0 move speed) for the duration. They will however be able to blink away.
| Tip: Use Fortune’s End on hasted enemies that are playing aggressively. It will instantly end the haste and force them to stand in place for the duration of the channel. This is a great way to catch over-confident players off guard. |
Be careful when using Fate’s Edict. Remember that it will amplify physical and pure damage by 50% and will disarm the target. Using it on an ally is therefore only usually advised when they’re fleeing spell casters. Similarly, although generally a great anti-carry ability, if you use it on the enemy carry keep in mind that any magic abilities your team use will be ineffective for the duration.
| Tip: You can use Fortune’s End on the target you’ve cast Fate’s Edict on if you change your mind and want to remove their magic resistance/disarm. |
Once maxed, Fate’s Edict lasts 6 seconds. Since it blocks the damage from Purifying Flames – which has a 3 second cooldown – you can get off two heals on an ally without dealing any damage to them with Purifying Flames.
Most heroes have a base magic resistance of 25%, so Purifying Flames will effectively heal for 31.5/63/93.5/126 health, assuming you don’t use Fate’s Edict to prevent the damage or Fortune’s End to end the heal. If you use Fate’s Edict beforehand then it will heal for a full 99/198/297/396.
| Tip: False Promise gives a good visual hint as to whether the target will take more damage than health or not. If the symbol above the hero’s head burns up then it is a sign that they will take more damage than health. If it is accompanied by green particles and doesn’t fire up then it is a sign that the hero will take more health than damage once it ends. |
Absolutely no damage or healing is applied to the hero that you cast False Promise on until it ends, and then it is applied all at once. The invisibility is also only broken by True Sight and nothing else.


