 Introduction
“Need...more...souls!”
Shadow Fiend is a ranged agility carry whose abilities give him the potential to dish out incredibly high amounts of burst physical and magical damage.
His farm and experience-greedy nature, as well as his ability to eventually dominate a lane and quickly clear creep waves makes him a popular mid hero, although he is sometimes albeit rarely played as a safe lane carry.
You can find our detailed character profile for Shadow Fiend here.
Pros & Cons
Pros
- Potential to amass incredibly high physical and magical damage
- Effective at all stages of the game
- Scales incredibly well
- Potential to quickly snowball out of control
- Good team aura
- Can quickly flash-farm creep waves and stacked jungle camps
Cons
- No escape mechanism
- Death negatively impacts Shadow Fiend more than any other hero
- First couple of creep waves can be hard to secure last hits on
- Very item and experience hungry
- Surprisingly high skill floor
Item Build
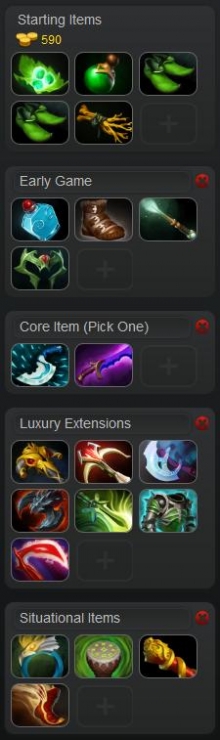 As Shadow Fiend is most commonly played in the mid lane role this guide will be built around the assumption that you are mid-laning.
Even if you’re forced into one of the sidelanes or forced out of the mid lane to stack and kill jungle creeps then his item and skill progression is essentially the same, although you may have to make some slight adjustments to your item purchases (such as not going for a fast Bottle, or picking up some early cost-efficient items like Drums).
Starting Items
A pretty typical and good all-round starting build for Shadow Fiend is as follows:
- A set of Tangos, a Healing Salve, 2x Slippers of Agility, 1x Iron Branches.
Although you’ll eventually sell at least one of those Slippers of Agility, which makes this build less cost-efficient than for example 1x Slippers of Agility and 3x Iron Branches, Shadow Fiend has absolutely terrible starting damage (35-41) and so badly needs the additional agility that the Slippers give him in order to boost his damage to a more reasonable level, allowing him to get those first couple of crucial last hits which will then allow him to start last hitting effectively.
Early Game
You want to get a quick Bottle so that you can maintain rune control and use Shadowrazes to farm jungle camps or creep waves. Shadowrazes are great at clearing creep waves, so you can push the wave out ahead of each rune spawn in order to ensure you get the rune (or force the enemy mid to lose out on some experience and gold).
Next up get some basic Boots of Speed. You want these as quickly as possible, in order to make you less susceptible to rotations from enemy supports in the early goings. As Shadow Fiend is both quite squishy and lacks an innate mobility or escape mechanism skill, he is more susceptible to early smoke ganks than most mid heroes.
Power Treads are my upgraded boots of choice on him; Necromastery and your item progression will ensure you have fantastic physical damage without needing Phase Boots, and the extra stats and attack speed are great to have.
Finally, to round out your early item purchases, upgrade any Iron Branches you have into a Magic Wand, and upgrade your Slippers of Agility into a Wraith Band. This can in turn be upgraded into a Ring of Aquila, which is a very cost-efficient stat item, especially since its buff in the 6.80 balance patch.
Core Options
There are traditionally two major core options for Shadow Fiend: Blink Dagger or Shadow Blade.
As is commonplace for heroes that have these two choices of items, Shadow Blade tends to be the more pub-stomp oriented approach, whereas Blink Dagger tends to become more favoured in the higher levels of matchmaking and in competitive matches.
Unusually for me, I actually recommend Shadow Blade on Shadow Fiend, rather than Blink Dagger (I recommend Blink ahead of Shadow Blade on most heroes that have these two items as their core options).
Shadow Fiend is quite squishy, at least until he’s stacked with luxury items, and Blink Dagger only gives him positioning capability, whereas Shadow Blade gives him mobility, an escape mechanism (albeit an unreliable one), and damage-oriented stats, and it allows him to chase much like a Blink Dagger.
The other upside of Shadow Blade is that the invisibility is not broken by the use of your ultimate until the lengthy cast animation has finished. If you go the Blink Dagger route you need to guarantee either that you will not be stunned during the wind-up animation or have a Black King Bar if you’re going to ensure your ultimate can be used effectively.
In short, I think Shadow Blade is both the safer option and the better option in most cases, especially for public matchmaking play, but higher skilled players will get more out of the positioning superiority Blink Dagger grants them and be more likely to be countered by detection if they go the Shadow Blade route.
Luxury Extensions
Black King Bar – BKB is virtually core on Shadow Fiend. The only time I wouldn’t buy it on him is if the other team has no stuns, or if their only disables go through Spell Immunity anyway. And the only time I wouldn’t prioritise it as my first luxury item on him is if I find the other team simply aren’t devoting their stuns/disables to me, and I’m being given rein in teamfights.
In all other situations it is a compulsory first luxury item purchase on SF, giving you some much-needed health, a small damage increase and all-important spell immunity which protects you from (most) stuns and disables and will allow you to get off both your ultimate and a decent amount of right clicks in teamfights.
Daedalus – Daedalus is a great item on SF, and one of the more popular luxury pick-ups for him. Incredible damage gain and the chance to convert his already fearsome damage output into a critical strike. With Daedalus an SF going to town in a teamfight simply cannot be ignored.
Manta Style – A slightly less popular luxury item is Manta Style. Its uses extend beyond mere teamfighting to also split-pushing, base-sieging and can be used to dispel certain debuffs, including silences. Less damage-based, but brings utility to the table that you may need in certain situations.
Satanic – Very expensive but it doubles up as both a fantastic offensive and defensive weapon. You get a nice chunk of health, very handy life steal from your attacks, and the chance to heal yourself back up when low on health using the Unholy Rage active. I like to liken this to the health effects of Roshan's Cheese. As long as you're able to attack, you basically get your health pool completely regenerated.
Butterfly – The ultimate luxury item for any agility carry. Shadow Fiend is no exception here. Butterfly gives you lots of agility, attack speed, damage, and evasion - three stats he thrives on and one which will make you much harder to bring down, or which will force opposing cores to go for a Monkey King Bar.
Assault Cuirass - AC is great on SF for a few reasons. A big boost to your attack speed magnifies your damage output, especially if you opted for a Daedalus earlier on. The minus armour aura will affect any targets you are attacking, as well as any within a 900 unit radius of yourself; a minus armour aura which not only affects enemy structures but also synergises superbly with your passive, Presence of the Dark Lord. All of this together makes it a deceptively offensive item on Shadow Fiend. Meanwhile the positive auras will benefit your entire team during teamfights.
AC is definitely worth considering and giving high priority once you have your core, just make sure no one else on your team is build one.
Desolator - The damage is nice, it's quite an inexpensive offensive item, and the minus armour makes you hit harder and again synergises well with your passive. The minus armour doesn't just work against enemy heroes and creeps either - it works on buildings, making you a very quick base pusher. It’s not as good as the items listed above, which is why I’ve listed it quite low down, but its cheaper cost does make it easier to build into if you’re struggling to farm.
Situational Items
Things don't always go to plan. Sometimes you'll be kept down with ganks, or you'll unintentionally end up feeding a couple of kills and losing a lot of unreliable gold, which puts your item progression massively behind. Death especially hurts Shadow Fiend because he loses half of his Necromastery souls.
If you are struggling early on consider going for cost-efficient items. Upgrade the Wraith Band into a Ring of Aquila and grab a Drums of Endurance. Both will give you solid all-round stats at an affordable price.
Monkey King Bar – You may need to get this if the enemy carry is likely to build a Butterfly or Heaven’s Halberd, or has built-in evasion (like Phantom Assassin). A good damage item that counteracts the aforementioned items, but it is much less useful on SF than a Daedalus.
Boots of Travel - Boots of Travel are great for the late game, when you need to free up a slot which would otherwise be taken up by a TP Scroll. With this, you combine your Boots and TP Scroll slot into one, allowing you to put a slot to better use as well as allowing you to teleport to the front lines if you die or if you’re off split-pushing.
Skill Build
 Shadowraze is skilled second and more often than not maxed first. One of two magic damage abilities at his disposal, Shadowraze causes ‘razes’ to spike up in an area ahead of him, dealing magic damage to anyone within a 250 AoE of the raze.
Shadowraze is actually three independent abilities, each one casting a Shadowraze at a specific distance in front of him (Q is 200 units ahead, W is 450 units ahead, and E is 700 units ahead). Each has its own independent cooldown.
This ability is one of the reasons Shadow Fiend has a surprisingly high skill ceiling; it is difficult learning how to make the most of Shadowraze, not only in terms of ensuring you are facing the correct direction but also that you pick the correct Shadowraze to use to hit your target.
If used correctly you should be able to guarantee at least two raze hits on an enemy, sometimes even three. If used incorrectly you’ll miss each one, wasting 75 mana each time and wasting precious time that could’ve been spent right-clicking the target.
Necromastery is skilled first and usually maxed second (although some people prefer to max it first). This allows SF to steal souls, which he gains +2 bonus damage from, up to a total of 36 souls (or 72 damage). The catch is that if you die, you lose half of the souls currently stolen, which is the reason death hurts Shadow Fiend more than most heroes – you’ll then need to farm back up souls in order to regain your damage.
The reason it is skilled first is that Shadow Fiend has terrible starting damage (35-41 base damage), and so last hitting is quite difficult until he has stolen a few souls, which is done by killing or denying a kill (both on creeps, heroes and buildings).
Those first couple of creep waves are both the hardest for SF to deal with but also the most important in the game; get some good early last hits or denies and it becomes easy to dominate the mid lane, both last hitting enemy creeps and denying your own creeps with ease.
Presence of the Dark Lord is skilled and maxed last. Not because it’s a bad skill, but because the two abilities detailed above are simply better and do more for you early on.
Presence of the Dark Lord is a passive ability that reduces the armour of enemies within a 900 unit radius of SF by 3/4/5/6. This means you hit that much harder later on in the game, and means your presence in teamfights is especially valuable for your teams other cores, since they too will deal significantly more damage to enemies within the radius.
Finally, your ultimate Requiem of Souls is often not skilled until after your first two abilities are maxed (at level 9) but from that point on is always skilled (levels 9, 11 and 16), as you will need level 4 in Necromastery in order to get the most out of it and level 4 in Shadowraze is advisable for its early potency as a nuke.
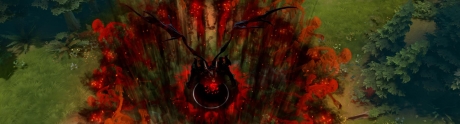
Requiem of Souls releases the souls you’ve captured using Necromastery, damaging enemies caught in its radius, slowing them, and reducing their damage. Requiem deals a wave of damage for every 2 souls SF has stolen (so a max of 18), and each wave deals 80/120/160 damage in a 1375/1425/1475 radius.
An incredibly powerful AoE magic damage nuke and debuff, Requiem is hampered only by its lengthy cast animation, which buys enemies precious time to create distance or stun you, and by its dependency on SF having collected lots of souls using Necromastery.
Gameplay Tips
 Shadowraze can be used to quickly clear creep waves or jungle camps. This makes it very useful for both farming purposes and for quickly re-capturing souls for Necromastery after you’ve died and lost some.
It’s crucial you practice learning how to use Shadowraze properly. This involves both ensuring you know how to face the exact direction your enemy is in relative to yourself and also learning to anticipate the distance in front of you each of the three abilities will reach. Both of these are easier said than done and it’s best to practice with SF before playing with him in matchmaking.
| Tip: Your attack range is 500, whilst the second Shadowraze (keybind: W) has a range of 450 (with a radius of 250 AoE), so a good beginner tip is to use your normal attack as a guide for how far the second Shadowraze will hit. |
The Radiant side is especially good for Shadow Fiend to play on, as he can dip into the jungle and stack the nearby jungle camp whenever he gets a few spare seconds. Stacked neutral camps are easy to take down using Shadowrazes and a few right clicks.
| Note: all creeps, creep denies, heroes (both allied and enemy heroes), and buildings provide bonus damage to Necromastery |
Requiem of Souls’ lengthy cast animation means that you can struggle to get it off because you become a prime target for stuns when people see you ‘winding up’ to use it. This is one reason Black King Bar is such an important luxury item for Shadow Fiend, as it allows him to use it in the middle of teamfights without interruption.
Remember also that invisibility from Shadow Blade will not be broken when using Requiem until the animation is completed, but the same is not true of Invisibility Runes (which is broken shortly before the animation is complete).
| Tip: The closer the targeted unit is, the greater the number of lines hit it, so ideally you want to be stood right next to the enemy when using it. This is another reason Shadow Blade Is such a popular pick up on him, as it allows you to stand right next to an unsuspecting enemy and use Requiem. If you have the maximum number of souls captured (36) you’ll often net a kill from Requiem of Souls alone early on. |
Last Updated - Patch 6.83.