 Introduction
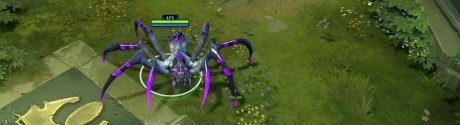
“My brood needs food.”
Broodmother is a pushing hero and has one of the most original and distinctive play styles in Dota. She is typically chosen to camp in the offlane, where she can apply tremendous pressure to enemy towers and, ultimately, their base, while slowly taking over the enemy jungle.
Broodmother's complete character profile can be found here.
Pros & Cons
Pros
- Very strong split pusher
- Very elusive and hard to kill
- Can bully most supports out of the lane and many carries as well
- Strong farmer if played well
Cons
- Squishy if caught
- Pretty much forced to camp in the offlane, making fights elsewhere 4v5 affairs
- Requires micro-management
- Her spiders can give away a deceptively high amount of gold and experience
- Not a true carry
Item Build
Broodmother is a very unique type of pushing hero. Where most pushers excel at either opportunistic and sneaky split-pushing (Nature’s Prophet, Lycan), quick bursts of damage (Leshrac, Pugna), or brief but sustained attempts to kill off towers (Shadow Shaman, Lone Druid, Chen, Enchantress), Broodmother literally sets up camp in one lane and doesn’t leave it until the barracks have fallen, gradually building up an army of spiders with which to destroy towers when the opportunity is ripe.
It’s a playstyle which forces your team to largely play 4v5, with Broodmother taking advantage of teamfights to push down towers, or distracting multiple enemies while the rest of the team ganks. Because of the inherent risks in such a strategy Brood is a very niche pick, but a good Brood player can win the game all by herself and make life hell for the enemy safe lane.
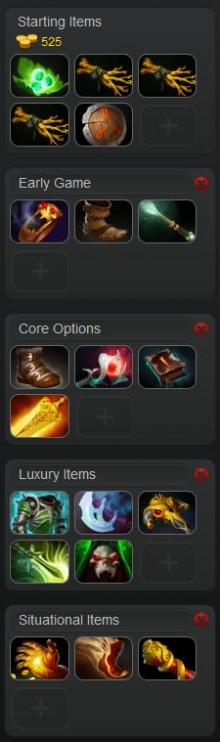 Starting Items
A typical set of starting items for Broodmother would be something like this:
- Tangos, 3x Iron Branches and a Stout Shield.
The Tangos are sufficient regeneration for Broodmother during the laning phase, thanks to the bonus health regeneration her webs provide. A Stout Shield will allow you to tank a lot of harassment during the laning as well, and furthers the argument that a set of Tangos is all the regen you need to start with.
The Iron Branches provide you with some early stat gain, and will later be upgraded into a Magic Wand, making them efficient starting items.
Finally, you can purchase the recipe for your Soul Ring if you wish, which will prevent the need to use the Courier to ship it to you later on as the other components can all be bought from the side shop, or grab another stat-based item to help with last-hitting.
Early Game
Early on you want to purchase a Soul Ring. Not only is the regen great to have, the burst mana you can obtain from the active will allow you to use Spawn Spiderlings whenever you need it and thereby build up a large army of spiders.
Round out your early game purchases with some basic Boots of Speed and upgrade the Iron Branches you bought at the start into a Magic Wand. The boots can be upgraded straight away as well – into Power Treads.
Core Options
Brood tends to build in one of three ways when it comes to core items. These are:
Radiance – The Radiance rush is the greediest of the three builds because it’s so damn expensive and there are no cheap components to provide you with early benefits. Basically you play a farm-centric role, rush your Radiance and use it to quickly clear the enemy jungle and their creep waves, constantly applying pressure by flash farming everything in sight.
Necronomicon – The Necro book build is basically the decision to play to your strengths solely as a pusher. Whenever the enemy team makes its presence felt elsewhere on the map you quickly go to work on their towers and, eventually, their barracks, using a pre-built army of spiders that you’ve managed to build up by killing off jungle camps and lane creeps and then popping your Necronomicon warriors to quickly melt away at enemy structures.
The advantage this build affords is that your strength as a pusher lies in your summons – your spiders and your Necronomicon warriors – and so you don’t actually need to put yourself at risk. If enemies are conspicuously absent from the map you can push remotely with your summons while you farm in the relative freedom of the jungle. Just be careful to keep an eye on your summons – they have a high gold and experience bounty, and so you’ll want to pull them back if a fast wave clearance hero shows up in the lane.
Orchid Malevolence – Orchid is the traditional core item for Broodmother. The high mana regeneration ensures you’ll always have access to Spawn Spiderlings, while the offensive stats give you some measure of right-click capability. Brood is often under-estimated in the DPS department, but a Brood with an army of Spiderlings and an Orchid active up her sleeve is not a hero to trifle with.
Each of these builds is very much viable and which you opt for will depend both on how the game develops (farming well? Radiance can help you snowball. Poor start and vulnerable to ganks? The Necronomicon build will afford you a measure of safety) and also how you personally like to play Brood (a Brood player that likes to engage in hero combat and not just focus primarily on split pushing will be better served by Orchid, for example).
Luxury Items
Vladmir’s Offering – One of the best luxury options for Broodmother and it’s very affordable. The auras are all beneficial to Brood herself – bonus damage, life steal, armor, and mana regeneration. Better yet, they’re auras which apply to your summons as well (both spiders and Necronomicon units), giving them higher damage output and making them significantly tankier, so Vlad’s is a great option for both pushing-focussed Broods and more combat-oriented ones.
Manta Style – Manta is a great item for any agility-based semi-carry or pusher. Brood fits into both of those roles. Manta Style gives you plenty of agility, move speed, attack speed, and some strength and intelligence. Most importantly it gives you the Mirror Image active, which will allow you to become an even more effective pusher and also allows you to disjoint certain projectiles and debuffs.
Black King Bar – Black King Bar is usually purchased on Brood for one of two reasons: 1) You’re actually man fighting quite a lot, or 2) You both get caught/found quite easily and then disabled/stun locked, to prevent you from both escaping or from fighting. In both situations Black King Bar is an essential purchase as it allows you to avoid being disabled. On top of that it gives you so health gain and a small damage increase.
Butterfly - The ultimate late-game item for any agility-based carry or semi-carry, Butterfly gives you huge chunks of agility, damage, evasion, and attack speed. A must-have in the late game if you’re playing Brood as a carry. If, however, you’re still focussing on split pushing then consider…
Assault Cuirass – Assault Cuirass is an item that will augment both your own physical damage output but also greatly increase the potency of your pushes. The plus armor aura makes both Brood and her summons much tankier, the attack speed increases their damage output, and the minus armor aura for enemies works on buildings, making enemy towers and barracks much more susceptible to pushes.
Situational Items
Hand of Midas – Hand of Midas is quite a popular choice in public matchmaking, both as a way to vastly accelerate the pace of your farming and also to act as a catch up mechanism if you struggle to farm early on.
Boots of Travel - When you are at that stage of the game when you’re becoming 6 slotted you can swap out your initial set of boots for Boots of Travel (assuming you bothered to upgrade your basic Boots of Speed earlier). It frees up a slot you would otherwise have reserved for a TP Scroll and also gives you much greater freedom to move around the map and actually take part in teamfights or base defences while still maintaining pressure in the offlane with your summons.
Monkey King Bar – A damage item that is taken on Brood only in specific scenarios, namely if you need to counter evasion (e.g. the enemy carry is Phantom Assassin, an agility carry that has purchased Butterfly, or a high-impact core with Heaven’s Halberd).
Skill Build
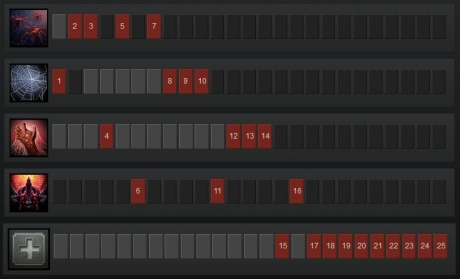 Spawn Spiderlings is skilled second or last but is always maxed first. It is a magic damage nuke with deals 75/150/225/300 magic damage to a single target. If the target is killed within 2 seconds of being hit by Spawn Spiderlings then 1/2/3/4 Spiderlings will spawn. Spawn Spiderlings is thus used both as a magic damage nuke and as a means of building up an army of Spiders.
Spiderlings have two passive abilities of their own: Poison Sting, which slows units they attack by 15% and deals minor damage over time; and Spawn Spiderite, whereby each time one of Broodmother’s Spiderlings kills a unit they in turn spawn Spiderites which last 60 seconds.
Spin Web is always skilled first but maxed either second or last. Spin Web allows you to place up to 2/4/6/8 large webs on the map which has a 900 unit radius.
These webs grant Broodmother and her Spiders invisibility when they stands on them, as well as bonus move speed (20/25/30/35%) and bonus health regeneration (+2/4/5/8), and grant them unobstructed movement.
Incapacitating Bite is an offensive passive ability. It is usually skilled and maxed last. A unique attack modifier, it imbues Broodmother’s attacks with a move speed slow effect (10/20/30/40%) and a miss chance (30/40/50/60%). These effects work on all enemies Brood attacks for 2 seconds.
Insatiable Hunger is Broodmother’s ultimate ability. It is typically always skilled (levels 6, 11 and 16). This grants Broodmother a bonus 60/80/100 damage for 14 seconds as well as a bonus 60/80/100% lifesteal which stacks with other sources of lifesteal.
Insatiable Hunger can be thought of as being similar to a Satanic but with a longer duration. Insatiable Hunger grants you 60/80/100 damage and 60/80/100% life steal for 14 seconds, whilst Satanic grants you 20 damage, 25 strength, 5 armor, and 175% life steal for 3.5 seconds.
Gameplay Tips
 Spawn Spiderlings has two central uses: 1) As a nuke on enemy heroes, and 2) As a means of building a small army of Spiders for farming, pushing, and sometimes even hero killing.
When using on enemy heroes, you can potentially use it to deal harassment damage in the lane, as the low 10 second cooldown makes it fairly spammable, and since you’ll purchase a Soul Ring and probably at least one other source of regen (such as Ring of Basilius or the components for Orchid Malevolence) you should have enough mana to support doing so.
Alternatively, if the enemy laners lack creep clearance capability you can instead use Spawn Spiderlings to secure creep kills and quickly build up a small army of Spiderlings, and then use those Spiderlings and Spiderites to zone enemies out of the lane.
Most lane supports in particular struggle to stay in lane against persistent Spider harass and will be forced to shelter under the tower. When the opportunity arises you can crowd around the hero using Spiders and Brood herself, and then finish them off with a final Spawn Spiderlings nuke. The lengthy 700 range makes it great for sniping off enemies on low health.
If the enemy laners do have a good way of dealing with your Spider army, you need to be extremely careful in micro-managing your Spider army – both Spiderlings and Spiderites have substantial experience and gold bounties so you need to minimise losses to heroes.
A good way to avoid feeding Spiders to enemy heroes in the lane but still getting some use out of them is to send your Spiders into the jungle. They’re good at killing off jungle camps and this will net you some additional gold.
The other advantage of using the Spiders to farm the enemy jungle is that the Spiderlings will spawn Spiderites in the process, allowing you to continue building up your army which you can then use to swarm a tower or enemy hero if the opportunity presents itself.
At the start of the game you should rush to plant your first Web in the lane as soon as you’ve purchased your starting items. This way you’ll gain access to your second web before the creeps meet in the lane, allowing you to set up your first two webs without any trouble and granting you access to a third should you need to replace the first one.
| Remember: The invisibility granted from Spin Web has a lengthy fade time of 2 seconds – you are not therefore instantly safe when standing on a new web or when waiting to return to invisibility after attacking, for example. |
As you level up Spin Web the number of webs you can place on the map increases, up to a maximum of 8. Most Brood players will place subsequent webs in the tree lines along the path to the enemy tier 2 and tier 3 towers, or in the jungle. Since these webs give you unobstructed movement it allows you to hide in the tree line if the enemy attempts to gank you. This is extremely frustrating to deal with when playing against a Brood, and only a handful of heroes (such as Storm Spirit) are able to effectively gank a Brood player with well placed webs.
Your Spider army gains invisibility from your webs, as well as the unobstructed movement benefits. It is, however, important to remember that if you take damage then you will not have unobstructed movement for 6 seconds, making you susceptible to gank if you’re caught out of position.
One point is often taken in Incapacitating Bite early on for harassment purposes. The slow effect comes in very handy if you find opportunity to attempt a hero kill early on, and the miss chance (as well as the health regeneration from Spin Web) makes Brood a strong early 1-on-1 hero capable of bullying some carries and almost all supports.
| Warning: Incapacitating Bite is a unique attack modifier that does not stack with other unique attack modifiers. In short, do not purchase items like Desolator or Eye of Skadi on Broodmother – their attack modifier effects do not work on her. |
Insatiable Hunger, alongside your passive, makes you a very strong 1-on-1 fighter in general. Early on you can win most man fights purely based on this skill advantage. Later on, however, unless built out as a carry (a role she’s fairly mediocre at) you’ll probably want to avoid fighting enemy carries head-on.
A number of heroes in the game hard counter Brood, while others are more like semi-counter. Heroes you want to avoid picking Brood against in general include: Axe, Legion Commander, Earthshaker, Bounty Hunter, Slardar, Storm Spirit and Faceless Void.
Last Updated - Patch 6.83.