Introduction
“Failure is just another kind of success. The wrong kind.”
Throughout 2013 some professional teams flirted with playing Alchemist as a 4th or 5th position support, with only somewhat mixed success initially. Nonetheless pro teams persisted with this strategy until it finally seemed to pay off – Alchemist is now typically picked more for support or mid duties than carry duties in professional Dota.
Non-competitive Dota still lags behind in this respect, but it’s not unheard of to see Alchemist played as support there as well; indeed it has much to recommend it, as I'll explain below.
Alchemist's complete character profile can be found here.
Our detailed Build Guide for Carry Alchemist can be found here.
Pros & Cons
Pros
- Amazing ‘Steroid’ ability that makes him very tanky for a support
- Powerful lockdown ability that deals physical damage
- Can deny himself
- Two great support abilities that synergise well together
- Great push/anti-push AoE
- Scales amazingly well
Cons
- Stun can quite easily turn against you
- Melee
- Low armour
- Very bad stat gain
Support Alchemist
When should you go support Alchemist? When the safe lane is taken by a carry and there’s a more suitable mid-laner in your line-up (or the match-up at mid would be strongly in the enemy hero’s favour).
…Or when you’re bored of playing carry Alchemist and fancy playing the fun support build instead!
Item Build
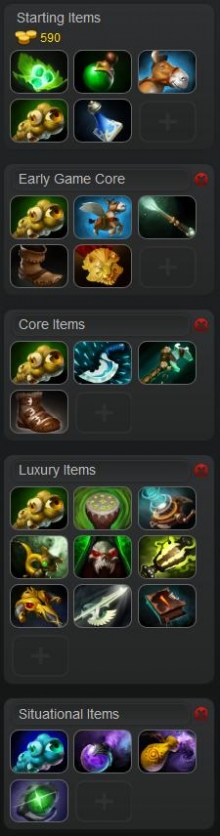 You’re playing as a support, so act like one. Make sure your team has both a Courier and a set of Observer Wards at the start. Often you can split the cost between yourself and another support, but if not then you need to buy both.
After that, for starting items you want to get plenty of regen: a set of Tangos, a Healing Salve, and a Clarity. If someone else on your team bought Wards or Courier at the start then you can grab a couple of Iron Branches and an extra Clarity.
Early Game Core
Observer Wards are core whenever they’re off cooldown, naturally. Make sure the Courier is upgraded into a Flying Courier when it comes off cooldown at the 3 minute mark.
Grab some basic Boots of Speed as soon as possible, and upgrade any Iron Branches you may have into a Magic Wand. Your first ‘major’ support item is a Medallion. Medallion is 100% core on support Alchemist and here’s why:
Unstable Concoction is you main ganking/lockdown skill. It is the reason you can function as a support in the first place, being one of the most potent stuns in the game. Concoction doesn’t just stun, it deals quite a lot of damage (360 at level 4), and this damage is physical. That fact is crucial. You can burn through enemy armour by first casting Acid Spray on the enemy (-3 to -6 armour) and Medallion on top of that (-6 armour) before you land your stun. If you pull it off successfully you’re almost certainly dealing pure damage on top of a 4 second stun.
Mid Game Core
Wards (again).
You can upgrade your basic Boots of Speed into Power Treads at this stage if you want. The main reason you should get Power Treads instead of Phase Boots is that you first ‘big ticket’ support item will be a mobility item, so you don’t need the bonus move speed that Phase Boots give you in order to gank and actually land your stun before it blows up in your face.
Blink Dagger is your core big ticket pick up. It will allow you to charge up and land Unstable Concoction virtually every time. One of the major downsides of support Alchemist is that he can struggle to get off a full duration Concoction because he will telegraph its charge to enemies, giving them chance to get out of cast range and causing you to stun yourself. Blink Dagger allows you to prevent this from happening because of the superb positioning power it will grant you.
The downside of Blink Dagger is that it is one dimensional and largely offensive, it also does little to directly benefit your team beyond you being able to land your stun. For these reasons a Force Staff can be picked up instead of a Blink Dagger if you prefer. The positioning capability of Force Staff is inferior, so your stuns won’t be quite as easy to land, but it can be used defensively to get yourself and/or teammates out of trouble.
Luxury Items
Wards (yes, really).
At this stage you have your core – your team has a Flying Courier, you have Observer Wards, a Magic Wand, Power Treads, Medallion, and a mobility item. Now you can pick your luxury item(s). Great options on support Alchemist include:
Mekanism – You may need to buy this ahead of a mobility item if your team desperately needs it and/or the other support player on your team is not building into it. Good stats, good armour, an armour and health regen aura, and 250 burst heal for your entire team. It’s the primary support item in the game for good reason.
Drums of Endurance – Great all-round stats to help tank you up, cost-efficient, easy to build into, and gives your entire team bonus attack speed and move speed auras. Always a good luxury item on supports.
Pipe of Insight – A very expensive item for a support, and not an ideal pick-up if you bought the team’s Mekanism (having both on one hero is very risky), but always a good item to have if the enemy team has any magic damage (which they almost certainly will). You probably won’t be able to afford it though in most games.
Vladmir’s Offering – Your entire team will benefit from the bonus damage, mana regeneration, and armour auras. It’s doubly good if any of your team’s core heroes are melee DPS’ers thanks to the lifesteal aura.
Ghost Scepter – 4 seconds of physical immunity will feel like a lifetime to the enemy carry. It will buy both yourself and your team a lot of time. Always a good pick-up if you find yourself dying quickly to right clicks.
Black King Bar – On the other side of the coin is BKB, which will give you Spell Immunity, protecting you from spell casters and stuns. It will make you a lot more tanky as well.
Heaven’s Halberd – I love picking this up on non-traditional supports like Alchemist or Naga Siren. At this stage of the game you’re actually becoming difficult to deal with yourself and transitioning into a semi-carry. Heaven’s Halberd will make you even harder to take down and also gives you the ability to disarm enemies for 3-4.5 seconds.
Necronomicon – Great if you’re part of a pushing line-up or your team is struggling to break the base. Also a great item for teamfights and for countering any invis enemy heroes.
Situational Items
Sentry Wards, Dust of Appearance, Gem of True Sight – all-important detection. You’ll need at least one of these in your inventory if the enemy line-up features an invis hero. Sentry Wards will also allow you to deward rune spots, and Gem will give you superior vision going into the mid and late game.
Smoke of Deceit – If you roam with another support in the early stages of the game a Smoke will allow you to do so more quickly and without being spotted by enemy wards. Smoke will also come in handy in the post-laning phase if your team wants to gank as 5.
Skill Build
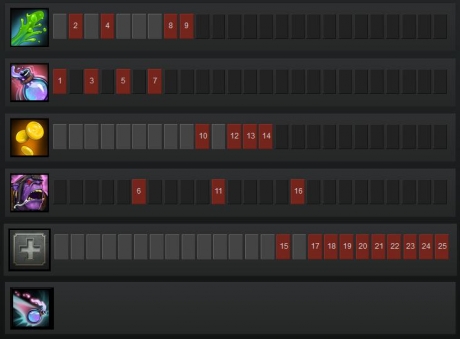 Support Alchemist’s skill build is similar to that of the Battle Build for a carry Alchemist. You want to skill and max Unstable Concoction first for the bonus damage and lockdown it provides, and max Acid Spray second, for the AoE minus armour and damage over time.
As noted earlier in the guide, you should throw out Acid Spray onto enemies before you stun them with Concoction because Concoction’s damage is actually physical, so the minus armour from Acid Spray will make it hurt enemies that much more.
With these two skills used in conjunction you become a very dangerous roaming support and give your team a lot of utility in teamfights.
Always get Chemical Rage whenever you can (levels 6, 11 and 16). On a carry Alchemist it’s a steroid ability that makes him a fearsome DPS’er, but on support Alchemist it makes you ridiculously tanky for a support hero, forcing the enemy team to either waste time focussing on a lowly, but very tank support, or ignoring you and your damage output. It also allows you to regenerate your health quickly, and gives you bonus mana regeneration so you can use it ‘for free’.
You max Greevil’s Greed last, but you do get it ahead of stats. Towards the mid-game support Alchemist can transition into a semi-carry and Greevil’s Greed accelerates his ability to do so.
Gameplay Tips
 Concoction doesn’t just stun, it deals quite a lot of damage (360 at level 4), and this damage is physical. That fact is crucial, as explained earlier in the guide. You can burn through enemy armour by first casting Acid Spray on the enemy (-4 to -7 armour) before you land your stun. If you pull it off successfully you’re going to deal a lot more damage on top of a 4 second stun.
| Tip: You can actually use Unstable Concoction to deny yourself if you know you have no chance of surviving. |
| Tip: You can start charging Unstable Concoction and then TP to one of your towers to hit a diving enemy with a fully charged Concoction. |
Acid Spray deals quite considerable damage over time – lay it down in front of your tower/base when the enemy team is pushing, or on top of/slightly behind the enemy tower if your are pushing them.
| Tip: Always cast Acid Spray in teamfights if only to apply the minus armour debuff to enemy heroes in the AoE. |
Chemical Rage pays for its mana cost itself over the course of its duration (75/187.5/300 mana is regenerated in total), so feel free to cast it to regenerate your health when necessary without worrying about losing mana, but avoid teamfighting without Chemical Rage.
| Tip: You can dodge spells and auto attacks by activating Chemical Rage at the right time; during the 0.35 transformation time you dodge attacks. |
Last Updated - Patch 6.83.