 Introduction
“Quiver and quake!”
One of only a handful of melee heroes traditionally played in the support role, Earthshaker is famed for his ability to stun from extremely long range with his impassable Fissure, and for his ability to potentially completely turn the tide of a fight with his ultimate, Echo Slam, providing the situation is just right.
His passive stun ability, Aftershock, which is triggered whenever Earthshaker uses one of his abilities, and the fact that Echo Slam is an amazing way to initiate some fights, makes Earthshaker both a solid support and a great initiator once he has a mobility item.
You can find our complete character profile for Earthshaker here.
Pros & Cons
Pros
- Enormous range on his stun, makes it easy to hit and hard to see coming
- Fissure can be used to block off enemy retreat/re-inforcements
- Decent lane support
- Great chain-stunner
- Fantastic initiator
- Ultimate can insta-win engagements if used optimally
- Amazing teamfight potential
Cons
- Needs a mobility item to be used to his full potential
- Huge mana issues
- For those two reasons he is not a very item independent support
- Fissure can work against your team if you get the angle even slightly wrong
- Long cast animations for two of his three active abilities
Item Build
 Starting Items
As a support hero it’s your job to ensure that the Courier and/or Observer Wards are bought at the start of the game. Usually these duties will be split between yourself and another hero on your team, but you can’t always guarantee this in public games. If no one else ponies up the gold for one then you should bite the bullet and buy both for your team.
Good starting items if there’s another support on your team are:
Courier or Observer Wards, a Set of Tangos, a Healing Salve, 2x Iron Branches, and 2x Clarity.
And if you’re forced to solo support:
Courier, Observer Wards, a set of Tangos, a Healing Salve, and an Iron Branch.
Early Game
Ensure that the Courier is upgraded into a Flying Courier when it comes off cooldown at the 3 minute mark. Also ensure that Observer Wards are always purchased when they’re off cooldown.
Grab basic Boots of Speed whenever you can, and upgrade any Iron Branches you have into a Magic Wand.
At this stage of the game a number of situational items may appeal to you. With your woeful mana pool and the high cost of Fissure you’ll soon get through all of your mana and any Clarities you bought at the start, even when using Fissure sparingly. In order to be a useful lane support you will need to have access to an emergency Fissure.
Ideally you’ll want to grab Arcane Boots as quickly as possible, but sometimes you just won’t have a good enough start or you’ll be involved in too many early engagements to save up for them, and so they’ll be a distant luxury. In these circumstances consider buying a Soul Ring. This will somewhat resolve your mana issues, at least during the early game, as you’ll almost always have enough health to exchange for mana. It’s relatively cheap (800 gold) and very easy to build into (3 separate components).
Another item you may wish to consider in the early game is a Bracer, in order to tank up a bit with some cost-efficient stats. Later on you can upgrade it into a Drums of Endurance (both for the stat gain and for the utility it’ll provide your team). This is entirely optional, however.
Core Items
Keep buying those Observer Wards whenever they’re off cooldown!
As mentioned above, your upgraded boots of choice are Arcane Boots. They’re a no-brainer – you desperately need both the mana regen the active provides and the larger mana pool in order to be able to use your skillset effectively.
Throughout the early and mid game you have two key items to shoot for. The first item is the aforementioned Arcane Boots. The second is a Blink Dagger. These two items are absolutely core on Earthshaker – no exceptions!
You need the Blink Dagger in order to transition into your role as an initiator. The only way you’re going to get off both a great Echo Slam and/or your entire combo is with a Blink Dagger for positioning. It allows you to stand back and carefully watch the enemy team’s movements, and then when enough are clumped together (ideally near creeps), you can Blink into a spot of your choosing with Echo Slam, all the while providing harassment if necessary with Fissure thanks to its insanely long range.
Once you have both you’re really ready to roll and Earthshaker turns into a whole new beast; no decent team can lightly ignore the threat an Earthshaker with his ultimate off cooldown and a Blink Dagger in his inventory poses.
Luxury Items
It’s easy to lapse and forget to buy up Observer Wards once you’ve transitioned more into an initiator/teamfighter role, but try not to forget; vision is still all-important for your team, and you now have your core anyway, so you can afford it.
As for proper luxury items, Earthshaker has, in my view, a very rigid build order, so the items listed below are listed generally in order of priority:
The main luxury item you’ll be wanting is an Aghanim’s Scepter. It gives you good all-round stats and some amazing buffs to your ultimate. With Aghanim’s any enemy illusions will count as heroes for the purposes of your ultimate, and it also causes each initial hero hit to ‘echo’ twice, making for a substantial damage buff to an already potent teamfight ultimate.
Next up you should definitely upgrade your Bracer, if you have one, into a Drums of Endurance. It gives good stat gain and a couple of great auras to nearby teammates. Even if you didn’t buy a Bracer early on you should still consider a Drums if no one else on your team has one. If someone else does have Drums then consider skipping them and going straight for a…
…Veil of Discord. With a Veil, Aghanim’s and good timing your ultimate will deal tremendous damage. The active, which lasts for a lengthy 25 seconds, won’t just buff your own magic damage output either, it will also increase the potency of any other magic damage spells your teammates cast on affected enemies in that time frame.
By now you’re probably 5 slotted, with room to replace at most 1 item, and it’s invariably a late-game situation. As you only have room for 1 or at most 2 more items your choices are as follows:
Shiva’s Guard – The more defensive of your options, it will make you more durable thanks to the armour buff, and the aura will also provide utility for your team by slowing the attack speed of enemies. The Arctic Blast active also has great synergy with your own abilities, and can be cast in the middle of your initiation, so as to hit as many enemies as possible, or to make chasing easier.
Refresher Orb – The more offensive option. An all-in on your ultimate, because that’s basically what you’re buying a Refresher Orb for. Either to allow you to cast your ultimate twice (if you get off a great initiation), or to have as a back-up in case a teamfight takes place soon after you’ve already used your ultimate.
Situational Items
Sentry Wards, Dust of Appearance, Gem of True Sight – all-important detection. You’ll need at least one of these in your inventory if the enemy line-up features an invis hero. Sentry Wards will also allow you to deward rune spots, and Gem will give you superior vision going into the mid and late game.
Smoke of Deceit – If you roam with another support in the early stages of the game a Smoke will allow you to do so more quickly and without being spotted by enemy wards. Smoke will also come in handy in the post-laning phase if your team wants to gank as 5.
Bracer and Soul Ring are both situational early item pick ups (see the ‘Early Game’ section above). One item that I would consider situational in the late-game phase is a Heaven’s Halberd, if you need to tank up a bit whilst also performing more of an anti-carry role (if, for example, the enemy carry is cutting through your team quite quickly).
Skill Build
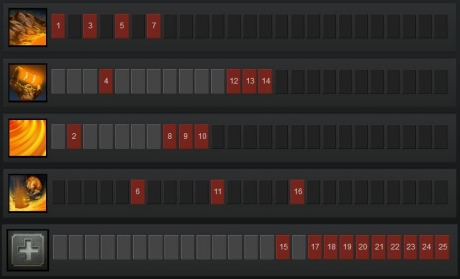 Skill and max Fissure first without fail. It’s the only truly reliable stun you have until you get a Blink Dagger, and has such an incredibly long range that it gives you so much utility, from blocking off enemy escape or initiation routes, to disrupting creep pathing, to blocking off choke points for enemy re-inforcements. It’s the most versatile stun in the game.
Enchant Totem is typically skilled at level 4, and is always maxed last. Totem’s primary usefulness comes in triggering an extra Aftershock, in order to keep enemies locked down and to deal more damage during that lockdown duration. The bonus damage at level 4 is quite significant (400%), but that is the only aspect of the ability that scales, and since Earthshaker is never seriously built as a carry just one point is sufficient.
Aftershock is usually skilled second and is always maxed second, straight after Fissure. Your passive stun, Aftershock triggers a stun of 0.6-1.5 seconds in a 300 AoE everytime you cast one of Earthshaker’s abilities. On top of that it deals scaling damage (a mere 50 at level 1, up to 125 at level 4).
Aftershock in and of itself is relatively under-powered ability, but because it synergises so well with all of Earthshaker’s other skills, it allows you to keep enemies caught in a 300 unit radius locked down for a few extra seconds, all the while dealing additional damage. In a typical Blink initiation by Earthshaker, your goal will have been to catch as many people as possible with Echo Slam. This can then be followed up with Enchant Totem and Fissure to deal additional damage and keep enemies in place.
Finally, Earthshaker’s ultimate, Echo Slam, is skilled at every available opportunity (levels 6, 11 and 16). As mentioned throughout this Build Guide, this is a hugely potent teamfight ultimate. The more enemy units (including creeps) there are within the 570 radius it covers, the more damage it will deal to everyone you manage to catch, as each enemy hit with the initial blow will ‘echo’ damage to other units. This is how Earthshaker is able to turn the tide of certain teamfights (or even essentially win them right from the start), and why enemies will always try to spread out when they know you have a Blink Dagger up and running.
Typically, then, you should aim to either initiate with Echo Slam (if you see enough enemy heroes and creeps packed together to deal significant damage), or counter-initiate with it (often people tend to converge on a similar point at the start of teamfights, almost instinctively, which gives you an opening to get off your combo).
Gameplay Tips
 The huge 1400 range on Fissure means you can block off an entire lane for 8 seconds. This is useful in a number of different situations. It can be used to cut off an enemy retreat, for example (all the better if you manage to clip them with the edge of it), or to prevent enemy heroes coming to one of their teammates’ aid.
| Warning: Ideally you want to catch the enemy hero with your Fissure, in order to stun them and deal some burst magic damage, but the animation delay on the ability and the enemy hero’s movement can mean you will catch them on the wrong side of the Fissure if you are not spot on with your Fissure placement. This can allow an essentially dead enemy to escape to freedom whilst blocking off your teammates and preventing their pursuit of the enemy. If you are not confident in your ability to time Fissure properly then consider laying it down safely ahead of the enemy (so long as they don’t have a Force Staff or in-built mobility skill). You won’t deal the damage or stun them, but you will block off their ideal route for 8 seconds. |
Another fairly common usage of Fissure in the early game is to block off your own creep wave, delaying creep movement and thus pushing the creep equilibrium towards your tower. This is especially useful in the early laning stage if you are offlaning and the enemy team is attempting to keep the creep wave away from your tower and out of your experience range.
Fissure is especially good at blocking off certain choke points, like the narrow side ramps at the edge of the jungles and near the Roshan pit. If fighting around Roshan look out for opportunities to block off choke points in order to split up the enemy team.
The cooldown on Enchant Totem is so low (5 seconds) that you can often cast it more than once during an engagement. One tip is to cast it before you engage the enemy, so that you get the bonus damage from your first hit (the buff will last for 14 seconds), and can then Enchant Totem again right after.
Your goal with Echo Slam is to catch as many enemy units within its area of effect as possible (both enemy heroes and creeps, ideally). If you catch enough of them then the damage dealt is increased tremendously, but as with Enigma’s Black Hole, don’t spend so long waiting for the ideal circumstances to unfold that you risk never actually using it.
Earthshaker’s typical early game (pre-Blink Dagger) combo is: Fissure > Enchant Totem near the enemy (with Aftershock taking effect).
Your typical mid-game combo (with Blink Dagger) is: Enchant Totem > Blink > Echo Slam > Attack > Enchant Totem or Fissure > Attack > Enchant Totem or Fissure > Attack.
| Note: Echo Slam, unlike Earthshaker’s other abilities, has zero cast time (i.e. it will take effect instantly after being cast). This is why you initiate with Echo Slam most of the time once you have your Blink Dagger, as it leaves no room for your combo to be interrupted by anyone caught in the radius covered. |
You will often die straight after you’ve initiated. This is fine; so long as you managed to get most of your combo off and hit enough enemies with it, you have done your job.
Last Updated - Patch 6.83.