 Introduction
"Juggernaaaaaaaaut!"
Yurnero the Juggernaut is a popular and fun-to-play melee agility carry. He is usually played as a safe lane or dual offlane farmer. Atypically for most carry heroes, Juggernaut has high damage output in the early and mid game thanks to his two active damage dealing skills. This, combined with his defensive Healing Ward makes him one of the go-to carries in pushing line-ups.
Juggernaut has the potential to snowball out of control thanks to Blade Fury and Omnislash, which makes isolated heroes easy pick-offs and squishy opposing line-ups will always be reluctant to fight against a Juggernaut without a large creep wave nearby.
You can find Juggernaut's complete character profile here.
Pros & Cons
Pros
- Fun to play
- Adaptable skill and item builds
- Very high damage output early and mid game
- Very good attack animation
- Built-in Spell Immunity (Blade Fury)
- Great lane-kill potential if partnered with a stunner
- Amazing synergy with push-heavy line-ups
Cons
- Doesn't scale as well as most carries
- Can feel irrelevant if he doesn't snowball
- Squishy
- Mana problems
- Generally low stat gain
- No disable/stun or slow
- Ultimate is amazing but its usage is situational and it can be countered
Item Build
 Most Juggernaut build guides on the internet recommend Battle Fury as a core item. This guide will not be recommending Battle Fury and here's why: a Battle Fury build tends to be recommended for hard carry rice heroes (most notably Anti-Mage). Juggernaut doesn't really fit into this category - although yes he is notionally a carry he actually excels in the early and mid game, not so much the late game.
Battle Fury is expensive to build into and, in most cases, will take a long time to get to in public games. It is during this time that you should be fighting and pushing towers (you are an amazing pushing hero), not avoiding fights because you fear losing your unreliable gold so that you can save up for a Battle Fury to rice the jungle with. This, in my view, is a huge waste of Juggernaut's snowball potential.
Instead, this guide is going to use the build commonly seen in competitive Dota, which allows Juggernaut to get the most out of his early and mid game potential. It will give you the survivability you sorely lack to be involved in early skirmishes and the burst damage to (hopefully) allow your team to get towers out of successful teamfights.
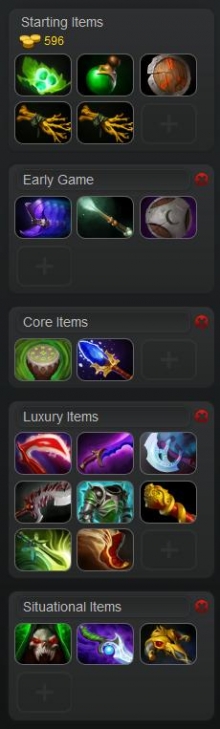
Starting Items
So for starting items, if you're safe lane farming, you need the traditional set of regen and stats: a Healing Salve, a set of Tangos, an Iron Branch and 2x Slippers of Agility.
If you're dual laning the offlane then you'll probably need the block provided by a Stout Shield to stay in the lane and grab last hits, in which case your starting build should look something like this: a Healing Salve, a set of Tangos, Stout Shield, and 2x Iron Branches.
Once you're farming, grab Boots of Speed as soon as possible, to massively increase your killing potential with Blade Fury in the lane. Upgrade any Branches you have into a Magic Wand and the Slippers of Agility/Stout Shield into a Poor Man's Shield to round out your early game core.
Core Items
Upgrade your Boots of Speed into Phase Boots in the laning phase of the game. The active on Phase Boots does work with Blade Fury but only if you activate it after you've triggered Blade Fury, so keep that in mind when chasing down enemy heroes or when Blade Furying away to safety.
| Tip: You can use TP Scrolls whilst Blade Furying (and vice versa). Since you're Spell Immune whilst spinning this is a great way of ensuring you teleport out safely. |
Your two core item pick-ups are Drums of Endurance and Aghanim's Scepter. As mentioned above, this is the build most commonly used in competitive Dota, and for good reason. It gives you some much-need stats/survivability, allows you to fight very early on and help your team out, begin pushing as quickly as possible, and is easy to build into. It is, if you like, a combat build which is built with early skirmishes and teamfights in mind, which happens to also make it perfect for public games.
Juggernaut's damage in the early and mid game primarily comes from Blade Fury and Omnislash. The Aghanim's Scepter buff to Omnislash is considerable - you get 3 extra slashes at each level and the cooldown is reduced to a more tolerable 70 seconds. It doubles the average damage dealt by a level 1 Omnislash (yes, doubles; if you're having a very good early game you'll snowball even harder), and increases the damage of a level 2 Omnislash by a third.
Luxury/Situational Items
With all of the above you have your core and you should be a potent force throughout the early and mid game. You're next set of item choices will continue to build on your strengths as a mid-game oriented damage dealer, pusher and fighter rather than ricer. These are roughly ordered in terms of usefulness/effectiveness on Jugger:
Desolator - Desolator is an amazing pick-up on Juggernaut and should probably be considered your first core luxury item in most situations. It's a relatively cheap damage item (compared to most) which means you should be able to build into it fairly quickly; the minus armour effect works on enemy heroes and buildings, so it augments your power as a pushing carry; and the minus armour attack modifier works in concert with Blade Fury and Omnislash.
To be precise, in the case of Blade Fury, although it may seem you can auto attack whilst spinning you actually aren't dealing attack damage, unless the target (such as a building) is immune to Blade Fury. But any attack modifiers (including Desolator's) are applied to the enemy when using Blade Fury.
Omnislash, meanwhile, is in some ways the opposite of Blade Fury in this respect. It may not seem like it (because the slashes are so quick), but you can actually deal additional attacks whilst Omnislashing, assuming Jugger has enough attack speed. During these attacks not only is your passive Blade Dance proc-able, but any attack modifiers (including Desolator's) will be applied to the enemy hit by Omnislash.
| Note: With an Aghanim's Scepter, Juggernaut will deal an additional 13 auto-attacks over the course of an Omnislash with enough attack speed (400%). At 240% AS he will deal 9 additional attacks, and at 80% AS he will deal 5 additional attacks. |
For all of the above reasons Desolator is an amazing offensive item on Juggernaut and shouldn't be under-estimated.
Diffusal Blade - If you're not going Desolator then consider picking up Diffusal instead (don't get both, unless you really need the Purge late-game!). Again, it has a unique attack modifier that takes effect during both of your damage spells (although it's not as good as the one on Desolator in most situations), as well as decent stats for Jugger.
But the main reason to consider Diffusal is the active Purge ability. Not only can you use it to remove debuffs on yourself/allies but you can also remove enemy buffs, most notably Ghost Scepter's active, Ghost Form. Ghost Form is one of the best counters to Juggernaut - it prevents you taking physical damage, which includes all damage from his Omnislash.
Diffusal allows you to counter Ghost Scepter and you can use it during Omnislash - if an enemy you're attempting to slash down uses Ghost Scepter then Purge him instantly. Before the most recent patch an activated Ghost Scepter would prematurely end your Omnislash. This is no longer the case, and so not only did Omnislash receive a substantial buff in the 6.79 patch but so too did Diffusal for Juggernaut.
Manta Style - A good all-round item for Juggernaut. It won't massively increase your damage output, although your illusions will gain the benefit of your passive Blade Dance ability. The stats are all great for Juggernaut - increased mobility, agility, attack speed, and movement speed. Above all it makes you an even more potent pusher - pop your Illusions when pushing down towers, when in teamfights, or when silenced in order to remove the effect.
Assault Cuirass - Although by no means an item you want to rush, AC is an amazing 5th/6th item on Jugger. It benefits your entire team with its potent attack speed and armour aura, and negatively affects the enemy team with its negative armour aura - your auto-attacks and your Omnislashes will hit that much harder. Since that negative effect also affects enemy buildings AC makes you an even more potent pusher. Oh, and it stacks with Desolator, which is virtually core on Jugger.
Abyssal Blade - Added survivability, damage, and lockdown which goes through Spell Immunity. A good item to round out your inventory late game.
Monkey King Bar/Butterfly - The two high damage end-game items for Juggernaut. Only go Butterfly if the enemy team doesn't have (and likely won't get) a Monkey King Bar. You're probably going to need one of these if you want to remain relevant in the truly late game.
Black King Bar - Always a good situational pick-up, it will give you a small amount of damage and health but most importantly it gives you active Spell Immunity, so you'll be able to right-click in teamfights without being stun-locked. Although Blade Fury gives you Spell Immunity it does fall off late-game and your attacks during it do not actually deal physical damage, so it's not a viable alternative to BKB later on.
Boots of Travel - If the game is going really late then you should probably turn your Phase Boots into Boots of Travel at some point; you'll need all of the slot in your inventory and can't afford to waste one on a tp scroll, but you likely will need some form of teleportation in order to prevent backdooring.
Vladmir's Offering - Vlad's is an ok mid-game pick up. I'd classify it as highly situational - it's very affordable and will help out your entire team during pushes and teamfights (doubly so if there's another melee core on your side), but there are better items for Jugger. Consider getting one if you're struggling farm-wise.
Skill Build
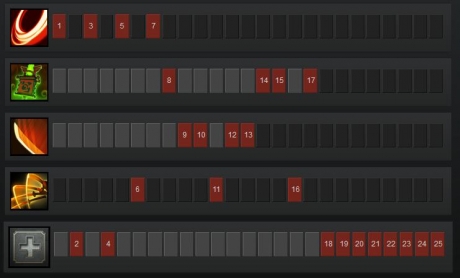 The above image displays what I would consider to be the ideal skill build, but often things don't work out that way so you need to be open minded about how you skill. You may, for example, find yourself running out of regen quite quickly if you're in a competitive lane and facing heavy harassment, in which case it is perfectly acceptable to forego one of those points in stats and instead put it into Healing Ward.
Blade Fury is skilled and maxed first, to maximise its damage potential. As it's such a strong ability early on, especially when combined with an allied stun, it can make for easy kills if there's an enemy squishy opposing you in the lane.
Two points in stats is typically gotten instead of your other abilities because it allows you to perform you Blade Fury into Omnislash (or vice versa) as soon as you hit level 6. Without those two points in stats you will not have enough mana to cast both.
Healing Ward is skilled at least once by level 8. Don't be tempted by the lure of Blade Dance, Healing Ward is so much more useful to both yourself and your team in the early and mid game. You can force sustained tower pushes with it, keeping your entire team and allied wave nicely healed. It's actually extremely useful in teamfights too if the enemy team don't kill it (though they usually will), and it allows you to stay in lane if you find you're under heavy harassment early on.
After you have a point in Healing Ward you can switch to maxing Blade Dance second to increase your damage potential. Finally max Healing Ward and then Stats.
Gameplay Tips
 A Blade Fury & Omnislash combo will net you a kill in most situations. Early on you should be looking out for opportunities to perform it whenever Omnislash is off cooldown. As you have fairly good move speed most heroes will struggle to outrun you whilst Blade Furying (remember to use the active on Phase Boots only after commencing a Blade Fury).
Blade Fury makes you spell immune but it does not make you immune to physical damage, so don't under-estimate your susceptibility to physical attacks whilst Blade Furying.
Once you hit level 11 (and thus have two points in Omnislash), most heroes will die to your ultimate if they are alone - it deals a massive 1050-1500 damage.
| Tip: The initial Omnislash hit has a mini-stun, so can be used to prevent enemies who are channeling skills or a TP Scroll. |
Because the damage of Blade Fury is so high when maxed (700 magic damage), a common strategy is to Blade Fury an enemy that is nearby a creep wave. This either forces them to tank the damage from Blade Fury and hope that enough creeps survive to tank your Omnislash, or forces them to run out of range of the creep wave, which allows you to use Omnislash on them once Blade Fury ends.
It goes without saying that you should avoid, whenever possible, using Omnislash when there is a full creep wave or a lot of neutral creeps nearby.
| Note: As discussed in the item section above, Ghost Scepter is a great counter to Omnislash. A lesser known pseudo-counter is Force Staff. Force Staff will end your Omnislash if the target is pushed out of a 425 radius before the next slash. |
Last Updated - Patch 6.83.