 Introduction
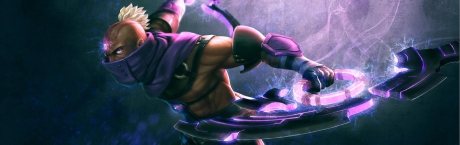
“They who live by the wand shall die by my blade.”
Anti-Mage is a highly mobile hard carry. His low cooldown Blink gives him excellent chasing potential and provides him with a crucial escape mechanism, whilst his passive Mana Break makes him a particularly obnoxious carry for magic-damage dealers, supports, and carries that rely on a healthy mana pool.
Anti-Mage's complete character profile can be found here.
Pros & Cons
Pros
- Highly mobile
- Great escape mechanism
- Great chaser
- Amazing flash farmer when he gets Battle Fury
- Cripples heroes who rely on mana
- Great late-game hard carry
Cons
- Needs a lot of farm…
- …A heck of a lot of farm
- Squishy and vulnerable in the early stages
- In public matchmaking can often leave teams at a 4v5 disadvantage in the early going
- Vulnerable to stuns and silences
Item Build
 Starting Items
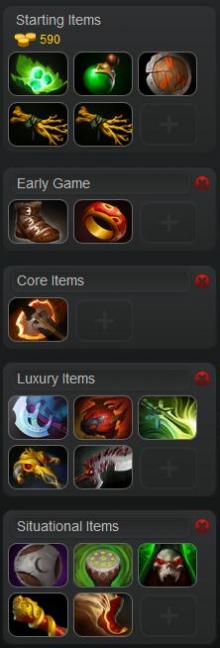
There are a couple of different starting builds for Anti-Mage. In public matchmaking you’re likely to face a certain degree of pressure on the lane (in contrast to most professional safe lanes) and so a build that errs on the safe side, like the one in the image on the right, is advisable:
- A set of Tangos, a Healing Salve, a Stout Shield, and 2x Iron Branches.
This gives you plenty of starting regen, which should see you through until you get that early Ring of Health, a Stout Shield to block harass, and Iron Branches to give you some starting stats.
Alternatively, if you’re confident that either you’ll be facing up against an easy offlane opponent or that your team can keep you well protected in the lane, you can swap the Stout Shield out for a Quelling Blade, and get an extra Iron Branch. This is a greedier starting build but will make last hitting easier.
Early Game
Upgrade any Iron Branches you purchased at the start into a Magic Wand. It’s also acceptable to upgrade your Stout Shield into a Poor Man’s Shield in the early going.
Grab basic Boots of Speed as quickly as possible, and start working towards your Power Treads. Grab a Ring of Health from the side shop if you run out of regen at any point; you’ll need it for your Battle Fury anyway.
All of the above can be bought from the side shop (except for the Magic Wand recipe, which you’ll need to get the Courier to deliver, so there’s no reason to leave the lane except to dodge an expected gank, in which case you may be able to clear the easy camp if you feel it’s safe).
Core Items
Your core is Battle Fury. You need to get Battle Fury up and running as quickly as possible. Be warned though: Battle Fury does not make you battle ready! This is a common mistake made in public games, whereby an AM will farm his Battle Fury and then feel he is able to fight. For the most part you are not ready to fight. You purchase Battle Fury so that you can quickly flash farm the jungle, Blinking from camp to camp and clearing them with ease thanks to the item’s Cleave passive.
Think of Battle Fury as AM’s Hand of Midas, albeit one which also gives you more useful stats and damage.
Once you have your Battle Fury you can push your lane out, then dive into the jungle whilst the lane is pushed and clear the creep camps, before returning to the lane when it gets pushed back in again. Your GPM should rapidly increase at this stage, so you can start working towards you first luxury item.
Luxury Items
Although this section is described as luxury, the first 2-3 items on this list should be considered core; you almost always want to build them straight after you have your Battle Fury, and typically in this particular order as well:
Manta Style – Good stats for an agility carry, increased mobility and attack speed, and most importantly 2 illusions every 50 seconds. This is useful not just for quickly pushing out lanes and taking down enemy buildings, but also for dodging certain silences and projectile attacks/stuns, making you much harder to lock down. Once you have your Manta you don’t need to fear being Orchid’d and silenced; you can simple pop your illusions to dispel the silence.
Your illusions also acquire your Mana Break ability, meaning they pack a much harder punch and drain enemy mana (think of it as a built-in Diffusal Blade passive effect).
Heart of Tarrasque – Although Manta will go a long way to preventing the enemy team locking you down, you are still a very squishy glass cannon; your damage output from right clicks is quite potent, but if you get focussed you’re likely going to die very quickly. And so Heart is your next item of choice.
The Vitality Booster can be bought whenever you want (before the Manta Style if you’re feeling too squishy), to give you a nice health boost. Once you have your Power Treads, Battle Fury and Manta you can work on completing the Heart, which will make you much tankier, and you should feel confident enough to engage in teamfights.
If you fall low, Blink out and regen but don’t fully retreat unless your team lost the engagement badly; the Heart will regen your health pool quite rapidly, so you may find an opening to re-enter the fight and pick off worn down enemy heroes.
Butterfly – Now you’re really a force to be reckoned with. You’ve transformed from a liability into a true hard carry and very few heroes will be able to stand against you 1-on-1 and the enemy team will be forced to either focus you down or ignore you at their peril in teamfights.
Butterfly is the ultimate late-game item for an agility carry like AM and should be purchased next. It gives you 35% evasion, 30% attack speed, +30 agility, and +30 damage. You become a heck of a lot tankier and do significantly more DPS.
Now you have your full complement of ‘true’ core items: Power Treads, Battle Fury, Manta Style, Heart, and Butterfly (and a TP Scroll or Aegis in the 6th slot ideally). At this stage you might want to consider switching out the Power Treads for Boots of Travel, to free up that 6th slot.
For your 6th slot there are generally two key items to consider, one is a Black King Bar, and the other is a Skull Basher, working into an Abyssal Blade. Once you’ve purchased one of these you can sell your Battle Fury and purchase the other, if you want. BKB gives you all-important Spell Immunity, which allows you to go to town in teamfights without being stun-locked or burst down, and Abyssal Blade gives you a nice infusion of damage and lockdown, to prevent enemies kiting you. Most of the time you’ll probably be needing the BKB first.
Your late-late game inventory should look something like this: Boots of Travel, Manta Style, Heart, Butterfly, BKB, Abyssal.
Situational Items
Poor Man’s Shield, Drums of Endurance and Vladmir’s Offering are all situational early game items that you may need to consider if things are going badly and you need an early and quick infusion of stats and damage.
Monkey King Bar is an alternative luxury item to consider; it’s especially good if you’re facing an enemy carry who is building into a Butterfly or Heaven’s Halberd, or if you’re facing Phantom Assassin.
Boots of Travel are great for the late game, when you need to free up a slot which would otherwise be taken up by a TP Scroll. With this, you combine your Boots and TP Scroll slot into one, allowing you to put a slot to better use.
Skill Build
 The above image displays a typical Anti-Mage skill build, but there’s room to tweak it quite substantially if you’re so inclined, or if the situation on the ground makes it necessary.
In general you want to prioritise Blink and Mana Break. Additional levels in Blink increase the distance you can travel and decreases the cooldown, which can be crucial for escaping ganks. Always skill Blink first, in case you need to escape from a level 1 gank.
Maxing Mana Break early on will allow you to deal decent damage even without items. If you’re against an offlaner who is very mana dependent (such as Dark Seer), it can be well worth maxing first and aggressively blinking onto them past the creep wave. They will not be able to trade blows with you because of the additional damage from Mana Break, and their mana pool will quickly drain.
Spell Shield is always maxed last, but it can be worth investing a point in it earlier than shown in the image above if your lane opponent(s) are heavily magic damage-based. The 26% magic resistance at level one is quite a significant chunk of damage reduction.
Always skill Mana Void (so levels 6, 11 and 16), and use on targets that have used a significant portion of their mana pool. Much like Mana Break (which it synergises superbly with) this makes you a complete pain in the backside for any enemy casters who tend to use a lot of their mana up in a single engagement. Remember that the damage dealt is AoE based (500 units), and so will deal damage to the enemy’s allies if they’re nearby, and it mini-stuns.
Stats are usually maxed last, but sometimes (especially in professional Dota), 2-4 early points are invested in stats instead of Mana Break or Blink, to help with last hitting and give you some early stat gain.
Gameplay Tips
 A well timed Blink will allow you to dodge projectiles. This means you can use it to dodge slow-moving projectile stuns like Sven’s Storm Hammer or Vengeful Spirit’s Magic Missile. It can also be used to dodge Sniper’s high-damage nuke ultimate, Assassinate (time your Blink so that you cast it after the shot has been fired, but before it reaches you).
Although it’s tempting to Blink aggressively into engagements so that you can reach attack range quickly, try to avoid the temptation to do so unless you’re confident your team is going to win the fight; you risk leaving yourself without the means to escape should the fight turn against you or should you end up being focussed down.
Mana Void has a mini-stun which goes through Spell Immunity. This means you can use it not only to cancel channelled abilities or to interrupt defensive TP Scrolls, but you can also use it to cancel ultimates which are commonly used in conjunction with BKB in the mid-to-late game, such as Enigma’s Black Hole or Witch Doctor’s Death Ward.
Mana Void will deal the full damage to any surrounding enemies in a 500 unit AoE. Thus if several enemies are packed closely together target the unit you suspect/know to have little mana left but a large max mana pool in order to deal a huge amount of damage to all of them.
Last Updated - Patch 6.82.