| Collectibles: |
|
Hall of Heroes Gift Shop
As soon as you enter the gift shop, you will find a Minuteman’s Armory vending machine on the right with no new weapon upgrades and a Veni! Vidi! Vigor! vending machine to the left with a new upgrade:
| New Veni! Vidi! Vigor! Upgrade: |
|
Before entering the open doorway to the next room check out the KINETOSCOPE ‘The Lamb is the Future of the City’ (Kinetoscope 1/3) and KINETOSCOPE ‘Behold the Miracle Child! A Prophecy is Fulfilled!’ (Kinetoscope 2/3) sitting either side of the door frame. When ready, enter the next room.
As you enter, note the tears that we can get Elizabeth to open in this room.
| Tears in this location: |
|
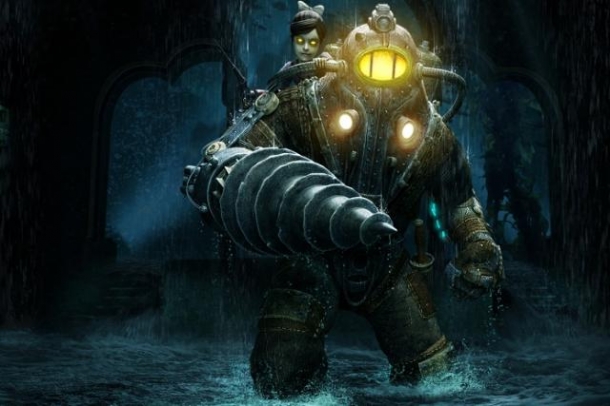
After a short bit of rhetoric over the loud speaker, a new enemy will breakt hrough the glass at the back of the room and attack you – the Motorized Patriot.
| New Enemy: Motorized Patriot |
| The motorized patriots are one of the more difficult enemies you will encounter in the game and are large, durable robotic automatons with a large reserve of armour making them very resistant to damage, it also means they will never seek cover and continue to proceed towards you even in the face of gunfire. They are slow moving and are equipped with the Peppermill Crank Gun – a minigun that can dish out enormous amounts of damage due to its very high rate of fire. They can also perform a devastating melee attack if you get in too close to them. The motorized patriot’s major weak point is the gears located in the centre of its back. To reach it, your best bet is to plant a trap to stun it or to attempt to outmanoeuvre the patriot. Note that vigors that cause increased damage for your weapons such as Murder of Crows and Devil’s Kiss will make life a little easier against these guys. Once you obtain it, the Shock Jockey vigor is also quite effective at chain stunning the patriots. The Patriots are automatons and as such have a colored indicator to let you know what their status is at a glance. The green light indicates that the Patriot has not seen you and will not attack. A yellow light indicates that itt has spotted you and is warning you to stop (if you duck out of sight at this point, they will return to green). Finally, red status means that they have seen you and are attacking. |
The motorised patriot will emerge from the glass case at the back of the room and make its way over to you. Before it gets too far, get Elizabeth to bring in the auto-turret on the right. Plant a trap or two to snare the patriot with some damage over time (Devil’s kiss) or weapon damage bonus (Murder of Crows). Now try to kite the patriot over to the left so that the turret can attack its weak spot whilst the patriot chases you. If things get a little hectic, get Elizabeth to bring in the health or salts as required.
Once the patriot is dead, check out the KINETOSCOPE ‘A City Mourns…’ (Kinetoscope 3/3) which is attached to the circular desk in the centre of the room. Head over to the back left corner of the room and open the locked door here. Inside you’ll find a safe we can open for a tidy sum of money (requires 5 lock picks).
Return to the gift shop and backtrack to the courtyard again.
The Courtyard
You’ll notice things are a little different this time around. Slate and his men are here now and will attack you in a series of waves. You need to simply wipe them out to progress. Slate himself sits on the raised balcony that we came in from the first time we came through the courtyard. He has the ability to throw electrified crystals that will damage you if you get too close to them and will use them to limit your range of movement around the ground floor.
Additionally there are a number of tears that Elizabeth is able to open to assist during the sequence.
| Tears in this location: |
|
I recommend using the freight hooks to access the upper balconies to the left and right and using the high ground to your advantage. Between waves, take the opportunity to hop down to ground level and refill that health if you need to do so before returning up to higher ground.
After each wave is summoned, Slate will run out of the room, only returning once you have killed them all. The first wave consists of 6 veterans who will appear both in the courtyard at ground level and on the upper ledge on which Slate is standing. The second wave of enemies will come from the door on the left hand side of the ground floor and consist of 6 veterans and a fireman.The third wave will enter from the left hand door on the upper balcony and consists of a motorized patriot and 3-4 veterans.
Once the third wave has been defeated, Slate will open the right hand door on the ground level for you. Drop down to the ground level and rather than proceeding to the right, go through the door on the left (the door the second wave came from). On the left side of the room is a work bench with a VOXOPHONE ‘A Soldier’s Death’ (Voxophone 1/1) on it. In the tool box behind this, you can also locate an INFUSION UPGRADE (Infusion 1/1) – note that you may need to jump up on the table in order to find an angle from which to pick it up. On the way out, hug the left wall and you can also grab a lock pick from behind some crates.
Return to the courtyard and head through the door on the right side of the room. Climb the stairs and continue along the path to the left. As you proceed ,more of those electrified crystals will be throw in in your way and a group of 4 veterans will come down the stairs in the distance. Climb the stairs they attacked from and turn left. Enter the door at the end.
As you exit, walk over and interact with the body in the spotlight for a scene. Make a decision during the scene (as far as I can tell the decision does not matter story wise, but whether or not Slate appears later in the game depends on the choice). After the scene, grab the Shock Jockey vigor from the ground next to him.
| New Vigor: Shock Jockey |
| The Shock Jockey vigor is one of the more useful vigors that you will find in game. Hitting the vigor button will fire off a wave of electricity that will shock any enemies within a short distance in front of you and stun them for a short period of time. Holding down the vigor button will allow you to fire off a trap that takes the form of a series of crystals. Electricity will form networks between crystals, creating a large field of damaging electricity. Again, these electricity traps have a chance to stun enemy combatants. From here on in, you will occasionally come across pools or puddles of water in the environment. Shooting off shock jockey into these pools will damage or kill any enemies that get too close or stand in said pool. When you acquire them, shock Jockey can be used in conjunction with the Possession, Murder of Crows and Undertow vigors to perform powerful combination attacks. |
Now that we have Shock Jockey, we can head back for the gondola. Backtrack through the Hall of Heroes until we are back outside. On the way you will encounter a pair of veterans in the Our Lady’s memorial exhibit and a Crow at the rotunda. Once you reach the entrance, you will see that the door has now closed. Use the salt machine to its left if you need salts and then shoot the power conduit to the right with Shock Jockey to open the door.
Exit back to the plaza to complete the chapter.