Once you land, talk to the man dead ahead for a map. To the right will be a Treasure Orb containing 500 Gil. There’s only one path here right now so head E and then N. Go back W and you’ll come to an area with search lights. Stay in the lights to avoid battles. Many of the monsters here are quite tough so I highly recommend staying safe. There are a few Treasure Orbs scattered around here but you don’t need to get them just now, you’ll have a chance to do so more safely later. Exit through the N side of these next two big areas. Up by Chocolina is a Treasure Cube on the right side. Open it up for a fragment that will allow you to Time Reverse Bresha Ruins. From here, make your way S E, E and then N.
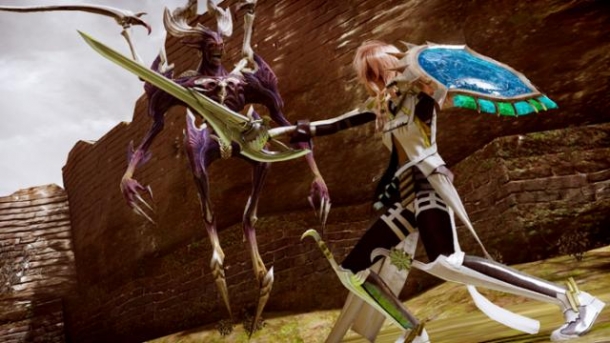
Make your way N to the blocked off area at the end. A woman there will tell you that only authorized personnel can enter the ruins. As she says this, another riftbeast will appear, Aloeidai.
Aloeidai
| 52990 HP | |||
|---|---|---|---|
| Element | Vulnerability | Status Immunity | Misc |
| Fire | Normal | Deprotect | Chain Resist: 80 |
| Ice | Normal | Poison | Stagger: 150% |
| Electric | Normal | Pain/Fog | None |
| Wind | Normal | Stop/Curse | None |
| Physical | Normal | Imperil | Untamable |
| Magic | Normal | Deshell | No Role |
Aloeidai is rather similar to Gogmagog except tougher in almost every way. He has more health, will do wounding damage, uses the shield ability frequently and Swipe can really hurt now. He does also have a new ability called Landshatter which does significant damage to your entire party. Otherwise, this fight operates the same way as Gogmagog. Play a little more conservatively now but you still want to stagger him. It may take a couple of staggers to take him down at this point but he doesn’t grow any tougher as the fight goes on so it’s just a matter of time before he goes down.
At the end of the fight, Aloeidai will try to suck you into a vortex. Hope will come to your rescue. After a short talk, you’ll receive the Aloeidai Fragment. Follow Hope for a walk. There’s an Orb just under the stairs you follow him up. When you get to the plaza there will be a Treasure Orb in the SE corner. Follow Hope the rest of the way to the command center. He’ll show you the Oracle Drive.
Hope will give you the Hollow Artefact. You can head over to the ornate statue head. Head all the way back down and then take the ramp at the W side of the ruins. After a few turns, you’ll come across a Treasure Orb containing 3 Remedies. Continue to follow this walkway. At the top, you can see a phased Treasure Cube in front of the chin of the statue. Do a Moogle Hunt to reveal it but you’ll have to wait until you’ve learned the Moogle Throw to get the cube. If you have it, collect the cube, otherwise, you will learn it in the second half of this episode. This cube contains the Pathos Jewel Fragment.
Make your way to the S from the ruins. You should see an area with a crimson floating orb that was previously blocked off. Hop down and follow this path to another Gate. Open it with the Hollow Artefact.