| C | Item |
| Pistol Scope | |
| Rosenkov Shoulder Guards | |
| M-12 Locust | |
| Shotgun Blade | |
| M-99 Saber |
Depending on what you are, I would take two of the opposite. If you play a Biotic, take two Overloads. If you play an Engineer, take two biotics (if you can). If you play a soldier type, bring one of each. In the first section, you'll have to fight two Phantoms and a Nemesis. Take this battle slowly and only pop out to attack the Phantoms. When you do though, make sure you hit them hard because you want them out of the fight quickly. Once they are both dead, take your time with the Nemesis. It's a little bit of a tough angle so if you have a Sniper on your team, make sure they are using it.
Go through the door and check the Med Station just to your right. Go into the around surrounded by the glass railings and check all the logs and computers inside. Once done, go downstairs and check near the two crashed shuttles for a couple more logs. Once done with those, go through the door that leads under the upper level. Inside, you will fight three Cerberus Troopers. They shouldn't be too difficult. Kill them and then go up to the desk in the middle. Next to a dead body will be a Pistol Scope. Go through the door on the left. Active the Console and check the Safe.
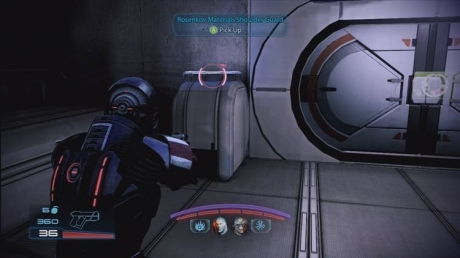
Once you get outside, there will be another Console that turns off the security. Drop down the ladder and head for the door at the back. Make your way through the tunnels and just to the left of the second door will be the Rosenkov Materials Shoulder Guard. When you get to the Command Center, activate the Console in the middle of the desk. Move to the next room and check for the PDA along the row of computers. In the back right corner of the room, there is a Console. Go down the stairs in this room and through the door.
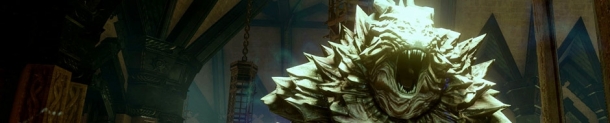
You'll be attacked by Husks. A Singularity on the steps in that room will likely stop them cold and then you can just kill them at your own pace. At the bottom of the stairs will be to Logs and a crate of ammo. When you go through the doorway into the next room, you'll be attacked by a group of Marauders, a Ravager and a Banshee. I recommend that you try and kill one Marauder quickly. Aim for the first one you see, strip his shields and then lift him. Kill him quickly and then draw the Banshee back into the previous room. Make sure your squad focuses on the Banshee and use all your Overloads and quick firing weapons to take down the barriers. After that, change to heavier weapons and start using Warp. Back further into the room and up the stairs if you need to. Once she is dead, a Ravager will likely be close to the room. Wait for it to round the corner and just unload since you already have the appropriate weapons out. Kill that and then move into the room to clean up the Marauders. Move into that room.
Move along this long room and turn left at the end. In the room with the window looking in on a Banshee, there are two more logs to listen to. Go through the door here. On the bottom floor of this next room are a Console with a message from Miranda, a PDA, and Data to salvage. At the top of the stairs will be two doors leading left. Both lead into the same room.
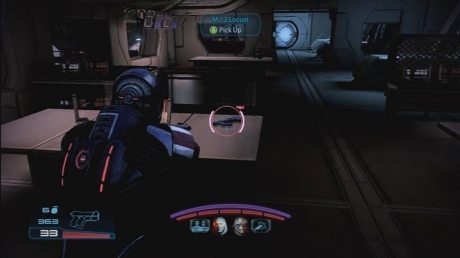
You'll get into a fire fight when you approach those doors. Set a squad member at each door and then set up at one of them to start clearing it out. Each side of the room has a Barrier Engine or two. Make sure you take those out and then watch for Marauders. Otherwise it should just be more Cannibals and at this range, you should have no problem clearing them out. Inside the room, on the left side will be a couple more logs. On the right side you will come across the M-12 Locust and a Shotgun Blade Attachment. At the back left of the room will be a PDA and another Console message from Miranda. Go up the ladder that drops down.
At the top, go up a ramp and you'll come to a pretty nasty room. It's filled with Cannibals, Ravagers and a Marauder or two. There are Barrier Engines in the back. It's hard to hit them though but if you can manage it, do so. The real problem will eventually be the Ravagers because they will march right down the hall with the Barrier Engines protecting them and then you'll have to fight three of them at once with a whole bunch of Swarmers at your feet. If it gets too hairy, head back down the ramp. Eventually they will be too far away from the Barrier Engines and then you can just kill them.
Clear the room and move through it to the next room. There will be a Med Station just to your right as you walk in and Research Data to salvage just to your left. Check the next panel for another log and then the last one by the closed off room. On your right will be a path to an open door. Jump the gap to the lift and then blow the door off the box at the front. Activate the lift from here. When it stops, jump across to the platform and go through the door.
In this room, you'll have to fight a few Brutes and a Banshee. The Brutes will come first and should be spaced out enough that you should be able to focus on one at a time. At this point, you should know the drill but be quick about it. Eventually a Banshee will appear to accompany the last Brute. Take out the Brute quickly before the Banshee arrives and then start working on her and back tracking since you have the space.
Once they are dead, go to the end of the room and check the Pod Integrity terminal. Go through the door on the right. You'll get a Charm/Intimidate Opportunity during the next conversation if your reputation is high enough.