Rally Point Alpha
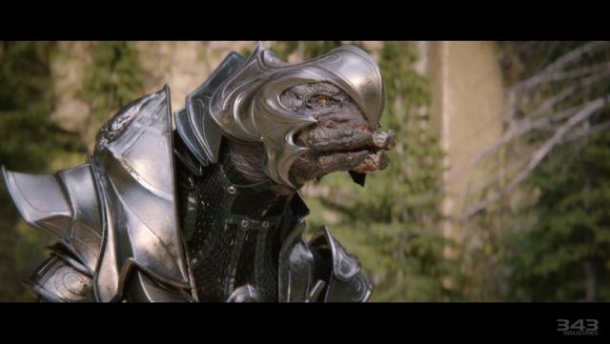
On the other side of the portal, walk straight ahead to find another control station. Put Cortana in and she will open a portal to your left. Get into the portal and you'll be dropped off in a craggy, almost volcanic area. Follow the valley until it opens to a larger area. You'll be attacked by your first Prometheans. These are called Crawlers and come in a few different types. All Crawlers are fast, can climb on almost any surface and use their mouth to shoot. This variant will get up close to hit you with rapid shots or melee damage. While they are fast and dangerous in large numbers, they are also very vulnerable. Their head is very fragile and a single shot from a precision weapon will kill them. As a bonus, their heads are lit by either a blue or orange light, making for a nice bull's-eye.
This type of Crawler will carry one of two weapons. When fighting them, there won't appear to be much of a difference but in function they can be very different. The first weapon is called a Suppressor and acts similarly to an Assault Rifle. The second is the Boltshot which normally functions like a Magnum without a scope. It does have an alternate fire if you hold the button down. When you do so, the weapon will charge up and release five shots at once. This shot is very similar to a Shotgun blast, being best at close range. It also boosts the damage significantly as well doing as much as 10 shots worth of damage with half of the ammo usage.
Walk a little further along and you'll be ambushed by one of the Knights. He'll run away and you'll chase after him. As you round the corner and finally find a Knight that will stick around and fight, you'll be attacked by Crawlers off to the left as well.
This basic Knight will have either a Suppressor or Lightrifle (a cross between DMR and Battle Rifle) and be accompanied by a Watcher. Back up around the corner first and lure the Crawlers around the corner so you can deal with them without the Knight. When they are gone, go around the corner to confront the Knight. If he has a friend hovering around him, go for that first. After a couple of shots, it will try to escape but come back later so try to be quick about killing it. This Watcher can give the Knight a Hardlight Shield and catch/throw back grenades that you use against them.
The Knight is pretty capable at long range and carries a shield which makes him a tough kill from far away. Up close, he has a devastating melee attack and the tougher Knights can kill you in a single hit. When fighting Knights, you want to stay at a medium range where you can use a rapid fire weapon or Plasma Pistol to drop shields while still comfortably avoiding their melee attacks. If you have neither, the Boltshot is an excellent weapon. It takes a couple of shots but you can dance around cover to provide time to charge each shot.
Beyond the Knight to the left will be an entranceway.
Rally Point Bravo
Inside this hallway along the left will be a Promethean weapon locker. Check that out and head down the hall. Go through the next set of doors to enter another similar outdoors area. The first thing you will notice is another Knight. Go forward and take cover by the rock in front of you. Deal with him however you wish but be careful because he is going to be pretty close and might ambush you.
Just beyond him will be a group of Crawlers followed closely by another Knight. Like before, back up a little and try to lure the Crawlers away for a simpler right. The Knight might be a little more persistent this time so be prepared for him to come towards you. You should also watch out if you start retreating to the right side because you may bump into another Knight. Doing so at the wrong time could find you dead.
Go to the left a little and watch for the Crawlers that might come down the left wall. You'll find a small cave that will lead you to other side of the cliff wall. This will provide you with a slightly better angle and much better cover. When you come out, you'll see a round platform ahead with a couple of Crawlers and a Knight jumping around behind it. Work through this round platform to the other side and then take cover on this arm of the platform. Peek out through the right side and you'll see Crawlers on the walls. Kill them but be sure to watch behind you as Crawlers and eventually a Knight may come up behind you this way.
Be careful here as one of the Knights will be a Lancer who will be tougher and carry better weapons. This one in particular will likely carry a Scattershot which isn't entirely different from a Shotgun. Clear out the Prometheans down below and head there yourself. On this level, you'll see a large doorway above you to the right. Underneath this platform will be your second Terminal. Grab this and head left so you can climb up to that platform. From here, you can get inside the tower.
This first hallway will be kind of long but if you check the offshoots, you 'll be able to find ammo. Grab whatever you can because there's a decent amount of fighting here.
Tower Base
Exit the hallway and you'll be on a raised platform looking over a base. Down below and to the left will be a bunch of Crawlers and towards the center of the base will be a Knight or two. Unfortunately, the incoming fire will be kind of dense so it won't always be easy to kill the enemies. Try picking off the Crawlers first since they only take one shot and if you thin them a little, taking out the Knight will be a lot easier.
With this first group of enemies down, Cortana will mark a power core. Head over to the power core and take it out (a single charged Boltshot will do it). As soon as you destroy this, more enemies will appear in the base though most of them will appear towards the center of the base rather than behind you. At first, you'll have to deal with a couple of Crawlers but once you've dealt with them, you'll walk out a little ways and probably bump into a Knight.
If you happen to notice a Watcher, try to take that out first before dealing with the Knight. Take him out and find the next power core. At this point, the enemies will get a little denser. You'll start to encounter some tougher Crawlers called Alpha Crawlers. They will be more aggressive with their melee attacks but still pack a lot of fire power and can take a lot more damage if you don't get a head shot. Take out the Crawlers that you see as quickly as possible so you can deal with the Knight.
With the Crawlers out of the way, take out the Knight and his Watcher before destroying the final core. When you've done this, get out of there because there will be two Knights this time. Thankfully, there are fewer Crawlers but that doesn't mean there are none. Keep your eyes open for fast moving targets while you deal with the Knights.
Fighting the two Knights might require you to be a little more aggressive than you like but when you've learned how to weave between cover, you'll become much more comfortable fighting Knights. I would highly recommend using a Suppressor at this point since you likely don't have Plasma Pistol. The Boltshot is useful for a single Knight but with the two of them, you'll appreciate having the extra breathing room. Not only will you be able to avoid their attacks better but it will mean that you can likely remain in cover while fighting one at a time.
Enter the structure where Cortana has marked but be careful because there's another Knight hiding inside of the building, waiting for you. Be careful of the Knight because he'll be another of the Lancer class Knights. The ramps will lead back outside and around this ring is where you will likely run into the Knight and where you can find a couple of weapon's lockers. With him out of the way and your ammo restocked, go up the ramp and enter the tower. At the top, deal with the beam controls. A new portal will appear in front you. Take this back to the beginning and hop into the new portal leading to the right.
Rally Point Charlie
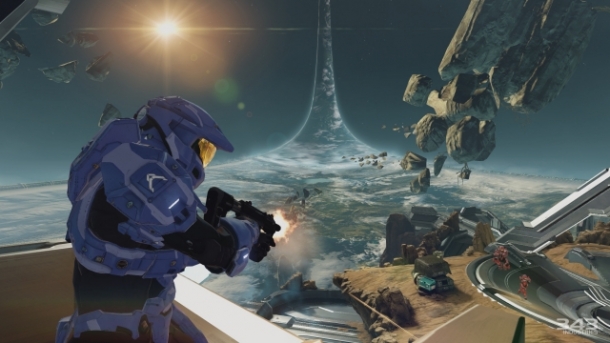
After coming out of the portal, you'll find a weapons locker to you right with a variety of weapons. When you get outside, you'll find a crazy battle with Prometheans fighting off invading Covenant. If you stick to the right, you can get some elevation and watch the fight. From here you can also pick your targets and try to keep the two opposing forces even until they knock each other out and you can clean up whatever is left.
Alternatively, you can skip the fight entirely and climb across from here. You'll see a large almost spiral column of rock. If you place your jumps correctly, you can climb to the top of the column and spring jump twice to get across the battle below. This method can be a little dangerous however because the spot where you land will place you between a set of Promethean forces waiting for you and a ramp leading back down to the fight that hasn't finished yet.
Whichever way you get to this point, you'll watch a Knight kill an Elite. There are three parts to this fight that you need to watch out for. The most obvious is the Knight but he has a Watcher with him and far in the distance will be a large Turret. If you stay to the rocks on the left side, you should be able to find a point where you can see the Turret in the distance and attack it a little at a time. Between blasts, hit it a few times. After doing this a couple of times, the Turret should go down leaving you with something far more familiar. Lean out a little ways and hit the Watcher a couple of times. When it starts to run, feel free to leave cover to finish it since the Turret won't harass you anymore. Just watch out for the Knight because he may be close. Now finish up the Knight and you are set. If you need ammo, the Elite that was killed should have dropped a Carbine nearby.
Go past the Knight and you'll watch two Ghosts go by and be destroyed by another Knight. Kill the lone Knight and grab one of the Ghosts. Go slow in the area below because there are a lot of tough enemies here. There will be several Elites and Knights as well as a few Grunts with grenades. You'll soon see the source of the Covenant forces is a small cover at the back of this area. Enter that cave and take a right.
You'll come to an entrance guarded by a token Covenant force. Enter the long hallway and check on the right side as you go for ammo. Grab the Banshee from the same spot and head to the end of the hallway. When you get outside, watch just to your left to see an Elite running for a Banshee. Take him out and steal his Banshee.
Use the Banshee to take out the other two Banshees in the air. If your Banshee takes a particular beating, there's another Banshee on a natural plateau on the far left side of the base that you can switch to. When you are ready, change weapons to the Fuel Rod Cannon with the Y button. Fly around the area and find the bunkers in the corners of the base that house the power cores. Try to find the doorways on the sides of the bunkers and try to destroy the core with a couple of good shots. If you need to, you can even jump out of your Banshee to destroy a core. When you've destroyed all of the cores, take your Banshee over the door and turn so you're flying along the bridge away from the door. Jump out of the Banshee, turn around and then run in the front door.
Inside, get on the elevator and at the top of the tower, deactivate the beam. Another portal will open and this will lead to another portal.
Rally Point Delta
On the other side of the second portal, you'll see a rather large orange sphere. Approach the sphere and when you see the doorway on your right, take it. At the top of the ramp will be some Covenant forces with Prometheans holding them off. It is possible to jump along the structures on the left side to get to the door at the end but the best way through is to attack the Covenant from behind right now. There will be a few Jackals and Grunts but there will be almost as many Elites as well. Be sure to watch the slightly raised wall on the right side because Elites will try to use Carbines from here to take you out.
Go through the door at the far side and in the next room will be weapons crates. Load up on ammo and take the elevator up. You'll come to another area loaded with Covenant forces that will curve slightly left. Stick to the right side and you will have access to ramps that lead you upwards. You'll meet up with a lot of resistance, particularly from Elites along this path but you'll avoid wasting ammo on the minor enemies below. Keep climbing up the ramps here and it will eventually lead to the top where Covenant forces are trying to fight their way through some Knights to access the same control panel that you are.
Off to the right side will be more ammo if you need it. Work your way through the two groups a little at a time. Try to keep them even so you have less to deal with. Make sure you watch for the large Turret in the middle and behind that will appear another Knight. Alternatively, you could simply run past the Knights once they are sufficiently occupied by the Elites and activate the panel.
Escape
You'll find yourself outside and not far from where you are will be a set of Ghosts. Grab one and start riding. Most of this ride just involves you boosting constantly and not crashing into anything.
Up ahead, you'll come to a section where a large sheet of rock shoots past in front of you and then you'll have to jump over the gap and it may help you land a little if you let off of the boost just before landing. In general, this is best practice for a few different jumps where the nost of the Ghost will hit the ground and flip you. This is generally the toughest part of the trip and the rest really only involves trying not to crash. Even if you do keep driving and many times you can still make it.