Rally Point Alpha
When you have control of the Chief, turn left and find your way down the hill through the jungle. Cortana will mark a waypoint for you. At the waypoint, you'll find a couple of Knights standing over a couple of Bodies. Open fire on them and that will get them moving. After a few moments, the Knight swill disappear and you won't hear any more from them. Drop to the dead marines below. Scattered around them will be dropped weapons and caches of grenades. Grab what you need and continue past them.
You'll make your way through more of the jungle until you come to a sort of canyon in the trees that's filled with Crawlers. If you haven't managed to track down a precision weapon yet, use controlled bursts from an Assault Rifle at these ranges. Try and find a precision weapon as soon as possible. Move up a little ways and you'll encounter the rest of the Crawlers. Be careful because there's a Knight not far beyond them.
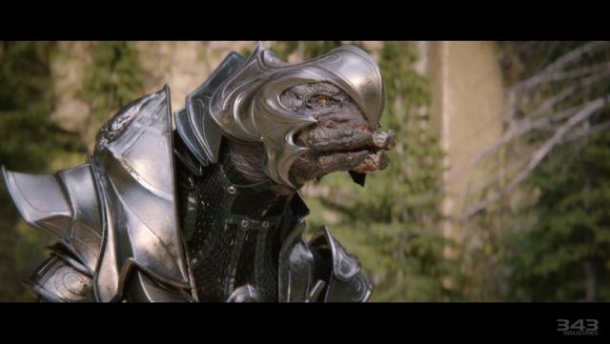
This Knight is just a regular Knight but he will spawn a Watcher so be careful. Hang back and use the trees as cover. Slowly walk around the outside to attack and then push back around the tree when you need cover. When you've succeeded in defeating the night, go up ahead and through some trees. You'll pass a couple of marine bodies (there will be a Shotgun on the floor) and then you'll see a Watcher flying around.
The Watcher will stop somewhere in front of you and activate what looks like a search light on the ground. Make sure to kill it quickly because if you don't, he's going to revive an ally. This is one of the abilities that a Watcher has and they will start using this in combat now so make sure to take out Watchers first so they don't revive enemies that you've already killed. After killing the Watcher, a couple of Crawlers will appear including an Alpha. The few that appear should be no problem for you now.
When everything is dead, Cortana will point out something that has been dropped by the Prometheans. Pick it up to get Promethean Vision. It will use blues to detail your surroundings, red outlines for enemies that are obscured and filled red figures for enemies that are not obstructed. Pick it up and turn it on to see the enemies in the path ahead of you.
Below you will be a large group of Crawlers and a couple of Knights. Be careful because one of the Knights will be a Lancer and could possibly have long range weapons. Poke your head over the lip of the ridge and shoot down into the group a little. When you have, back up and switch to a precision weapon. The Knights won't be able to follow you up but the Crawlers will start jumping up from the lower area. Their jumps are rather predictable so just use whatever precision weapon you have to pick them off as they make their huge leaps.
With the Crawlers out of the way, pick up a Suppressor if you need ammo and start taking out the Knights. Try to take them out from here if you can but feel free to hop down if you feel comfortable with your abilities and their positioning. Check over the Knights bodies and you may find a Binary Rifle which is the Promethean version of a Sniper Rifle. It only has two shots per clip and carries far fewer shots. It also shoots a little slower than the UNSC Sniper Rifle. It is almost twice as powerful per shot though. Two shots on most Knights will kill them no matter where you hit them.
Turn right and continue forward. Remember to use your Promethean vision to figure out what you've got coming up ahead of you. Keep walking until Cortana tells you about the IFF up ahead. Pick it up and then continue in the same direction but watch out for Crawlers in the area below you. They shouldn't be too much of an issue but there is a much larger force not far behind them. There will be a few Alpha Crawlers, at least one Knight with a Watcher. The Knight will have the Auto-Turret ability and you may see one hovering in the air but not moving.
As you approach this area, be careful because there's a lot of depth to it and you will likely not be able to see all the way. Use the Promethean Vision to counteract this. This will allow you to see all the way through the fog to fight. With this much depth, if you have a weapon with decent range, you should be able to clear the area pretty well. Make your way to the end of this long tree canyon and you'll find another IFF tag but no bodies.
Rally Point Bravo
After a quick chat with some friends, you'll be asked to clear an LZ for some friendly casualties. Before moving, immediately turn around to find a Terminal. Almost as soon as you walk out of the door on the other side, you're going to come along some enemies. Thankfully, you'll have some Marine help and not far ahead is a defensive position with some pretty good supplies. Grab them and start taking out the various enemies here. There are a couple of Crawlers, a Knight and Watcher. While your Marine companions won't be the most dangerous allies on their own, they will do a great job of drawing attention, allowing you to flank and get close to the Knights to maximize your damage.
Go through this group and as the trees start to close in, you'll encounter a similar type of group. Kill them and the narrow pass will open to a large area. You'll be on a hill leading down and in the distance will be a hill leading up. Between the two will be a small pond with a bunch of cover nearby. Your Marines should be pretty safe from this position so take out the enemies across the pond. They will consist primarily of Crawlers.
When you cross the pond, you'll encounter a huge group of enemies at the top of the hill and your allies will move up. It will be tough keeping them alive and it's going to require you to be pretty aggressive. The left side is probably the best bet as it will allow you to flank the enemy while your Marines draw fire from the front. There will be a couple of Knights and Watchers towards the top. Watch out for the Auto-Turrets and the large beam Turret attached to the structure.
Take out the large Turret first which should give you more ability to move around. Try to locate the Watchers and take them out and then clean up the Crawlers so you have a simple fight with the Knights that are left. If you can get up near the door ahead, there's all sorts of weapons and ammo at the top. When you've cleared the enemies, plug Cortana in and then get ready to fight off some Prometheans. Not far from where you are will be a Turret and there will be another off to the right.
Hop on the Turret and get ready to start shooting. You'll have a lot of enemies coming up the main slope directly ahead of you but there will be quite a few coming up the ridge on the left side as well. Thankfully, these should only consist of Crawlers but if you don't pay attention, several of them can bunch up there unnoticed until they all attacked on your flank and take you down quickly. Kill as many as you can before you have to move. When you start taking too much damage, detach the Turret and start moving around with it. Your ammo will be limited this way but the ability to move will keep you from taking as much damage (you can move back over the lip of the hill for cover). You can also fire as much as you like without overheating. Just remember that the resource your up against is ammo now so make sure the shots count. You'll likely run out of ammo but there's another Turret to the right and lots of ammo. I had a full Assault Rifle which was sufficient for the right of the battle.
After a little while, Cortana will manage to open the door so grab her and run through. On the other side, you'll be in a tunnel and you'll see a Knight giving orders to some Covenant forces below. Attack him and take out the Grunts with him. When you're done, take the branch leading to the right. This will open up along a ridge where there will be a Jackal and will continue to a path leading down to Grunts. Killing these enemies will provide you with both precision weapons and Plasma Pistols which will be very useful. There is also a Rail Gun around here which will help later. You can fight from here but there's a lot of angles you can be attacked from. Restock on ammo as you need to and then you can head back to the left to go along the path by where the Knight was instructing the Grunts.
There will be a lot of enemies in this area. Try to pick off as many Grunts, Jackals and Watchers as you can to limit the number of enemies. When you've thinned the crowd out, you can start to approach. Depending on the range you think you'll be at, it may be more to your advantage to take the Rail Gun. At closer range it can be very useful against the Knights. Either way, head back along the right path and when you follow the tunnel down to the bottom level, you should see stalagmites coming up out of the ground that you can use for cover. Finish off the remaining enemies to clear the LZ. This can be a tough section and one of your main concerns will be running out of ammo so don't be disheartened if it takes a couple of tries. When the Pelican arrives, board it.
Rally Point Charlie
When you put down again, you'll be with Spartan IVs instead of Marines which is fantastic. They aren't entirely invulnerable but they seem to fight more intelligently and have the shields/toughness to match. If they take damage, they will recover just the same as you will. As long as you can give them enough time to recharge their shields, they'll never die.
Your first touchdown is going to be a little complicated with Covenant forces on the ground in front of you. With your team, this shouldn't be an issue. There will be some Elites in the mix so don't get careless but wait for your Spartans to attack and attack with them to make short work of the enemies. After you've cleared this landing area, they'll drop off a Scorpion for you. You can have them jump on board with you or you can take off immediately and let them follow along. Having them follow will be safer for them but you'll have to go much more slowly since they won't be able to keep up with your Scorpion. This could cause you to lose the Warthog that's coming with you.
Roll out and you'll start encountering a variety of ground forces. Be extra careful as areas start to open up as you'll come across Wraiths and Sniper towers that can do a lot of damage to your Scorpion. Usually, before entering such an area, you'll have to ride over the lip of a hill and come down which should provide some measure of cover if you take things slowly.
After crossing the first area like this, you'll have a quick reprieve before entering a rather difficult area that splits. You'll find some Wraiths along a right path and you should take the left. This will cut them off because of the large structure in the middle and allow you to slowly roll forward with that structure as cover. Poke your nose out and start destroying the Wraiths and then continue into the next area.
Kill the few Grunts and you'll enter a large open area filled with ruins and flames. There will be more tough weapons emplacements and Wraiths so keep your distance and keep moving. This will cause the shots from the Wraiths to miss more often than not. With this area clear, roll forward and down into the rocks to find an elevator leading up into the Infinity.
Inside, you'll be in a vehicle bay. DON'T dismount but instead use the Scorpion to clear out the bay. There will be some pretty standard Covenant ground units like Grunts, Jackals, and Elites who should pose no match for your superior fire power.
The Captain will contact you and when he does, it will be safe to get out of the Scorpion. Nearby will be a partially opened door that you can slip through and you'll enter another bay. There will be a raised platform with a button. Pushing the button will bring the Mantis up for you.
A Mantis handles a little differently than other vehicles. It actually handles much more like a Spartan than a vehicle. You'll notice that there are two weapons at the top and you will be able to fire both of them simultaneously. The weapon on your right is a high powered Turret that handles like any other mounted Turret. It will overheat from over use so be careful. The left side will be a rocket pod that reloads when it is empty so once you use it, don't be shy about emptying it. The rest of the HUD should look the same but don't be fooled. While most vehicles display YOUR shields at the top of the screen, the Mantis actually has its own shields. Most vehicles can take physical damage separate from your own damage and can even be destroyed out from under you. The Mantis on the other hand cannot be damaged until the shields have been brought down. The shields are pretty tough but it is very important to note that they take far longer to recharge than your own shields so be careful. Finally, the Mantis has a couple of other human like abilities which are the ability for a melee attack (it will stomp the right leg) and it can even crouch, allowing you to duck behind cover if you need to.
With all of this in mind, start walking down the hallway. As you do, you'll come across any number of enemies. Primarily, you will be fighting Promethean Knights but other enemies will appear as well, particularly Watchers and Turrets. They should be no match for the Mantis but make sure to take it slow. Whenever you get rid of a group of enemies and have some breathing room, wait for your shields to recharge before continuing. Watch out for bridges that pass over your head because there will be enemies (primarily Grunts) on them. You can destroy the bridges with your rockets, making them a non-issue.
After working through this hallway, you'll turn left into a large room with a ramp. There are a lot of enemies in here so back up a little bit. Peek around the corner and take out a couple of enemies. When your shields get low, back up again. Keep doing this until only a few enemies still appear. At the top of the room, turn left and you'll come to a long hallway with multiple ramps along the sides. If you climb up these ramps, they can provide you with slight height advantage and you can also walk over the railings if you need to get back down to the lower level. Work your way to the large door at the back.
When you go through this door, you'll find a small group of enemies occupying an elevator. Clear them with a couple rocket shots and board the elevator. This will take you up to the top of the ship and just ahead will be a door leading out to the hull.
There will be three jammers on the hull of the ship and the Didact will be in the distance scanning the ship. Be careful when attacking the jammers because there are quite a few Elites and Grunts here with Fuel Rod Cannons. The cannons will do massive damage so clear them out as you make your way from jammer to jammer. The large cannons around the area make for great cover if you need it.
When you destroy the jammers, drop ships will start appearing to drop off more enemies. These groups will be similar to those you've already dealt with. While these won't be much more difficult on their own, you have to be wary of the drop ships themselves which come with several Turrets themselves. You likely won't be able to take out the drop ship fast enough for it to be tactically viable. They'll almost always drop their troops and be turning around to leave before you finish. For this reason, it's much more practical to either take cover from these Turrets or to take out just the Turrets. There is one under the nose that hangs down away from the hull and there will be a Turret manned by a Grunt on each side of the ship. You'll see a door that will open to reveal the hold where the troops are sitting but in the middle of this door will be a little slit that the gunner can shoot through. This is where you want to aim.
Fight off a few waves of ships and soldiers before you'll have to activate the main gun. A terminal will be marked on the hull. Jump out to activate it and complete the mission.