You'll be attacked by a large Dawnguard group but as long as you make smart use of your environment, you should be just fine. Kill the Dawnguard and their trolls. Make your way out of the glade.
Once you are outside, fast travel to the Dragon's Bridge and then start making your way to the Darkfall Cave.
Darkfall Cave
Once inside, just follow the cavern, killing any spiders you may come along until you come to a wooden bridge. Cross it and then cross back. The Bridge will fall out from under you and drop you in the drink. Ride this until you come to a much lower level with a trickling stream. Follow the stream until you can't any longer and you'll find a slope that leads up.
When you reach the fire, head east but watch out for the rock trap. Just continue to follow this cave as far east as it will let you go until you come to a larger cavern with a much larger stream of slow traveling water. In the distance, you will find an elf. Talk to him.
Gelebar will explain that he requires something from you before he gets you the bow of Auriel. He will raise up the central structure and explain that you must go through a rather long ritual. Get the ewer from him and then head through the portal inside the building. This will deposit you in a different part of the cave, Darkfall Passage.
Darkfall Passage
Darkfall Passage can be kind of dark so if you have it, feel free to make use of the Lord's Vampire Sight. Make your way along this long cave and watch out for the Chaurus Hunter that erupts from the pod on the left side of the hallway. These fly and are faster but they are otherwise just weaker versions of the chaurus you already know of. Continue through these tunnels killing the chaurus and falmer that you come across until you find yourself in a falmer village.
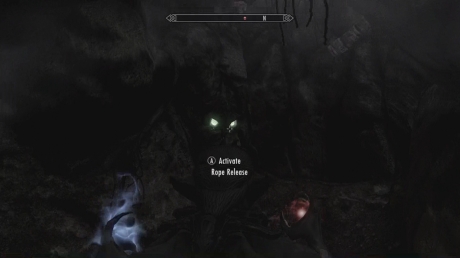
Cut your way through the village going to the west. You'll find some huts and a waterfall. Go through the waterfall and fall into the crevice in the ground. This will take you to a different set of caves. Follow these until it brings you to what looks like a dead end. If you look by the green lights just to the left, you will find a rope that you can pull which will open the wall.
You will go through another room and come to another Falmer village. This time, you'll want to travel westward for the most part. You're going to run into tougher Falmer like the Warmonger at this point. Thankfully, they'll come at you a little slower at this point too but still be careful because you never know when a couple of their friends will surprise you.
Go into the cave to the west and you'll enter a room with a large glowing stone. Go past the stone and follow this path until you get to a small room with a single Falmer hut and a Chaurus pen. Kill the Falmer and Chaurus, then head up to the hut.
Take either ramp through the waterfall and turn left to find a small cavern. Follow that but be careful of the strings hanging down. They'll trigger a rock trap if you hit them. Move along this cavern until you come to another dead end. Back up a little ways and you should see two ropes on the wall to the left. Pull one and then pull the other to get through the door.
On the other side of the door will be a Vale Sabre Cat. Kill it and then hug the wall to the right as it wraps down towards the large glowing stone below you. Walk past that large stone and under the large mushrooms to the lake below. Cross the land bridges to get to the other side.
You'll find another Vale Sabre Cat on this side of the lake. Kill it and then follow this path further. It will wrap around and another small bridge will take you across the lake but much higher up. You'll come to another buried Wayshrine and the Prelate Sidanyis. Talk to him, answer yes and then enter the wayshrine. Inside, dunk the ewer into the basin. Now enter the portal to the Forgotten Vale.
The Forgotten Vale
The Forgotten Vale is a rather cold looking place. Make your way to the markers on your compass. Each of them represents another wayshrine that you must get to. You may bump into trolls or the occasional Falmer out here but for the most part, the Vale is pretty safe. Make your way from wayshrine to wayshrine, activating each one. You should be able to reach three easily even if not necessarily quickly. They all seem to require that you get there by a roundabout way.
After you've gotten the easy three, make your way towards the last one in the west. This is going to be a long trek involving going over a waterfall, along a large river while fighting Falmer. And that's just the first leg! As you continue heading along this river, you'll start approaching this waypoint from the north (it should appear more to your south). Kill the Chaurus along the way and watch out for the Falmer above you.
When you reach the end of the river, you'll come to a couple of huts and a couple of Falmer. Kill them both and then head into the cave just next to their huts.
Glacial Crevice
When you get to the main room of the Glacial Crevice, you'll find some Falmer. There will be on directly ahead of you along the path to the left. You should be able to sneak up on him and kill him. Once that's down, move forward. This left path will eventually connect to a small Falmer village by an odd "U" shaped bridge. Kill the Falmer here and cross the bridge.
Climb up these slopes, first north and then south. At the top, you will be able to enter a cave. Follow it and at the end, open that gate that leads to the large canyon. Make your way along the canyon and kill any Falmer here as you head NW. You'll pass an oddly colored Falmer hut (purple) and then turn right. Enter the ice cave going north and then it will turn east. You'll come to another large canyon. Continue east until you come out back at the first main room of the Glacial Crevice except far higher this time.
Follow the ledge on the right side as it heads S and then cross the large bridge that goes to the east. Follow this ledge now and go into the cave between the two large pillars. This will put you in a large cave that will lead you back outside.
Forgotten Vale Again
You'll be outside again and get dropped right into a Falmer village. Make your way along this canyon as you head SSE. The canyon itself is rather linear though the various bridges through the village can be quite confusing. As long as you continue to go through the canyon and keep heading up ramps when you get the chance, you'll make your way through. The tough part is watching out for the Falmer shooting down at you from above.
Eventually, the canyon will reach a dead end but if you go up the ramps, one of them will lead you through a cove into another section of the canyon. Make your way through this section of village and then head back down to the bottom floor. Continue into a bluish cave. You won't meet any resistance inside but do watch out for tripwire traps. Keep climbing through this cave until you come to the final wayshrine in the middle of a Falmer village.
Fill the ewer this final time. Turn around, walk out of the wayshrine and just head straight until you cross a very large bridge. Make your way up to the front doors of the large building ahead. The doors will not open but if you look behind you, you should see a receptacle for pouring your water. This will eventually cause the door to unlock. When it does, go inside.
Inner Sanctum
Inside, you'll find yourself in a rather large room with a bunch of frozen Falmer and Chaurus. Go through the doors to the north but watch out for all the frozen enemies. Some of them will shatter the ice around them and attack you. Thankfully, this shouldn't happen in large groups. Continue northward.
You'll go through some rather large doors into another room which slowly turns into an ice cavern. Follow this cavern and it will lead you to Auriel's Chapel.
Auriel's Chapel
Go forward and drop down to the lower level. Turn left and make your way east. You'll come to a clear wall of ice with your target on the far side. He will wake the various Falmer and Chaurus on our side of the ice. They will keep coming at you but they are far weaker than normal it seems. Be careful not to hit Serana if you can because she can become aggressive towards you and make it difficult to finish this quest. Once you've cleared most of the enemies here, he will summon a Frost Atronach. Kill that and the giant ice wall should break.
Once it's broken, he will make a run for it. Follow after him, past the throne he was sitting on. This will take you to a beautiful balcony. Kill him but try not to knock him off the edge if you want his gear. Once he's dead, his brother will show up and the last wayshrine will open. After talking with Geleber, Auriel's Bow will appear inside. Grab the bow and then talk to Geleber to get Sunhollow arrows. The first batch is free but every arrow after that needs to be crafted and requires elven arrows. You can convert some extras if you want to be on the safe side but leave some elven arrows to spare if you can.
After talking to him, talk to Serana. She will agree that it's time to confront Harkon.